Practical Korea travel information, checked against Korean sources.

Tag: seoul stations

  • The Seoul Subway Transfer Your App Does Not Warn You About

    This guide is written in two parts. English first, Korean below. 이 글은 두 파트로 되어 있습니다. 영문이 먼저, 한국어가 아래에 있습니다.


    PART 1 — ENGLISH

    Your app says the trip takes 38 minutes with one transfer. Another route takes 41 minutes with none.

    You take the 38. Then you spend six minutes walking through a tunnel with a suitcase, and arrive later than the other route would have got you there.

    Seoul transfer distances range from about 200 metres to 414 metres, and no mainstream routing app shows you which one you are about to walk. The minute estimate absorbs the walk into a single number, so a long transfer and a short one look identical on screen.

    Here is which ones are long, and when it changes your decision.

    1. The numbers

    Measured transfer corridors at the stations visitors actually use (Hyundai Rotem):

    Station Transfer Distance On foot
    Hongik Univ. Line 2 ↔ Gyeongui-Jungang 414 m ~5 min 45 s
    Seoul Station Line 1 ↔ Airport Railroad 365 m ~5 min
    Hongik Univ. Line 2 ↔ Airport Railroad 355 m ~5 min
    Express Bus Terminal Line 7 ↔ Line 9 314 m ~4 min 20 s
    Jongno 3-ga Line 1 ↔ Line 5 312 m ~4 min 20 s
    Nowon Line 4 ↔ Line 7 278 m ~3 min 52 s
    Jamsil about 200 m for comparison

    Hongik Univ. Station has the longest transfer in the network — and it is the station most visitors arrive at from Incheon Airport, on the day they are carrying the most.

    Those times assume you walk briskly and unencumbered. With a large suitcase, in a crowd, add to them.

    2. Why the app cannot tell you

    Routing apps optimise for total minutes. A transfer is priced into that number as walking time, so a 414-metre transfer and a 200-metre one both just make the total slightly larger.

    What the number cannot express:

    • Whether the walk includes stairs or only escalators
    • Whether you will be dragging luggage the whole way
    • Whether it is a single corridor or several level changes
    • How it feels at rush hour, when the corridor is as crowded as the train

    None of that is in “38 min”. Two routes with identical estimates can be very different experiences.

    3. When it actually changes your decision

    Most of the time, do not think about it. A few minutes of walking is not worth planning around when you are unencumbered.

    It matters in four situations:

    Carrying a large suitcase. This is the big one. A 400-metre corridor with a checked-size case is meaningfully harder than the same distance empty-handed, and if there are stairs it is worse. Prefer the route with fewer changes even if the estimate is a little longer. More in taking luggage on Seoul transport.

    Tight connection to a flight or KTX. The estimate assumes you make the walk at normal pace. If you are cutting it fine, a long transfer eats the buffer you thought you had.

    Mobility limits, or travelling with small children. The distance is the same but the cost is not, and lift routes are often longer than the walking route.

    Late at night. Trains run less often, so missing one because the transfer took longer than you expected costs more than a few minutes.

    4. What to do instead

    There is no app that ranks routes by transfer comfort, so the practical substitutes are these.

    Count transfers, not just minutes. A direct route at 41 minutes usually beats a one-change route at 38 when you are loaded. This single habit handles most cases.

    Recognise the long ones. If your route passes through Hongik Univ., Seoul Station, Express Bus Terminal or Jongno 3-ga and involves a change there, assume five minutes of walking rather than two.

    At Hongik Univ. specifically, check whether you need to transfer at all. The Airport Railroad and Gyeongui-Jungang platforms have their own street exits — numbers 3 to 7. If your destination is on that side you can leave from there and skip the corridor entirely. That station is covered in detail in our guide to its layout.

    Use Naver Map for the exit number. It gives exit numbers where Google Maps cannot give walking directions at all, and coming out of the right exit saves more time than any transfer choice.

    5. One thing that works in your favour

    Long transfers do not cost you money. Under Seoul’s integrated fare system, a transfer within the allowed window is a continuation of the same journey, not a new fare — and the window is generous enough that even a 414-metre walk does not threaten it.

    The rules, including the night-time extension most guides miss, are in the transfer discount guide.

    6. Before you go

    • Seoul transfer corridors run from about 200 m to 414 m
    • Hongik Univ. Line 2 ↔ Gyeongui-Jungang is 414 m — the longest in the network
    • Its Line 2 ↔ Airport Railroad transfer is 355 m, and that is the one arrivals meet
    • Seoul Station Line 1 ↔ Airport Railroad is 365 m
    • Apps fold the walk into the total, so long and short transfers look the same
    • Count transfers, not just minutes — especially with luggage
    • Assume five minutes of walking at the stations above, not two
    • At Hongik Univ., check whether you need to transfer at all — exits 3–7 are on the other side
    • A long transfer does not cost extra fare

    PART 2 — 한국어

    앱이 38분에 환승 1회라고 합니다. 다른 경로는 41분에 환승이 없습니다.

    38분을 고릅니다. 그리고 캐리어를 끌고 통로를 6분 걷고, 결국 다른 경로보다 늦게 도착합니다.

    서울 지하철 환승 거리는 약 200m에서 414m까지 벌어지는데, 주요 길찾기 앱 어디도 지금 걸을 통로가 어느 쪽인지 알려주지 않습니다. 소요시간 숫자가 도보 구간을 하나의 값에 녹여버려서, 긴 환승과 짧은 환승이 화면에서 똑같아 보입니다.

    어디가 긴지, 그리고 언제 판단이 달라져야 하는지 정리했습니다.

    1. 숫자

    방문자가 실제로 쓰는 역들의 실측 환승 거리입니다(현대로템).

    환승 거리 도보
    홍대입구 2호선 ↔ 경의중앙선 414 m 약 5분 45초
    서울역 1호선 ↔ 공항철도 365 m 약 5분
    홍대입구 2호선 ↔ 공항철도 355 m 약 5분
    고속터미널 7호선 ↔ 9호선 314 m 약 4분 22초
    종로3가 1호선 ↔ 5호선 312 m 약 4분 20초
    노원 4호선 ↔ 7호선 278 m 약 3분 52초
    잠실 약 200 m 비교용

    홍대입구역이 서울에서 가장 긴 환승을 갖고 있습니다. 그리고 인천공항에서 오는 방문자 대부분이 도착하는 역이며, 하필 짐이 가장 많은 날입니다.

    위 시간은 빠르게, 짐 없이 걸었을 때입니다. 큰 캐리어를 끌고 인파 속을 지나면 더 걸립니다.

    2. 앱이 알려줄 수 없는 이유

    길찾기 앱은 총 소요시간을 기준으로 최적화합니다. 환승은 도보 시간으로 그 숫자에 반영되므로, 414m 환승과 200m 환승 모두 그냥 총합을 조금 늘릴 뿐입니다.

    숫자가 담지 못하는 것들이 있습니다.

    • 그 구간에 계단이 있는지 에스컬레이터뿐인지
    • 그 길을 짐을 끌고 가야 하는지
    • 통로 하나인지 층을 여러 번 오르내리는지
    • 혼잡 시간대에 통로가 열차만큼 붐비는지

    “38분”에는 이 중 아무것도 없습니다. 같은 예상 시간의 두 경로가 전혀 다른 경험일 수 있습니다.

    3. 실제로 판단이 갈리는 상황

    평소에는 신경 쓸 필요 없습니다. 짐이 없다면 몇 분 걷는 건 계획에 넣을 값어치가 없습니다.

    문제가 되는 건 네 경우입니다.

    큰 캐리어가 있을 때. 이게 가장 큽니다. 위탁수하물 크기 캐리어로 400m 통로를 지나는 건 빈손으로 같은 거리를 걷는 것과 확실히 다르고, 계단이 끼면 더합니다. 예상 시간이 조금 길더라도 환승이 적은 경로를 고르세요. 캐리어 들고 대중교통 타기에 자세히 있습니다.

    비행기나 KTX 시간이 빠듯할 때. 예상 시간은 평소 속도로 걷는 걸 전제합니다. 아슬아슬하게 잡았다면 긴 환승이 여유분을 먹어버립니다.

    거동이 불편하거나 어린아이와 함께일 때. 거리는 같아도 부담은 다르고, 엘리베이터 경로는 대개 도보 경로보다 깁니다.

    늦은 밤. 열차 간격이 벌어지므로, 환승이 예상보다 오래 걸려 한 대를 놓치면 몇 분 이상의 대가를 치릅니다.

    4. 대신 할 수 있는 것

    환승 편의로 경로를 정렬해주는 앱은 없으므로, 현실적인 대안은 이렇습니다.

    소요시간보다 환승 횟수를 세세요. 짐이 있으면 41분 무환승이 38분 1환승보다 대개 낫습니다. 이 습관 하나로 대부분의 경우가 정리됩니다.

    긴 곳을 기억해 두세요. 경로가 홍대입구·서울역·고속터미널·종로3가를 지나면서 거기서 갈아탄다면, 도보를 2분이 아니라 5분으로 잡으세요.

    홍대입구역에서는 환승이 필요한지부터 확인하세요. 공항철도와 경의중앙선 승강장에는 자체 출구 3~7번이 있습니다. 목적지가 그쪽이면 거기로 나가서 통로를 아예 건너뛸 수 있습니다. 역 구조 안내에 자세히 정리했습니다.

    출구 번호는 네이버지도로 확인하세요. 구글 지도가 도보 안내를 아예 못 하는 자리에서 네이버지도는 출구 번호를 줍니다. 맞는 출구로 나오는 것이 어떤 환승 선택보다 시간을 아껴줍니다.

    5. 한 가지는 유리하게 작동합니다

    긴 환승이 돈을 더 내게 하지는 않습니다. 수도권 통합요금제에서 정해진 시간 안의 환승은 새 요금이 아니라 같은 여정의 연장이고, 그 시간은 414m를 걸어도 위태롭지 않을 만큼 넉넉합니다.

    심야 연장을 비롯한 규칙은 환승 할인 안내에 정리했습니다.

    6. 타기 전에

    • 서울의 환승 통로는 약 200m에서 414m까지 벌어집니다
    • 홍대입구 2호선 ↔ 경의중앙선이 414m로 가장 깁니다
    • 같은 역 2호선 ↔ 공항철도는 355m이고, 공항에서 오면 이쪽을 만납니다
    • 서울역 1호선 ↔ 공항철도는 365m입니다
    • 앱은 도보를 총합에 녹이므로 긴 환승과 짧은 환승이 똑같아 보입니다
    • 소요시간보다 환승 횟수를 보세요. 짐이 있을 때 특히
    • 위 역들에서는 도보를 2분이 아니라 5분으로 잡으세요
    • 홍대입구역에서는 환승이 필요한지부터 확인하세요. 3~7번 출구는 반대쪽입니다
    • 긴 환승이라고 요금이 더 붙지는 않습니다

    함께 읽으면 좋은 글

    참고자료 / Sources

    환승 거리와 소요시간은 위 자료의 실측값입니다. 실제 소요시간은 보행 속도·혼잡도·짐에 따라 달라집니다.
  • Hongik Univ. Station Is Three Stations in One: The 355m Transfer Nobody Warns You About

    This guide is written in two parts. English first, Korean below. 이 글은 두 파트로 되어 있습니다. 영문이 먼저, 한국어가 아래에 있습니다.


    PART 1 — ENGLISH

    You land at Incheon, take the Airport Railroad, and get off at Hongik Univ. Station because your hotel is in Hongdae. The map says you are there.

    Then you need Line 2, and you walk. And keep walking.

    The transfer between the Airport Railroad and Line 2 here is 355 metres. Between the Gyeongui-Jungang Line and Line 2 it is 414 metres — the longest transfer in the Seoul network. Nobody tells you this, and it lands on the exact day you are dragging the most luggage you will carry on the whole trip.

    Here is how the station is actually laid out, and how to avoid the walk entirely.

    1. Why it is so far

    Hongik Univ. Station is not one station. It is three, sharing a name.

    Line Code Where it sits
    Seoul Metro Line 2 239 Yanghwa-ro / Seogyo-ro junction, toward Hongik University
    Airport Railroad (AREX) A03 Donggyo-dong Samgeori, toward Yeonnam-dong
    Gyeongui-Jungang Line K314 Same building as AREX

    Line 2 was built where the university is. The Airport Railroad and Gyeongui-Jungang line were built decades later, near a different intersection several hundred metres away. They were then connected underground and given one name.

    That connection is the 355m you walk.

    For comparison, the long transfers people complain about in Seoul are shorter than this one:

    Station Transfer Distance On foot
    Hongik Univ. Line 2 ↔ Gyeongui-Jungang 414 m ~5 min 45 s
    Seoul Station Line 1 ↔ AREX 365 m ~5 min
    Hongik Univ. Line 2 ↔ AREX 355 m ~5 min
    Express Bus Terminal Line 7 ↔ Line 9 314 m ~4 min 20 s
    Jongno 3-ga Line 1 ↔ Line 5 312 m ~4 min 20 s
    Jamsil about 200 m for comparison

    Budget about five minutes walking it unencumbered. With a large suitcase, more.

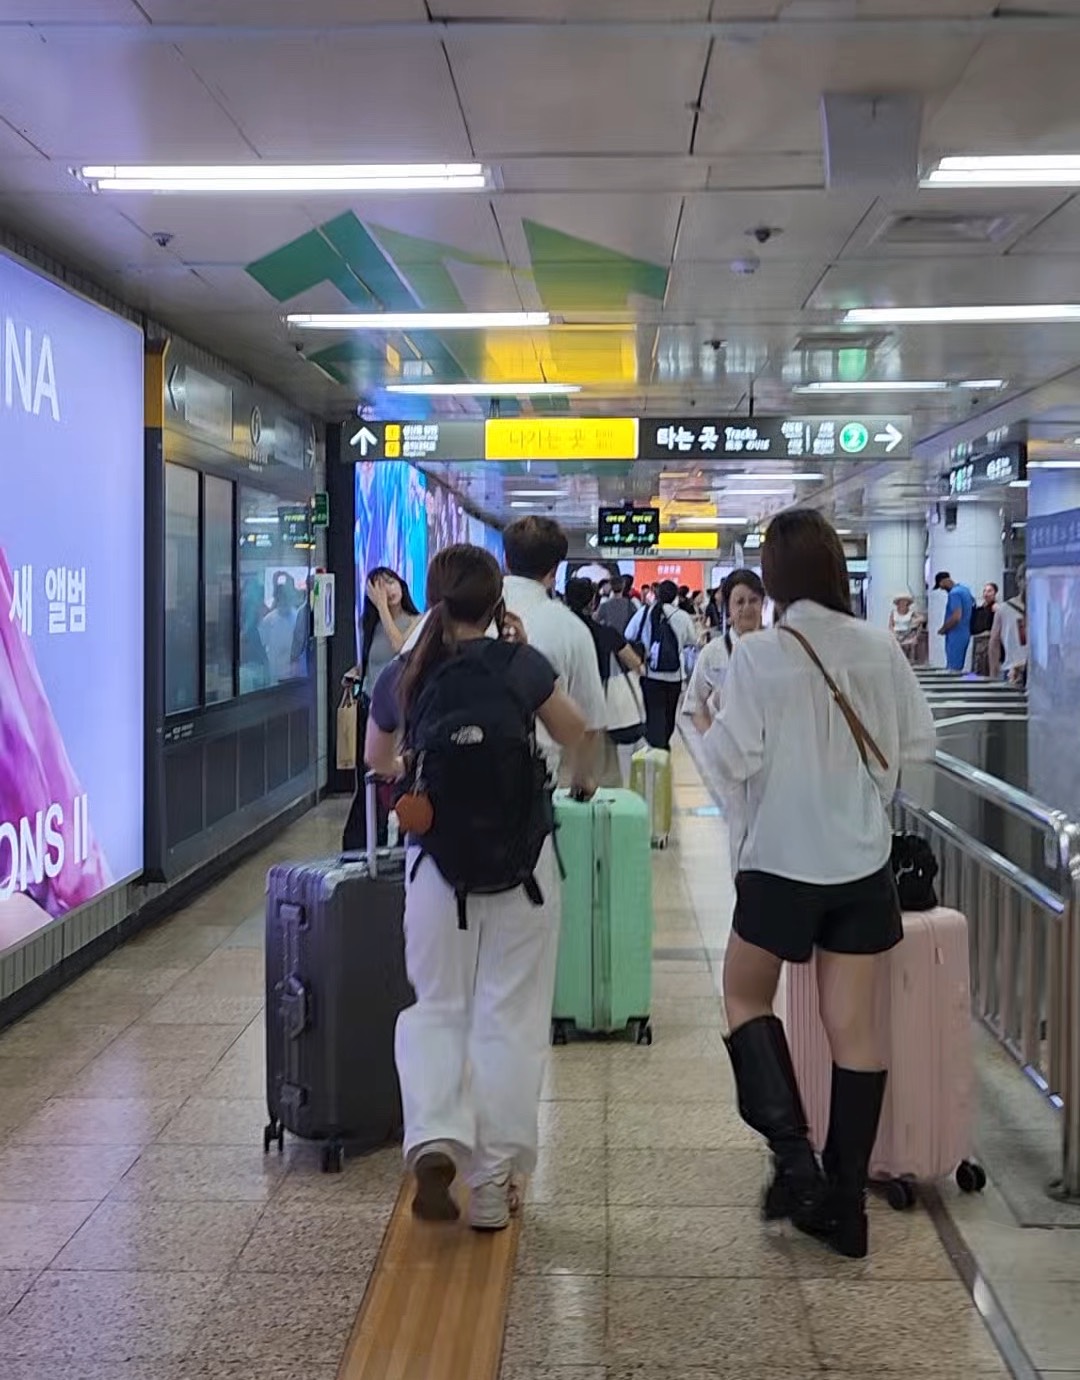
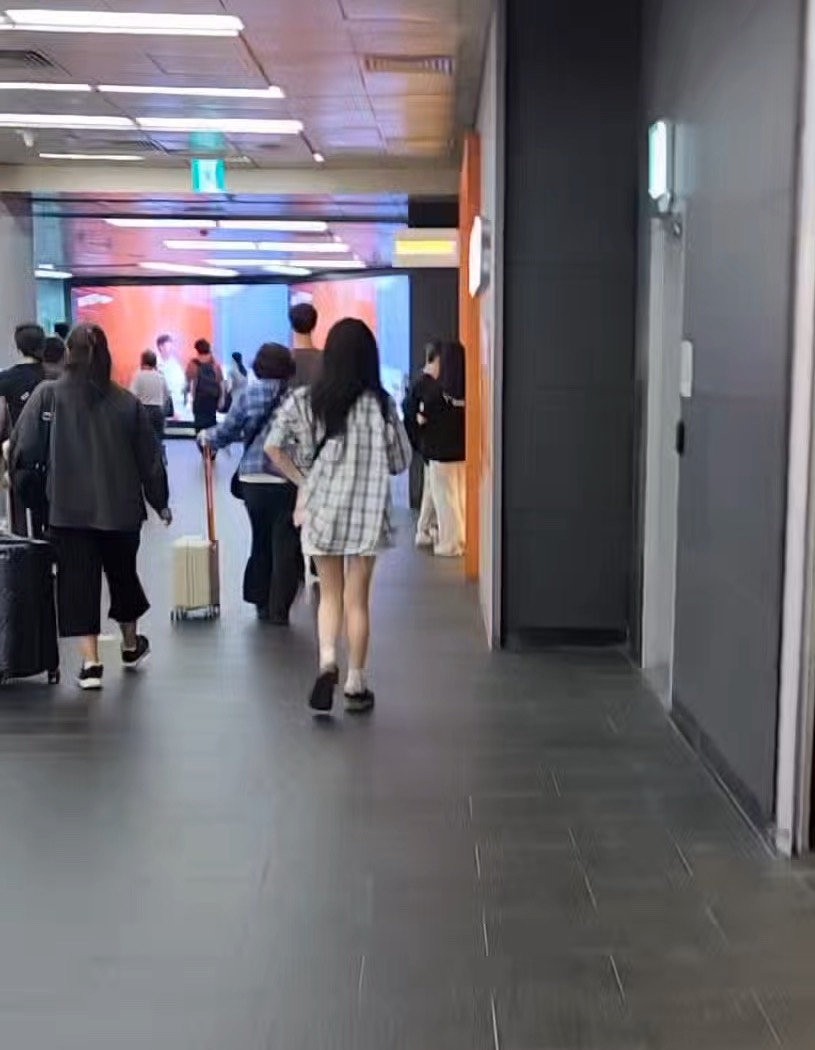
    A long underground corridor inside Hongik Univ. Station with travellers walking away from the camera, some pulling suitcases.
    355 metres of this. It is flat and well lit, which is the good news; it is also the walk you make on the day you are carrying the most.

    The one mercy: it is nearly flat. The route passes only a short escalator rather than long stair flights, so the distance is the problem, not the climb.

    2. How to avoid it

    If your hotel is in Hongdae, you may not need Line 2 at all.

    This is the part that saves people the most time. The Airport Railroad and Gyeongui-Jungang platforms have their own exits — numbers 3 to 7 — which come up at street level near Donggyo-dong Samgeori. If your destination is on that side, walk out there and skip the transfer completely.

    Line 2’s exits are 1, 2, 8 and 9, and they come up near the university.

    So the question is not “how do I transfer” but “which end of the station do I actually want?” Check your destination against the two exit groups before you start walking.

    If you do need Line 2 — you are heading to Sinchon, Gangnam, Jamsil, or anywhere on the loop — then the 355m is unavoidable and you should simply plan for it.

    3. What you walk past

    The passage is not a bare tunnel. It is lined with shops, and most visitors go through it staring at their phone without noticing.

    Along it you will find clothing and accessory stalls, snack countersdelimanjoo stalls are a fixture — a doughnut chain, and a flower shop, mixed in with the advertising screens. Prices on the clothing tend to sit below what the street-level shops in Hongdae charge, because the rent does.

    Coming off the Gyeongui-Jungang line and heading for Exit 2, the route is simple: take the escalator down from the platform and keep walking. The shops begin right at the bottom of it.

    Do not navigate by the shops themselves. Retail on this passage turns over — a snack restaurant that traded here has already closed. Any guide telling you to “turn at the doughnut place” is one closure away from being wrong. The escalator and the passage are the parts that stay put.

    None of this is a destination. But if you are transferring anyway, or killing twenty minutes before a train, it is more interesting than a platform bench.

    A practical note: these are small independent shops inside a transit passage. Card payment is normal but not universal, and hours follow the station rather than retail hours.

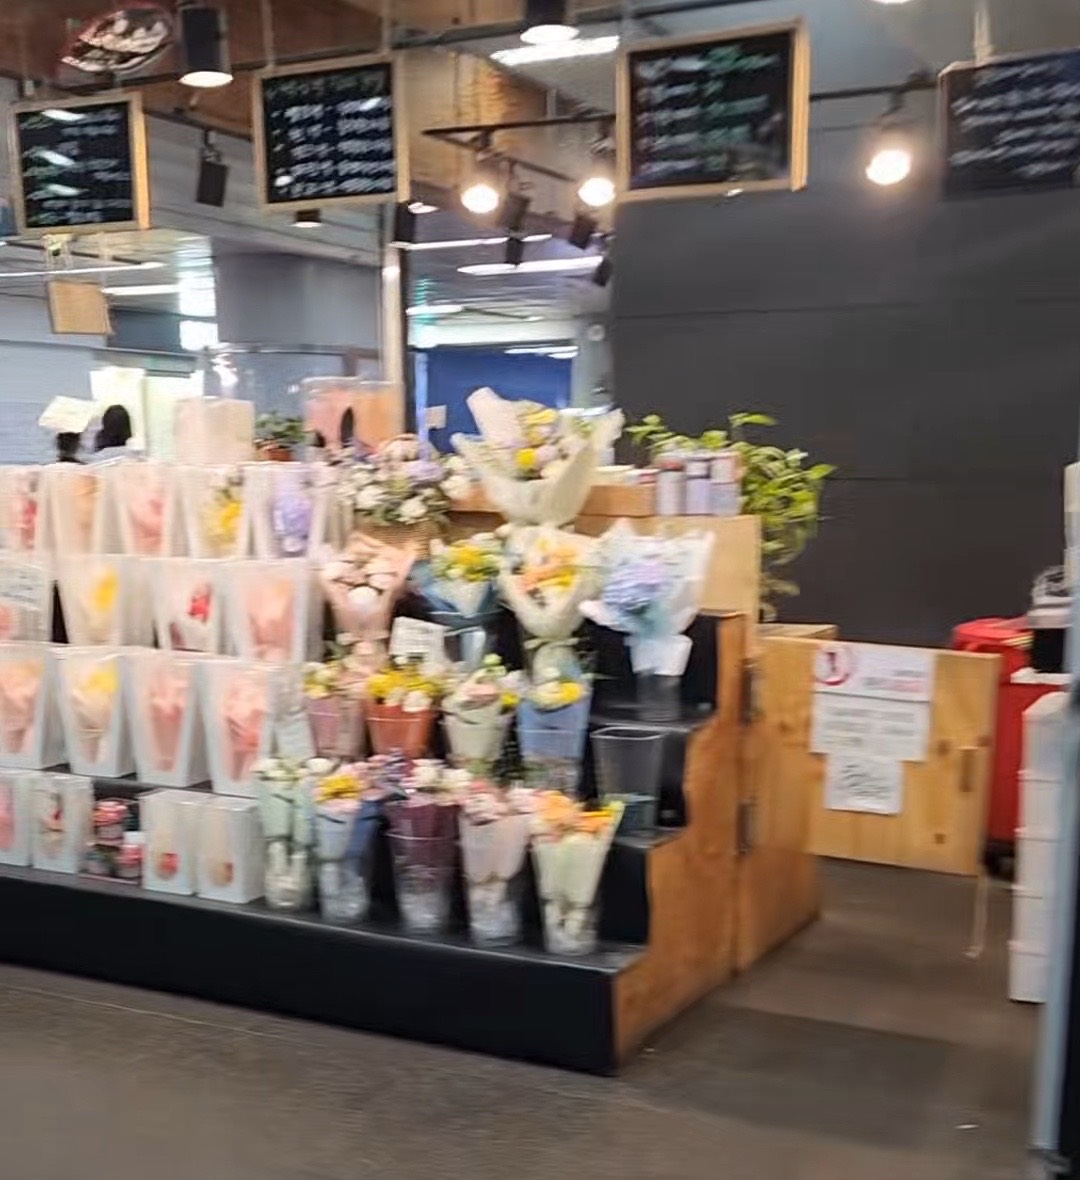
    A flower stall inside Hongik Univ. Station, bouquets arranged on tiered shelving beside the walkway.
    A flower stall on the passage. Shops like this sit along the transfer route, which is why the walk is less bleak than the distance suggests.

    4. Exit 9, and why it is always packed

    Exit 9 is the one that comes out at Hongdae’s main street, which means essentially every visitor uses it.

    The station handles roughly 189,500 passengers a day across its three lines. A large share of those funnel toward one staircase.

    Seoul has acknowledged the problem: a new Exit 8-1 is being built on the opposite side of the road from Exit 9, with escalators, specifically to relieve it. It is scheduled for 2028 (Seoul Metropolitan Government).

    Until then, if Exit 9 is backed up, Exit 8 comes up nearby and is usually clearer. Exits 3 and 4 no longer exist — if you find them on an old map or blog post, ignore it.

    5. If you are carrying luggage

    The 355m transfer is the single strongest argument for not carrying your bags around Hongdae at all.

    The staffed T-Luggage desk sits on B1, on the connecting passage toward the Airport Railroad — which is to say, directly on the route you are already walking. You can drop the case on the way through rather than making a special trip.

    Details, prices and the cheaper locker alternative are in our luggage storage guide.

    6. Before you go

    • Hongik Univ. Station is three stations sharing one name — Line 2, AREX, and Gyeongui-Jungang
    • The Line 2 ↔ Airport Railroad transfer is 355 m; Line 2 ↔ Gyeongui-Jungang is 414 m, the longest in Seoul
    • Both are longer than Express Bus Terminal or Jongno 3-ga
    • Exits 1, 2, 8, 9 belong to Line 2; exits 3–7 belong to AREX and Gyeongui-Jungang
    • If your destination is near the AREX exits, skip the transfer entirely
    • Exit 9 is the Hongdae street exit and is heavily congested; Exit 8 is often clearer
    • A new Exit 8-1 arrives in 2028 to relieve it
    • Exits 3 and 4 have been abolished. Old guides still list them
    • The transfer passage is lined with shops — clothing, snacks, flowers
    • The luggage desk is on that same passage, B1

    PART 2 — 한국어

    인천에 도착해 공항철도를 타고 홍대입구역에서 내립니다. 숙소가 홍대니까요. 지도상으로는 도착했습니다.

    그런데 2호선을 타야 합니다. 그래서 걷습니다. 계속 걷습니다.

    이 역의 공항철도 ↔ 2호선 환승은 355m, 경의중앙선 ↔ 2호선은 414m입니다. 414m는 서울 지하철에서 가장 긴 환승입니다. 아무도 미리 알려주지 않고, 하필 여행 전체에서 짐이 가장 많은 날에 마주칩니다.

    역이 실제로 어떻게 생겼는지, 그리고 이 걷기를 아예 피하는 법을 정리했습니다.

    1. 왜 이렇게 먼가

    홍대입구역은 하나의 역이 아닙니다. 이름만 같은 역 세 개입니다.

    노선 역번호 위치
    2호선 239 양화로·서교로가 만나는 곳, 홍익대 방향
    공항철도 A03 동교동삼거리 쪽, 연남동 방향
    경의중앙선 K314 공항철도와 같은 건물

    2호선은 대학이 있는 자리에 지어졌습니다. 공항철도와 경의중앙선은 수십 년 뒤에 수백 미터 떨어진 다른 교차로 근처에 지어졌습니다. 그리고 지하로 연결해 이름 하나를 붙였습니다.

    그 연결 통로가 355m입니다.

    비교하자면, 서울에서 길다고 불평이 나오는 환승들이 여기보다 짧습니다.

    환승 거리 도보
    홍대입구 2호선 ↔ 경의중앙선 414 m 약 5분 45초
    서울역 1호선 ↔ 공항철도 365 m 약 5분
    홍대입구 2호선 ↔ 공항철도 355 m 약 5분
    고속터미널 7호선 ↔ 9호선 314 m 약 4분 22초
    종로3가 1호선 ↔ 5호선 312 m 약 4분 20초
    잠실 약 200 m 비교용

    짐이 없으면 약 5분입니다. 큰 캐리어가 있으면 더 걸립니다.

    홍대입구역의 긴 지하 통로. 여행자들이 캐리어를 끌고 걸어가는 뒷모습.
    이런 통로가 355m입니다. 평지이고 밝다는 게 다행이고, 하필 짐이 가장 많은 날 걷게 된다는 게 문제입니다.

    다행인 점 하나. 거의 평지입니다. 긴 계단 없이 짧은 에스컬레이터 정도만 지나므로, 문제는 오르내림이 아니라 거리입니다.

    2. 이 환승을 피하는 법

    숙소가 홍대라면 2호선을 아예 안 타도 될 수 있습니다.

    시간을 가장 많이 아껴주는 대목입니다. 공항철도와 경의중앙선 승강장에는 자체 출구 3~7번이 있고, 동교동삼거리 쪽 지상으로 나옵니다. 목적지가 그쪽이면 거기로 나가면 환승 자체가 없습니다.

    2호선 출구는 1·2·8·9번이고 대학 쪽으로 나옵니다.

    그러니 질문은 “어떻게 환승하나”가 아니라 “내가 가야 할 곳이 역의 어느 쪽인가”입니다. 걷기 시작하기 전에 목적지를 두 출구 그룹과 대조해 보세요.

    2호선이 정말 필요하다면 — 신촌·강남·잠실 등 순환선 어디든 — 355m는 피할 수 없으니 그냥 감안하고 움직이는 편이 낫습니다.

    3. 걷는 동안 지나치는 것

    이 통로는 텅 빈 터널이 아닙니다. 양옆에 상점이 늘어서 있는데, 대부분은 휴대폰만 보며 지나칩니다.

    옷·액세서리 매대, 간식 코너(델리만쥬 매대는 거의 고정입니다), 도넛 체인, 꽃집이 광고 화면들 사이에 섞여 있습니다. 옷값은 홍대 지상 매장보다 낮은 편입니다. 임대료가 그렇기 때문입니다.

    경의중앙선에서 2번 출구로 간다면 경로는 단순합니다. 승강장에서 에스컬레이터로 내려와 계속 걸으면 됩니다. 상점들은 그 내려온 자리에서 바로 시작됩니다.

    가게를 지표로 삼지는 마세요. 이 통로의 상점은 바뀝니다. 여기서 장사하던 분식집은 이미 없어졌습니다. “도넛 가게에서 꺾으세요” 같은 안내는 가게 하나 닫히면 틀린 말이 됩니다. 변하지 않는 건 에스컬레이터와 통로입니다.

    목적지로 삼을 곳은 아닙니다. 다만 어차피 환승 중이거나 열차까지 20분이 남았다면, 승강장 의자보다는 볼 만합니다.

    참고할 점: 통로 안의 작은 개인 상점들입니다. 카드 결제가 일반적이지만 전부는 아니고, 영업시간은 일반 매장이 아니라 역 운영시간을 따릅니다.

    홍대입구역 안의 꽃집. 통로 옆 계단식 진열대에 꽃다발이 놓여 있다.
    환승 통로의 꽃집. 이런 상점들이 경로를 따라 늘어서 있어서, 거리에 비하면 덜 삭막합니다.

    4. 9번 출구는 왜 늘 붐비나

    9번 출구가 홍대 중심 거리로 나오는 출구입니다. 즉 방문자 거의 전부가 이 출구를 씁니다.

    이 역은 세 노선을 합쳐 하루 약 189,500명을 처리합니다. 그중 상당수가 계단 하나로 몰립니다.

    서울시도 문제를 인정했습니다. 9번 출구 건너편에 8-1번 출구를 에스컬레이터와 함께 신설 중이고, 목적이 9번 출구 혼잡 완화입니다. 2028년 완공 예정입니다(서울특별시).

    그때까지는, 9번이 막혀 있으면 가까운 8번 출구가 대개 낫습니다. 3번과 4번 출구는 폐지됐습니다. 오래된 지도나 블로그에 남아 있다면 무시하세요.

    5. 짐이 있다면

    355m 환승은 홍대에서 짐을 들고 다니지 말아야 할 가장 강력한 이유입니다.

    유인 또타러기지 데스크가 지하 1층, 공항철도 연결 통로에 있습니다. 다시 말해 어차피 걷게 될 그 경로 위에 있습니다. 따로 찾아갈 필요 없이 지나가는 길에 맡기면 됩니다.

    요금과 더 저렴한 보관함 대안은 짐 보관 안내에 정리했습니다.

    6. 가기 전에

    • 홍대입구역은 이름만 같은 역 세 개 — 2호선, 공항철도, 경의중앙선
    • 2호선 ↔ 공항철도는 355m, 2호선 ↔ 경의중앙선은 414m로 서울에서 가장 깁니다
    • 둘 다 고속터미널·종로3가보다 깁니다
    • 1·2·8·9번은 2호선, 3~7번은 공항철도·경의중앙선 출구입니다
    • 목적지가 공항철도 출구 쪽이면 환승을 아예 건너뛰세요
    • 9번 출구가 홍대 거리 출구이고 매우 혼잡합니다. 8번이 나을 때가 많습니다
    • 혼잡 완화용 8-1번 출구가 2028년 신설됩니다
    • 3·4번 출구는 폐지됐습니다. 오래된 안내에 아직 남아 있습니다
    • 환승 통로에는 상점이 늘어서 있습니다 — 옷, 간식, 꽃
    • 짐 보관 데스크가 그 통로 지하 1층에 있습니다

    함께 읽으면 좋은 글

    참고자료 / Sources

    환승 거리와 이용객 수는 이용자 편집 백과에서 확인한 수치입니다. 출구 신설 계획과 짐 보관 정보는 서울시·운영사 공식 자료입니다.

  • Luggage Storage in Hongdae: Four Options, and Your Suitcase Decides

    This guide is written in two parts. English first, Korean below. 이 글은 두 파트로 되어 있습니다. 영문이 먼저, 한국어가 아래에 있습니다.


    PART 1 — ENGLISH

    Walk past the staffed luggage desk at Hongik Univ. Station on a weekend afternoon and there is a queue — travellers with large suitcases, waiting their turn.

    That queue is not a mistake. Most of those cases genuinely will not fit a coin locker, and the desk is the right place for them. But it is not the only option here, and if your bag is smaller you have faster ones.

    There are four kinds of storage around this station at different prices. What decides your choice is the size of what you are carrying.

    Three travellers pulling wheeled suitcases along a corridor inside Hongik Univ. Station, seen from behind.
    This is what the four options are for. Which one you want comes down to whether your case fits a locker — and the overhead signs here are the same ones that will point you to storage.

    1. Why there is a queue

    The staffed desk is one counter serving everyone, and it is the option that handles oversized suitcases — the ones lockers cannot take. So it draws exactly the travellers who have no alternative.

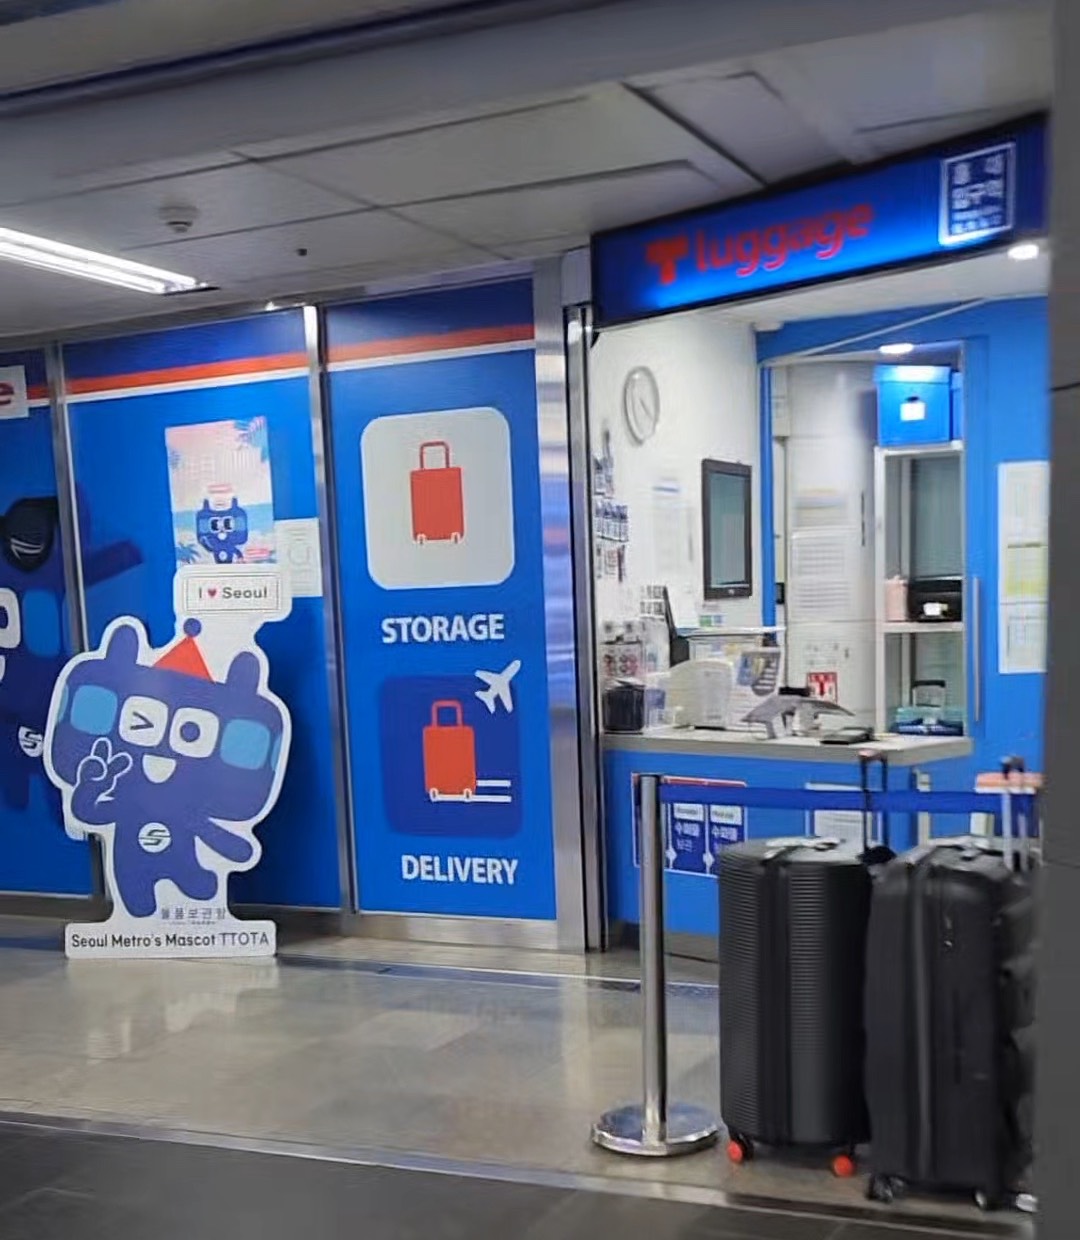
    The T-Luggage staffed storage desk inside Hongik Univ. Station, with STORAGE and DELIVERY signage in English and two large suitcases parked at the counter.
    The staffed desk at Hongik Univ. Station. The cases parked at the counter are exactly the size no coin locker takes — and the queue posts are permanent fixtures. Look for the words STORAGE and DELIVERY; the signage is in English.

    Demand is real and it is uneven. Expect a wait on weekends and at peak hours; the same counter can be quiet on a weekday morning.

    If your bag fits a locker, you can book one in the same station through an app and walk straight to it. If it does not, the desk is where you belong — go early or off-peak.

    2. The four options

    T-Locker (또타라커) — subway lockers, book by app

    Automated lockers across the Seoul subway. Roughly 5,500 lockers at 269 stations, so there are several at a busy station like this one.

    Weekday rate, 4 hours:

    Size Dimensions 4 hours Each extra hour
    Small 50 × 30 × 60 cm ₩2,200 ₩500
    Medium 50 × 45 × 60 cm ₩3,300 ₩800
    Large 50 × 90 × 60 cm ₩4,400 ₩1,000

    This is the cheapest option and it takes reservations. Install the T-Locker app, check availability, book, and go straight to the locker. No queue.

    The catch is size — a large locker fits a big suitcase, but large lockers are the first to fill on a busy day. Book ahead if you can.

    T-Luggage (또타러기지) — the staffed desk

    The counter people queue at. It operates at six stations — Hongik Univ., Seoul Station, Myeongdong, Gimpo Airport, Jongno 3-ga and Jamsil — daily from 09:00 to 22:00 (T-Luggage official). The Hongik Univ. desk sits on B1, on the connecting passage toward the Airport Railroad.

    Weekday rate, 4 hours, priced by suitcase size:

    Size 4 hours Each extra hour
    S (up to 20″) ₩3,000 ₩1,000
    M (20–23″) ₩4,000 ₩1,000
    L (23–27″) ₩6,000 ₩1,000
    XL (27″+) ₩9,000 ₩1,000

    Weekends cost more — noticeably more. The same four hours runs roughly ₩4,000 to ₩13,000 at weekend rates, a 30–50% premium over the weekday figures above. That is the same time you are most likely to meet a queue.

    The desk also runs a delivery service: instead of collecting your bag later, you can have it sent to another subway station or to Incheon Airport. If you are flying out and do not want to come back for it, this is the thing to ask about.

    More expensive than lockers, but with real advantages: no size limit that a locker imposes, staff on hand, and signage in English, Chinese and Japanese (Seoul Metropolitan Government).

    Worth the queue if your suitcase is oversized or you want a person to hand it to. Not worth it for a backpack.

    Private storage counters

    Independent operators sit around the station exits. Luggage Q, for example, is about a minute from Exit 7, open 24 hours, charges around ₩1,000 per hour, takes cards, and requires no reservation.

    The 24-hour part matters. Subway lockers and the staffed desk are bound by station hours; a late flight or a night out is where these earn their keep.

    Shop-based storage (LugStay and similar)

    Instead of a locker, your bag sits behind the counter of a partner café, restaurant or salon. You book through an app and drop it off.

    The advantage is location — you can often find one closer to where you actually are than the station is. The constraint is opening hours: if the shop closes at 8pm, your bag is in there until tomorrow. Check before you book.

    3. Choosing

    Your situation Take
    Backpack or small bag, few hours T-Locker — cheapest, bookable
    Large suitcase, want no fuss T-Luggage desk — go off-peak if you can
    Oversized case a locker will not fit T-Luggage desk
    Picking up late at night Private 24-hour counter
    Staying near Hongdae, not at the station Shop-based app — check closing time
    You hate queues, bag fits a locker Book a T-Locker before you arrive

    4. Before you go

    • If your bag fits a locker, you can skip the queue. Lockers in the same station take app bookings
    • If it does not, the desk is the right choice — just go on a weekday or off-peak
    • T-Locker is cheapest — from ₩2,200 for four hours
    • Large lockers fill first. Book ahead on weekends
    • The staffed desk costs more but has no locker-size limit and multilingual signage
    • Private counters run 24 hours — the only option for late pickups
    • Shop-based storage closes when the shop does. Check the hours before booking
    • Rates above are weekday, 4-hour baselines. Longer stays add hourly
    • Weekend rates run 30–50% higher at the staffed desk — budget for it
    • The desk can deliver your bag to Incheon Airport instead of holding it for pickup
    • Staffed desk hours: 09:00–22:00, six stations citywide

    PART 2 — 한국어

    주말 오후 홍대입구역 유인 보관 데스크 앞을 지나가 보면 줄이 있습니다. 큰 캐리어를 끌고 차례를 기다리는 여행자들입니다.

    그 줄은 잘못된 선택이 아닙니다. 그 캐리어 대부분은 실제로 물품보관함에 들어가지 않고, 그런 짐에는 데스크가 맞는 곳입니다. 다만 여기 선택지가 그것 하나는 아니고, 짐이 작다면 더 빠른 방법이 있습니다.

    이 역 주변에는 성격이 다른 보관 방법이 네 가지 있고 요금도 다릅니다. 선택을 가르는 건 들고 있는 짐의 크기입니다.

    홍대입구역 통로에서 캐리어를 끌고 가는 여행자 세 명의 뒷모습.
    네 가지 선택지가 있는 이유입니다. 어느 쪽을 쓸지는 결국 캐리어가 보관함에 들어가느냐로 갈립니다.

    1. 왜 줄이 생기나

    유인 데스크는 카운터 하나로 모두를 상대하고, 보관함에 안 들어가는 대형 캐리어를 받는 곳입니다. 그래서 다른 대안이 없는 여행자들이 정확히 여기로 모입니다.

    홍대입구역 안의 또타러기지 유인 보관 데스크. STORAGE, DELIVERY 영문 안내와 카운터 앞에 놓인 대형 캐리어 두 개.
    홍대입구역 유인 데스크. 카운터 앞 캐리어들이 물품보관함에 들어가지 않는 크기이고, 줄 폴대는 상시로 세워져 있습니다. 안내가 STORAGE·DELIVERY로 영문 표기되어 있어 찾기 쉽습니다.

    수요는 실제로 많고, 시간대에 따라 편차가 큽니다. 주말과 붐비는 시간대에는 기다림을 예상하세요. 같은 카운터가 평일 오전에는 한산하기도 합니다.

    짐이 보관함에 들어가면 같은 역에서 앱으로 예약하고 곧장 가면 됩니다. 들어가지 않는다면 데스크가 맞는 곳이니, 이른 시간이나 한산한 때를 노리세요.

    2. 네 가지 선택지

    또타라커 — 지하철 무인 보관함, 앱 예약

    서울 지하철 전역의 자동 보관함입니다. 269개 역에 약 5,500칸이라 홍대입구역처럼 붐비는 역에는 여러 개가 있습니다.

    주중 4시간 기준

    크기 규격 4시간 추가 1시간
    50 × 30 × 60 cm 2,200원 500원
    50 × 45 × 60 cm 3,300원 800원
    50 × 90 × 60 cm 4,400원 1,000원

    가장 저렴하고 예약이 됩니다. 또타라커 앱을 설치해 빈 칸을 확인하고 예약한 뒤 곧장 가면 됩니다. 줄이 없습니다.

    단점은 크기입니다. 대형 칸에 큰 캐리어가 들어가지만, 붐비는 날에는 대형부터 찹니다. 가능하면 미리 예약하세요.

    또타러기지 — 유인 보관소

    사람들이 줄 서는 그 카운터입니다. 홍대입구·서울역·명동·김포공항·종로3가·잠실 6개 역에서 운영하며, 매일 09:00~22:00입니다(또타러기지 공식). 홍대입구역 데스크는 지하 1층, 공항철도 연결 통로 쪽에 있습니다.

    주중 4시간 기준, 캐리어 크기로 요금이 갈립니다.

    크기 4시간 추가 1시간
    S (20인치 이하) 3,000원 1,000원
    M (20~23인치) 4,000원 1,000원
    L (23~27인치) 6,000원 1,000원
    XL (27인치 초과) 9,000원 1,000원

    주말은 눈에 띄게 비쌉니다. 같은 4시간이 주말 요금으로는 대략 4,000~13,000원이고, 위 주중 요금보다 30~50% 높습니다. 하필 줄을 만날 가능성이 가장 큰 때가 그때입니다.

    데스크는 배송 서비스도 합니다. 나중에 찾으러 오는 대신 다른 지하철역이나 인천공항으로 보낼 수 있습니다. 출국하는 날 짐을 다시 찾으러 오기 싫다면 이걸 물어보세요.

    보관함보다 비싸지만 실질적인 장점이 있습니다. 보관함 규격에 갇히지 않고, 직원이 있고, 안내문이 영어·중국어·일본어로 제공됩니다(서울특별시).

    캐리어가 크거나 사람에게 맡기고 싶다면 줄 설 값어치가 있습니다. 배낭 하나라면 아닙니다.

    사설 보관소

    역 출구 주변에 개별 업체들이 있습니다. 예를 들어 러기지큐7번 출구에서 도보 1분, 24시간 운영, 시간당 1,000원가량이고 카드 결제가 되며 예약이 필요 없습니다.

    24시간이라는 점이 중요합니다. 지하철 보관함과 유인 데스크는 역 운영시간에 묶여 있습니다. 늦은 비행기나 밤 일정이 있을 때 이쪽이 값을 합니다.

    상점 보관 (럭스테이 등)

    보관함 대신 제휴한 카페·식당·미용실 카운터 뒤에 짐을 둡니다. 앱으로 예약하고 맡기면 됩니다.

    장점은 위치입니다. 역보다 지금 있는 곳에 가까운 데를 찾을 수 있는 경우가 많습니다. 제약은 영업시간입니다. 가게가 저녁 8시에 닫으면 짐도 내일까지 그 안에 있습니다. 예약 전에 확인하세요.

    3. 고르기

    내 상황 선택
    배낭이나 작은 가방, 몇 시간 또타라커 — 가장 싸고 예약 가능
    큰 캐리어, 신경 쓰기 싫음 또타러기지 — 가능하면 한산한 시간대
    보관함에 안 들어가는 대형 또타러기지
    밤늦게 찾아야 함 사설 24시간 보관소
    역이 아니라 홍대 안쪽에 있음 상점 보관 앱 — 마감 시간 확인
    줄 서기 싫고 짐이 보관함에 들어감 도착 전에 또타라커 예약

    4. 가기 전에

    • 짐이 보관함에 들어가면 줄을 피할 수 있습니다. 같은 역의 보관함이 앱 예약을 받습니다
    • 안 들어가면 데스크가 맞습니다 — 대신 평일이나 한산한 시간대를 노리세요
    • 또타라커가 가장 저렴합니다 — 4시간 2,200원부터
    • 대형 칸부터 찹니다. 주말이면 미리 예약하세요
    • 유인 데스크는 비싸지만 보관함 규격 제한이 없고 다국어 안내가 있습니다
    • 사설 보관소는 24시간 — 늦게 찾아야 한다면 사실상 유일한 선택지입니다
    • 상점 보관은 가게가 닫으면 끝입니다. 예약 전 영업시간 확인
    • 위 요금은 주중 4시간 기준입니다. 길어지면 시간당 추가됩니다
    • 유인 데스크는 주말 요금이 30~50% 비쌉니다. 감안하세요
    • 데스크는 짐을 인천공항으로 배송해 줄 수도 있습니다
    • 유인 데스크 운영시간 09:00~22:00, 전국 6개 역

    함께 읽으면 좋은 글

    참고자료 / Sources

  • Google Maps in Korea: What Still Works, What Doesn’t, and What to Use (August 2026)

    This guide is written in two parts. English first, Korean below. 이 글은 두 파트로 되어 있습니다. 영문이 먼저, 한국어가 아래에 있습니다.


    PART 1 — ENGLISH

    Two things you have probably heard about Google Maps in Korea, and both are misleading.

    The first: “Google Maps doesn’t work in Korea.” It does — just not for the thing you need most.

    The second: “They fixed it in February 2026.” The government did grant permission. The feature still is not live.

    Here is the accurate picture as of August 2026, and what to actually put on your phone before you land.

    1. What works and what doesn’t

    Google Maps is not blank in Korea. Most of it behaves normally:

    Works Doesn’t work
    Viewing the map Walking directions (turn-by-turn)
    Searching for places Driving navigation
    Reviews, photos, opening hours Cycling directions
    Subway and bus routes Step-by-step guidance inside transit walking segments

    The surprise for most visitors is that public transit directions do work. Seoul Metro publishes open transit data, so Google’s subway routing is reasonably accurate. If you want to know which line to take from Hongdae to Gangnam, Google Maps will tell you.

    What it will not do is walk you there — and the way it fails is worth seeing, because it is not subtle.

    Ask for directions between two points in Seoul and look at the row of travel modes across the top. Transit shows a time. Driving, walking and cycling show a dash. Those three are simply not calculated. You do not get a bad route; you get no route.

    Close-up of the Google Maps travel mode row in Seoul: transit shows 8 min while driving, walking and cycling each show a dash.
    The mode row, close up. Transit returns 8 minutes; driving, walking and cycling each return a dash — those three are simply never calculated here.

    The give-away is what Google offers instead. Put in a destination a few hundred metres away and every suggestion that comes back is a bus — and most of the quoted journey time is spent walking to the stop and away from it again, for a distance you could have covered on foot without stopping. Not one of the alternatives says “walk.” Google is not being obtuse. Transit is the only mode it is allowed to compute, so transit is the only answer it has.

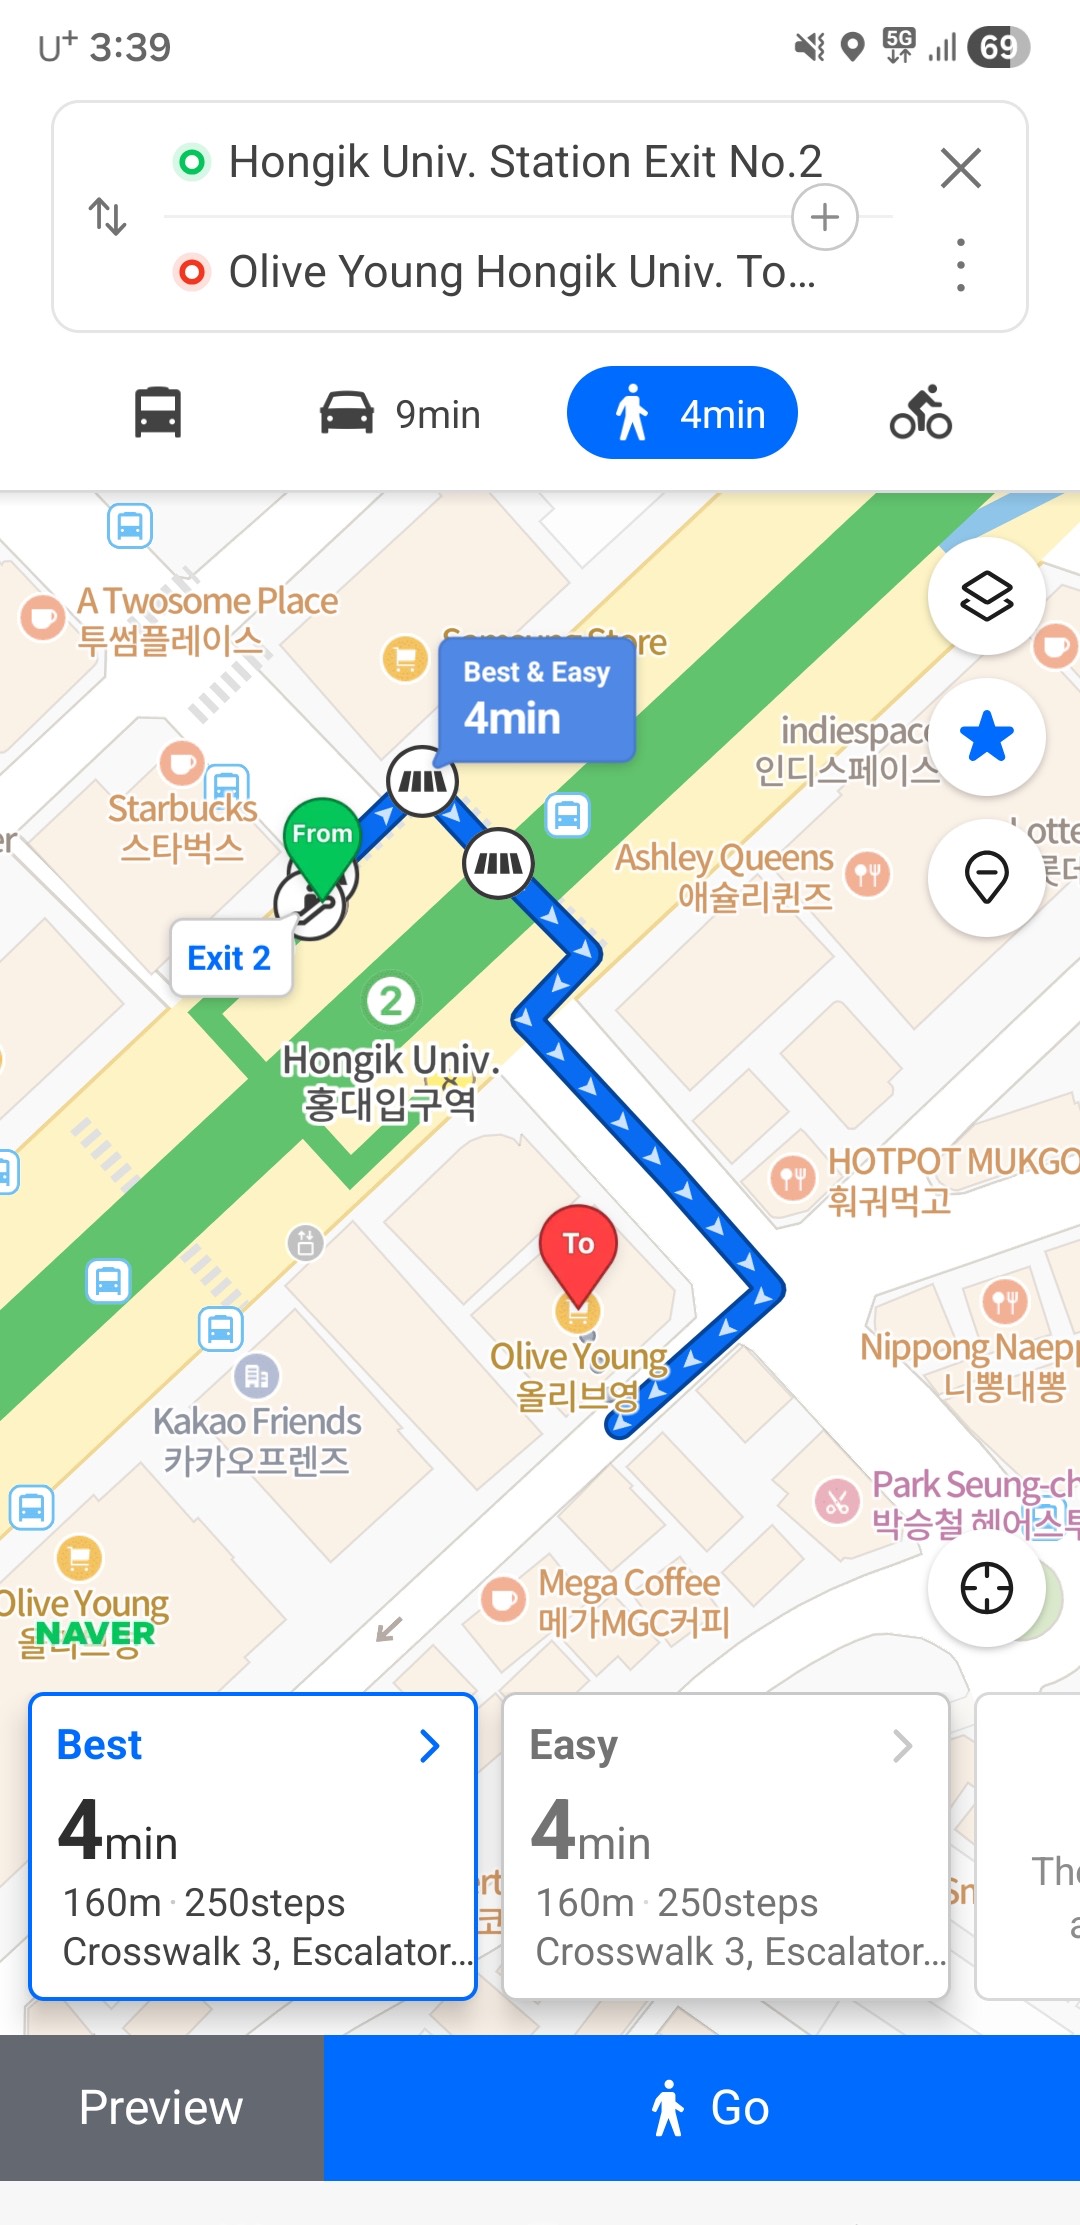
    Naver Map showing a walking route in English from Hongik Univ. Station Exit 2 to a nearby shop: 4 minutes, 160 metres, 250 steps, with a turn-by-turn line drawn on the map.
    The same kind of trip in Naver Map, in English: 4 minutes, 160 metres, 250 steps, turn by turn. This is the feature Google cannot offer here — not a worse version of it, the whole thing.
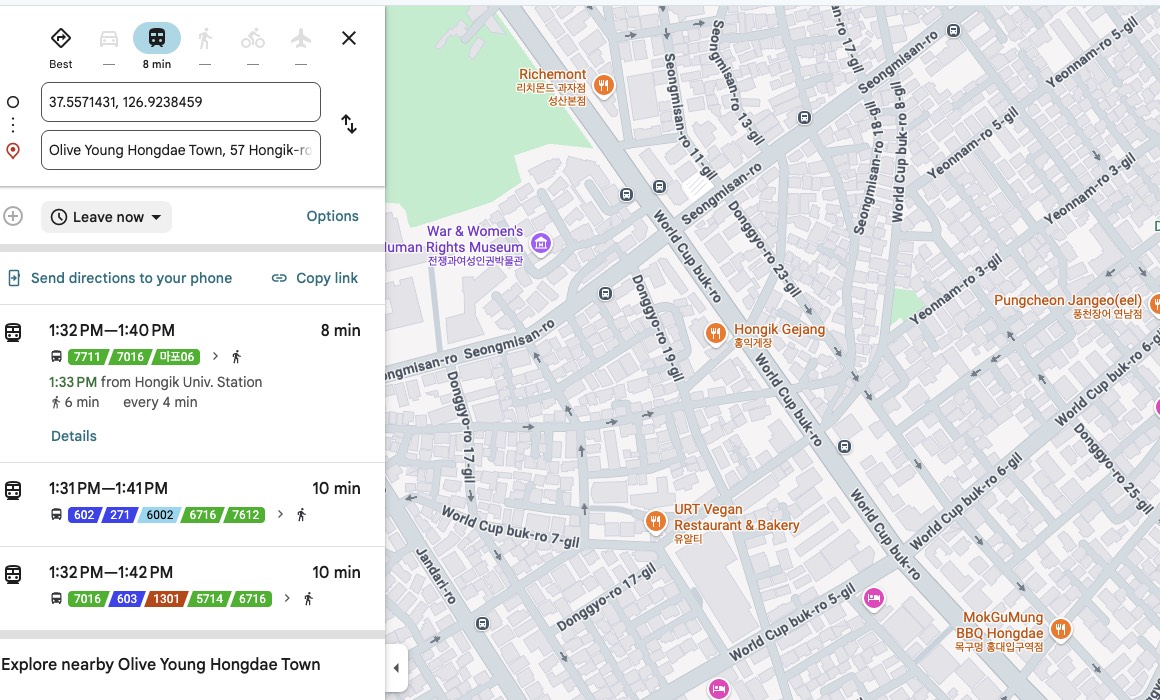
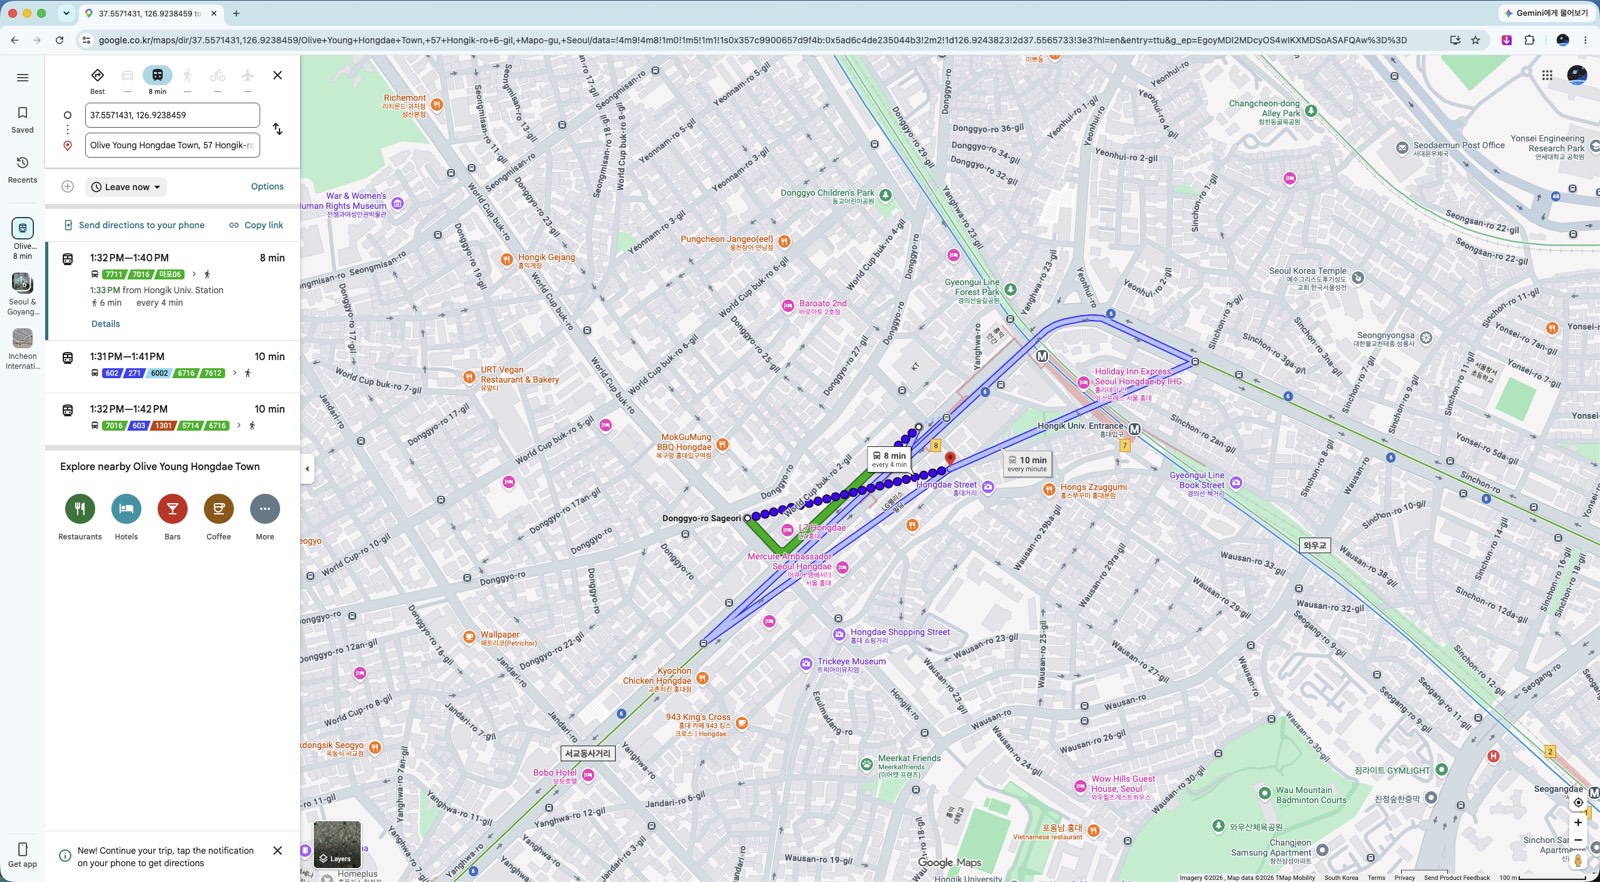
    Google Maps in Seoul returning three bus options for a walkable distance, with driving, walking and cycling unavailable.
    The same search in full. Hongik Univ. Station to Olive Young Hongdae Town — every option Google returns is a bus, and six of the eight minutes are spent walking anyway.

    Inside a transit route the same gap appears. The walking legs — station exit to your destination — come with no step-by-step guidance.

    That last part matters more than it sounds. Korean subway stations often have a dozen or more exits spread across several blocks. Coming out of the wrong one can mean a fifteen-minute correction.

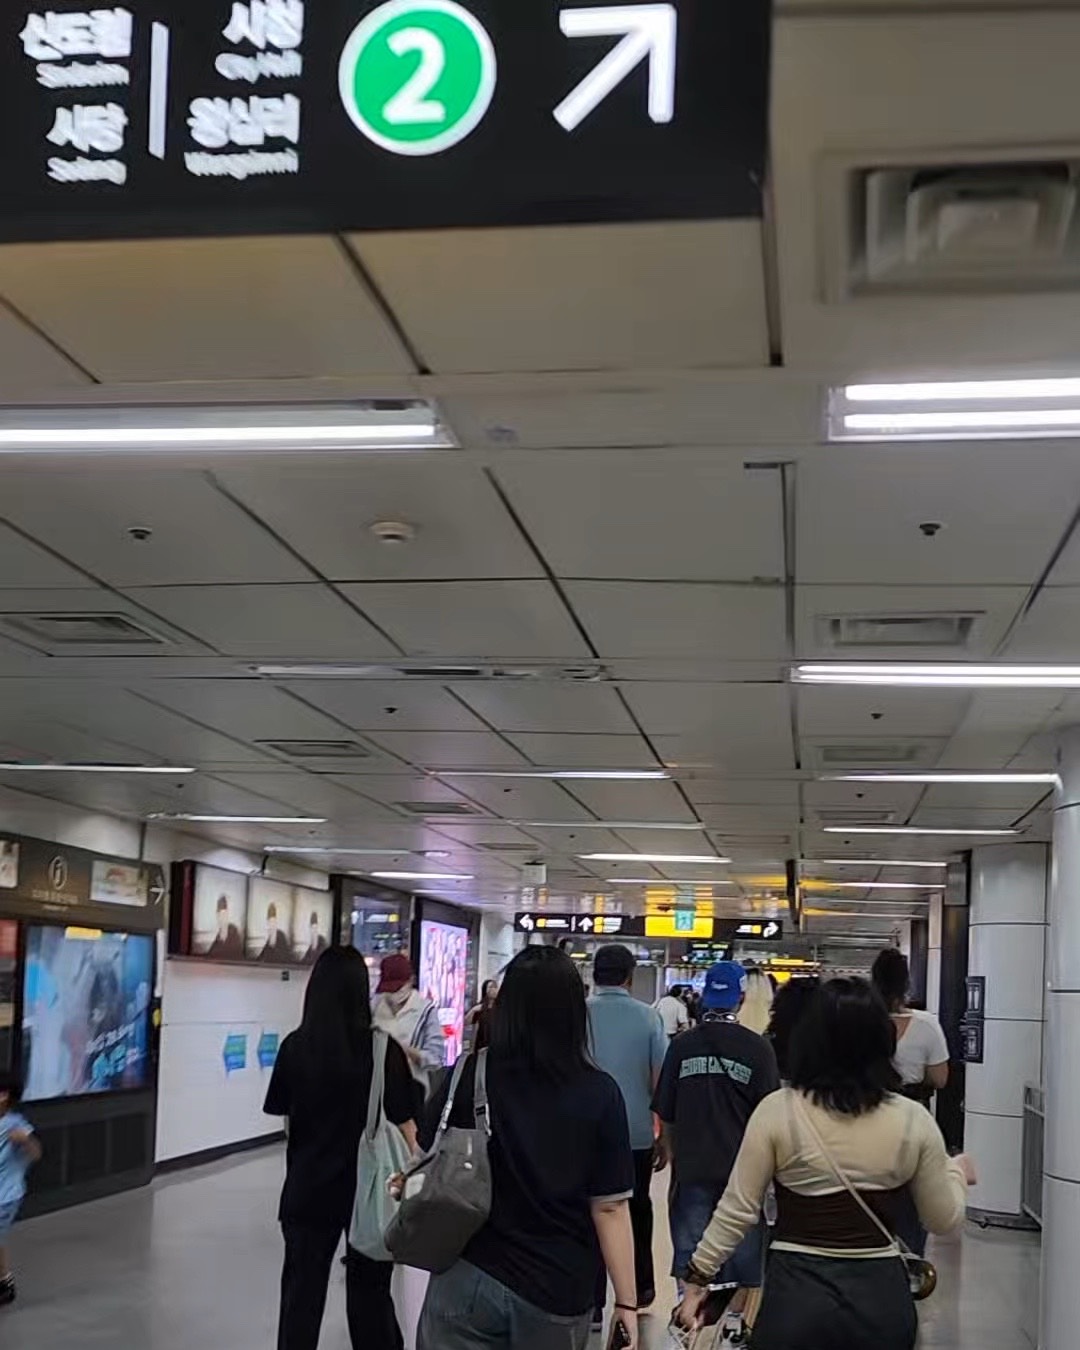
    An overhead sign inside a Seoul subway station showing exit number 2 with a directional arrow.
    Exit numbers are signposted clearly — but only once you are already inside the station. What Google Maps will not tell you is which number to aim for, and that is exactly where the missing walking directions cost you.

    One more thing the apps will not warn you about: on buses you have to tap your card again when getting off. Skip it and you lose the transfer discount — see the tap-out rule.

    2. Why it doesn’t work

    Korean law restricts exporting high-precision map data to servers outside the country. Google has served Korean maps from domestic servers since 2008, but the features that need Google’s own processing — walking directions, turn-by-turn navigation — were never possible under that arrangement.

    Google’s position is that routing requires “the enormous computing power of data centers distributed around the world,” which is why exporting the data is necessary rather than optional (Google Korea Q&A, August 2025).

    Worth noting: the data Google asked for is the 1:5000 national base map — already cleared through security review and already used by Naver and Kakao. The dispute was never about whether the data is secret.

    3. What changed in February 2026 — and what didn’t

    On February 27, 2026, an inter-agency committee under the National Geographic Information Institute approved conditional export of the 1:5000 high-precision map, closing an argument that had run for 18 years (ZDNet Korea).

    The committee included the Ministry of Land, the Ministry of National Defense, the National Intelligence Service, the Ministry of Foreign Affairs, and several others. Approval came with security conditions: imagery processing, restrictions on coordinate display, and continued use of domestic servers. The permission is limited to navigation and routing (Byline Network).

    Headlines at the time read like the problem was solved. It is not, yet.

    As of August 2026 — roughly six months after approval — walking and driving navigation still are not available in Google Maps in Korea, and no launch date has been announced.

    So if you read in February that Google Maps now works in Korea, that was permission being granted, not a feature shipping. Plan your trip on the assumption that it still does not work. If it launches while you are here, that is a bonus.

    4. Naver Map — install this one

    If you install one app, make it Naver Map. It has the strongest English support of the Korean options, accurate walking directions, and the most complete business listings — hours, photos, reviews, and which exit to use.

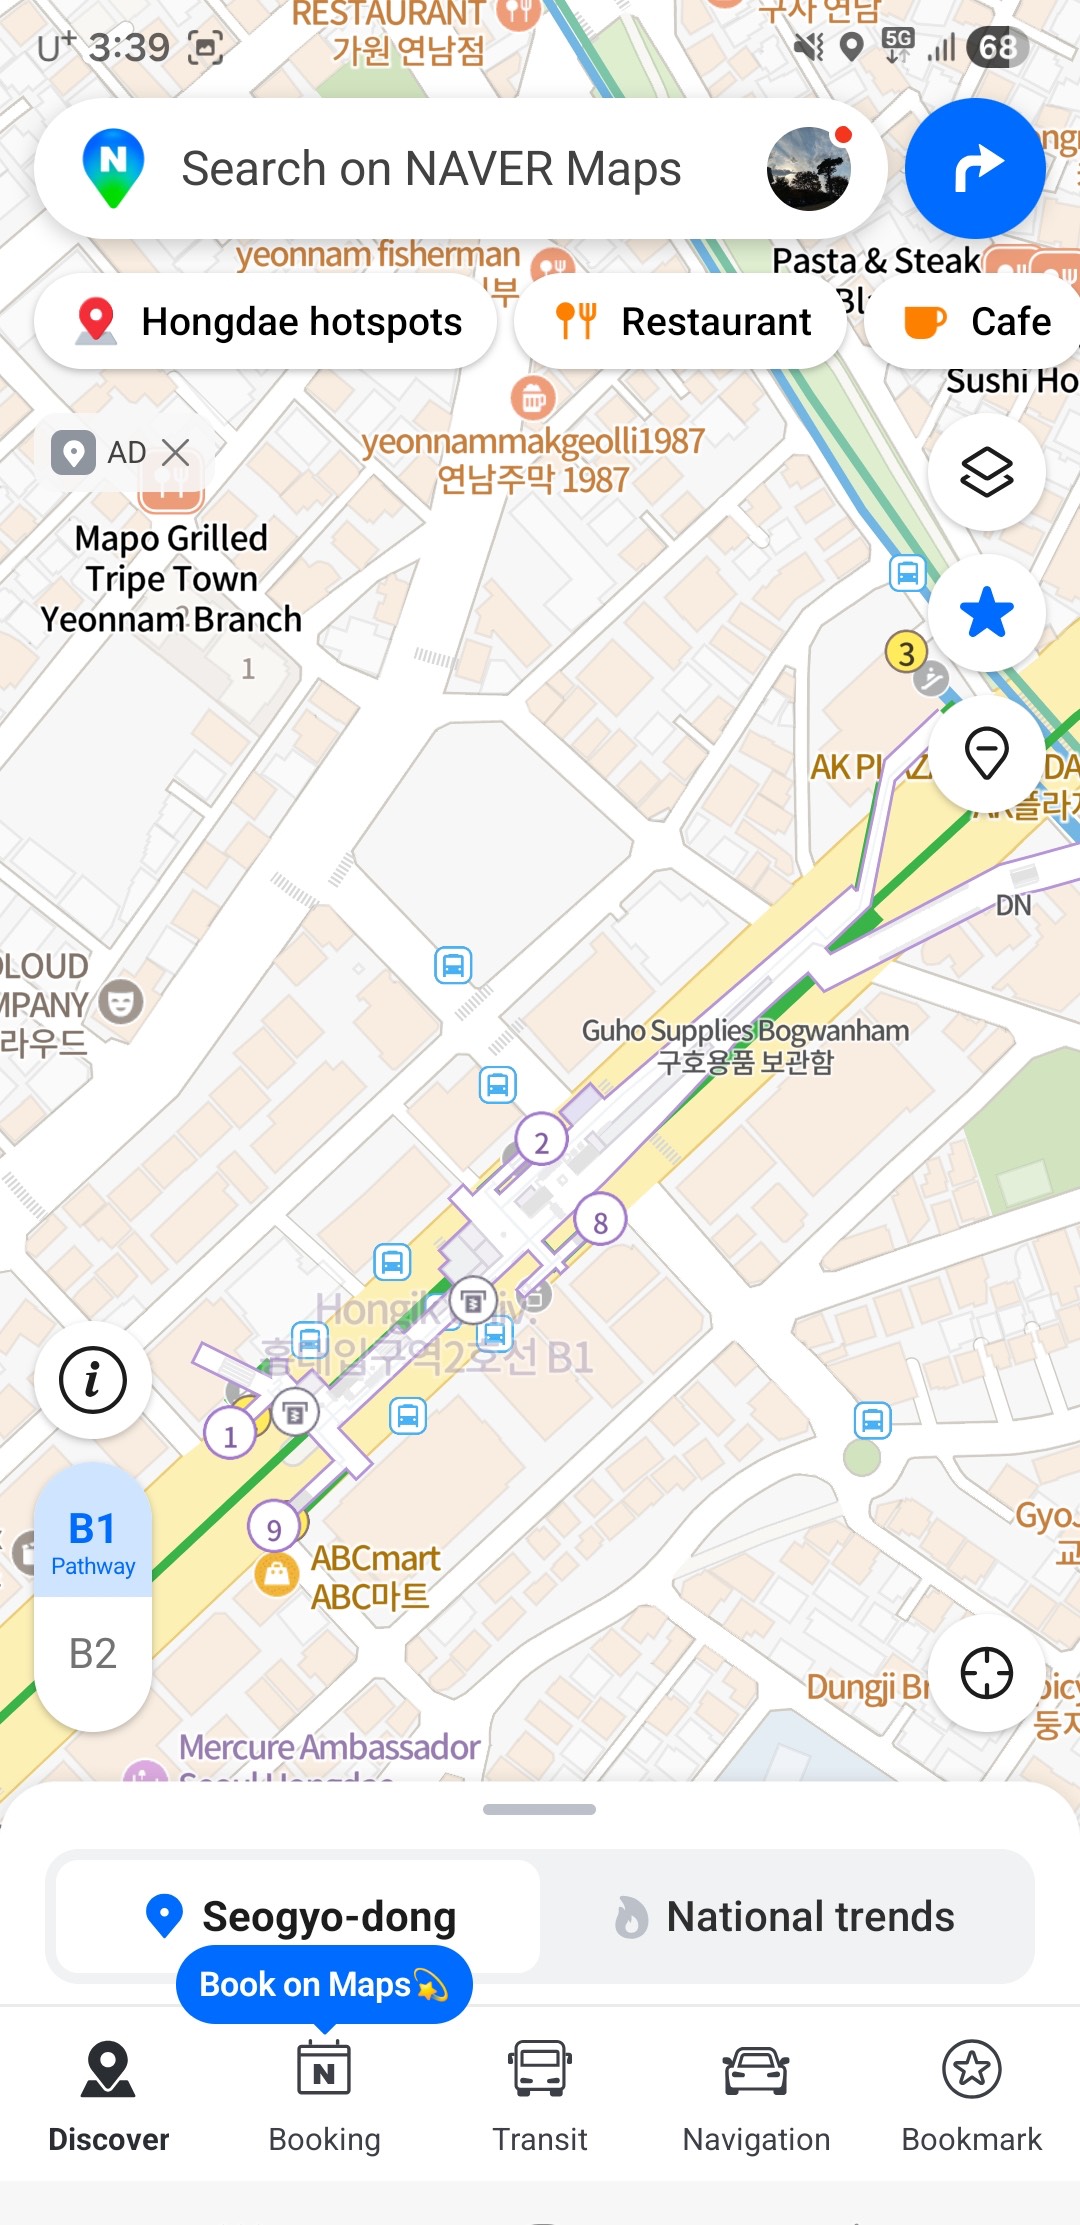
    The Naver Map home screen in English, with an English search bar and English category buttons along the bottom.
    What the app looks like once it is in English. If you have been putting this off because you expected a wall of Korean, this is the actual screen.

    It is probably already in English. Naver Map follows your phone’s language setting, so if your device is in English the app opens that way — no setup needed. Open it and check before hunting through menus.

    If it opened in Korean, switch it:

    1. Tap the menu icon (☰) in the top-left
    2. Tap the gear icon (⚙️) to open settings
    3. Find 언어 (Language) and choose English
    4. The app restarts in English — buttons, directions, and station names

    On desktop, go to map.naver.com, click the profile icon, and choose English in settings.

    (App layouts change with updates. If the icons have moved, look for the gear first, then the language entry.)

    Two things worth knowing:

    • You do not need an account. When a login screen appears, tap Skip or use Guest Mode. All core navigation works without a Korean phone number.
    • Place names often show in both Korean and English. This is deliberate and useful — you can show the Korean name to a taxi driver or shop staff.

    The limits: some reviews and smaller place names stay in Korean, and offline use is limited. Real-time navigation and transit need a connection.

    5. Kakao Map — the backup

    KakaoMap covers driving, walking, cycling, and public transit, and locals use it heavily. Its transit routing is as good as Naver’s.

    Its English support is weaker than Naver’s, so as a visitor it is harder to lean on as your only app.

    Where it earns its place on your phone: as a second opinion. Map apps disagree — about which exit is closest, whether a small shop is still open, how a complicated transfer actually works. When Naver gives you something that looks wrong, checking Kakao takes ten seconds.

    If you are only installing one app, install Naver. If you have room for two, this is the second.

    6. Before you arrive

    • Install Naver Map before you fly — download over your home wifi, not airport data
    • Switch it to English: ☰ → ⚙️ → 설정 → 언어 → English
    • Skip the login. No Korean phone number needed
    • Consider KakaoMap as a backup for cross-checking
    • Google Maps is still fine for subway routes — keep it, just do not rely on it to walk you anywhere
    • Do not assume the February 2026 approval means navigation works. Check on arrival; as of August 2026 it does not

    PART 2 — 한국어

    한국의 구글 지도에 대해 흔히 듣는 말이 두 가지 있고, 둘 다 정확하지 않습니다.

    첫째, “한국에서는 구글 지도가 안 된다.” 됩니다. 다만 가장 필요한 기능이 안 될 뿐입니다.

    둘째, “2026년 2월에 해결됐다.” 정부가 허가한 것은 맞습니다. 서비스는 아직 시작되지 않았습니다.

    2026년 8월 기준으로 정확한 상황과, 입국 전에 무엇을 준비해야 하는지 정리합니다.

    1. 되는 것과 안 되는 것

    한국에서 구글 지도가 백지로 나오지는 않습니다. 대부분은 정상적으로 작동합니다.

    안 됨
    지도 보기 도보 길찾기 (단계별 안내)
    장소 검색 자동차 내비게이션
    리뷰·사진·영업시간 자전거 길찾기
    지하철·버스 경로 대중교통 경로 안의 도보 구간 안내

    대부분의 방문자가 의외로 여기는 지점은 대중교통 길찾기가 된다는 것입니다. 서울교통공사가 공개 교통 데이터를 제공하기 때문에 지하철 경로는 상당히 정확합니다. 홍대에서 강남까지 어느 노선을 타야 하는지는 구글 지도가 알려줍니다.

    하지만 걸어서 데려다주지는 않습니다. 그리고 실패하는 방식이 꽤 노골적입니다.

    서울 안에서 두 지점을 놓고 길찾기를 하면 화면 위쪽 이동수단 줄을 보세요. 대중교통에만 시간이 나오고 자동차·도보·자전거는 대시(—)입니다. 계산 자체를 하지 않습니다. 부정확한 경로가 나오는 게 아니라 아예 경로가 없습니다.

    구글 지도 이동수단 줄 확대. 대중교통은 8분, 자동차·도보·자전거는 각각 대시로 표시된다.
    이동수단 줄 확대. 대중교통만 8분이 나오고 자동차·도보·자전거는 모두 대시입니다. 이 셋은 한국에서 아예 계산되지 않습니다.

    결정적인 건 대신 내놓는 답입니다. 몇백 미터 거리를 넣으면 돌아오는 안내가 전부 버스이고, 그 소요시간의 상당 부분이 정류장까지 걸어가고 내려서 다시 걸어가는 시간입니다. 그냥 쉬지 않고 걸으면 되는 거리인데도요. 대안 중 어느 것도 “걸으세요”라고 하지 않습니다. 구글이 어리석은 게 아니라, 계산할 수 있는 유일한 수단이 대중교통이라 그 답밖에 못 내놓는 것입니다.

    네이버지도의 영문 도보 길찾기. 홍대입구역 2번 출구에서 근처 매장까지 4분, 160m, 250걸음과 턴바이턴 경로가 표시돼 있다.
    같은 성격의 이동을 네이버지도에서 본 화면입니다. 영문으로 4분, 160m, 250걸음, 단계별 안내까지 나옵니다. 구글이 한국에서 제공하지 못하는 기능이 바로 이것입니다.
    걸어갈 거리인데 구글 지도가 버스 경로 세 개만 제시하는 화면.
    같은 검색의 전체 화면. 홍대입구역에서 올리브영 홍대 타운까지 — 돌아온 안내가 전부 버스이고, 8분 중 6분이 어차피 걷는 시간입니다.

    대중교통 경로 안에서도 같은 구멍이 생깁니다. 지하철 출구에서 목적지까지의 도보 구간에는 단계별 안내가 없습니다.

    이 마지막 부분이 생각보다 중요합니다. 한국 지하철역은 출구가 열 개를 넘고 여러 블록에 흩어져 있는 경우가 많습니다. 잘못된 출구로 나오면 15분을 되돌아가야 할 수도 있습니다.

    서울 지하철역 안의 2번 출구 안내 표지판과 방향 화살표.
    출구 번호는 역 안에서는 잘 표시돼 있습니다. 문제는 구글 지도가 몇 번 출구로 나가야 하는지를 알려주지 않는다는 점이고, 도보 안내의 부재가 실제로 손해를 끼치는 지점이 바로 여기입니다.

    지도 앱이 알려주지 않는 것이 하나 더 있습니다. 버스는 내릴 때도 카드를 대야 합니다. 놓치면 환승 할인을 잃습니다 — 하차 태그 규칙에 정리했습니다.

    2. 왜 안 되나

    한국 법은 정밀 지도 데이터를 국외 서버로 반출하는 것을 제한합니다. 구글은 2008년부터 국내 서버를 통해 한국 지도를 서비스해 왔지만, 구글 자체 연산이 필요한 기능 — 도보 길찾기, 턴바이턴 내비게이션 — 은 그 구조에서 제공할 수 없었습니다.

    구글의 설명은 길찾기가 “전 세계에 분산된 데이터센터의 막대한 컴퓨팅 파워”를 필요로 하기 때문에 반출이 선택이 아니라 필수라는 것입니다(구글코리아 Q&A, 2025년 8월).

    짚어둘 점은, 구글이 요청한 데이터가 1:5000 국가기본도라는 사실입니다. 이미 보안심사를 통과한 공개 데이터이고 네이버와 카카오도 쓰고 있습니다. 이 논쟁은 데이터가 비밀이냐 아니냐의 문제가 아니었습니다.

    3. 2026년 2월에 바뀐 것, 그리고 아직 안 바뀐 것

    2026년 2월 27일, 국토지리정보원 산하 협의체가 1:5000 고정밀 지도의 조건부 국외반출을 허가하면서 18년간 이어진 논쟁이 마무리됐습니다(ZDNet Korea).

    협의체에는 국토교통부, 국방부, 국가정보원, 외교부 등 관계 부처가 참여했습니다. 허가에는 영상 보안처리, 좌표 표시 제한, 국내 서버 활용이라는 조건이 붙었고, 범위는 내비게이션·길찾기로 한정됐습니다(바이라인네트워크).

    당시 기사 제목만 보면 문제가 해결된 것처럼 읽힙니다. 아직 아닙니다.

    2026년 8월 현재, 허가로부터 약 6개월이 지났지만 구글 지도의 도보·자동차 길찾기는 여전히 제공되지 않으며 서비스 개시 일정도 발표되지 않았습니다.

    2월에 “이제 한국에서 구글 지도가 된다”는 기사를 봤다면, 그건 허가가 났다는 뜻이지 기능이 나왔다는 뜻이 아닙니다. 아직 안 된다는 전제로 여행을 계획하세요. 머무는 동안 시작되면 그건 덤입니다.

    4. 네이버지도 — 이건 꼭 까세요

    하나만 설치한다면 네이버지도입니다. 한국 앱 중 영어 지원이 가장 낫고, 도보 안내가 정확하며, 업체 정보(영업시간·사진·리뷰·출입구)가 가장 충실합니다.

    영문으로 표시된 네이버지도 첫 화면. 검색창과 하단 메뉴가 모두 영어다.
    영어로 전환한 뒤의 화면입니다. 한글투성이일까 봐 미뤄뒀다면, 실제로 보게 될 화면은 이것입니다.

    대개는 이미 영어로 열립니다. 네이버지도는 휴대폰의 언어 설정을 따라가므로, 기기가 영어로 되어 있다면 앱도 영어로 실행됩니다. 메뉴를 뒤지기 전에 먼저 열어 확인해 보세요.

    한국어로 열렸다면 이렇게 바꿉니다.

    1. 왼쪽 위 메뉴 아이콘(☰) 을 누릅니다
    2. 톱니바퀴 아이콘(⚙️) 을 눌러 설정으로 들어갑니다
    3. 언어 항목에서 English 를 선택합니다
    4. 앱이 다시 시작되면서 버튼·길안내·역 이름이 영어로 바뀝니다

    PC에서는 map.naver.com에 접속해 프로필 아이콘을 누르고 설정에서 English를 고르면 됩니다.

    (앱 화면은 업데이트로 바뀝니다. 아이콘 위치가 다르면 톱니바퀴를 먼저 찾고 그 안에서 언어 항목을 찾으세요.)

    알아두면 좋은 두 가지

    • 계정이 필요 없습니다. 로그인 화면이 나오면 건너뛰기나 게스트 모드를 누르세요. 한국 전화번호 없이도 길찾기 기능은 모두 쓸 수 있습니다.
    • 장소 이름이 한국어와 영어로 함께 표시됩니다. 의도된 설계이고 유용합니다. 택시 기사나 가게 직원에게 한국어 이름을 그대로 보여줄 수 있습니다.

    한계도 있습니다. 일부 리뷰와 작은 장소 이름은 한국어로 남고, 오프라인 사용은 제한적입니다. 실시간 길안내와 대중교통 정보는 인터넷 연결이 필요합니다.

    5. 카카오맵 — 보조용

    카카오맵은 자동차·도보·자전거·대중교통을 모두 지원하고 현지인이 많이 씁니다. 대중교통 경로는 네이버지도만큼 좋습니다.

    다만 영어 지원이 네이버지도보다 약합니다. 외국인이 이것만 붙들고 다니기에는 어렵습니다.

    그럼에도 깔아둘 값어치는 두 번째 의견에 있습니다. 지도 앱은 서로 다른 답을 줄 때가 있습니다. 어느 출구가 가까운지, 작은 가게가 아직 영업 중인지, 복잡한 환승이 실제로 어떻게 되는지에서요. 네이버지도가 이상한 답을 줄 때 카카오맵으로 확인하는 데 10초면 됩니다.

    하나만 깐다면 네이버지도, 두 개를 깔 여유가 있다면 그다음이 이것입니다.

    6. 도착 전 체크리스트

    • 네이버지도를 출국 전에 설치하세요 — 공항 데이터 말고 집 와이파이에서
    • 영어로 전환: ☰ → ⚙️ → 설정 → 언어 → English
    • 로그인은 건너뛰세요. 한국 전화번호가 필요 없습니다
    • 카카오맵은 교차 확인용 보조로 고려
    • 구글 지도는 지하철 경로용으로는 계속 쓸 만합니다 — 다만 걸어서 안내받을 생각은 마세요
    • 2026년 2월 허가가 곧 서비스 개시는 아닙니다. 도착해서 확인해 보되, 2026년 8월 기준으로는 아직 안 됩니다

    함께 읽으면 좋은 글

    참고자료 / Sources