Practical Korea travel information, checked against Korean sources.

Author: 50대 웹디자이너

  • Luggage Storage in Hongdae: Four Options, and Your Suitcase Decides

    This guide is written in two parts. English first, Korean below. 이 글은 두 파트로 되어 있습니다. 영문이 먼저, 한국어가 아래에 있습니다.


    PART 1 — ENGLISH

    Walk past the staffed luggage desk at Hongik Univ. Station on a weekend afternoon and there is a queue — travellers with large suitcases, waiting their turn.

    That queue is not a mistake. Most of those cases genuinely will not fit a coin locker, and the desk is the right place for them. But it is not the only option here, and if your bag is smaller you have faster ones.

    There are four kinds of storage around this station at different prices. What decides your choice is the size of what you are carrying.
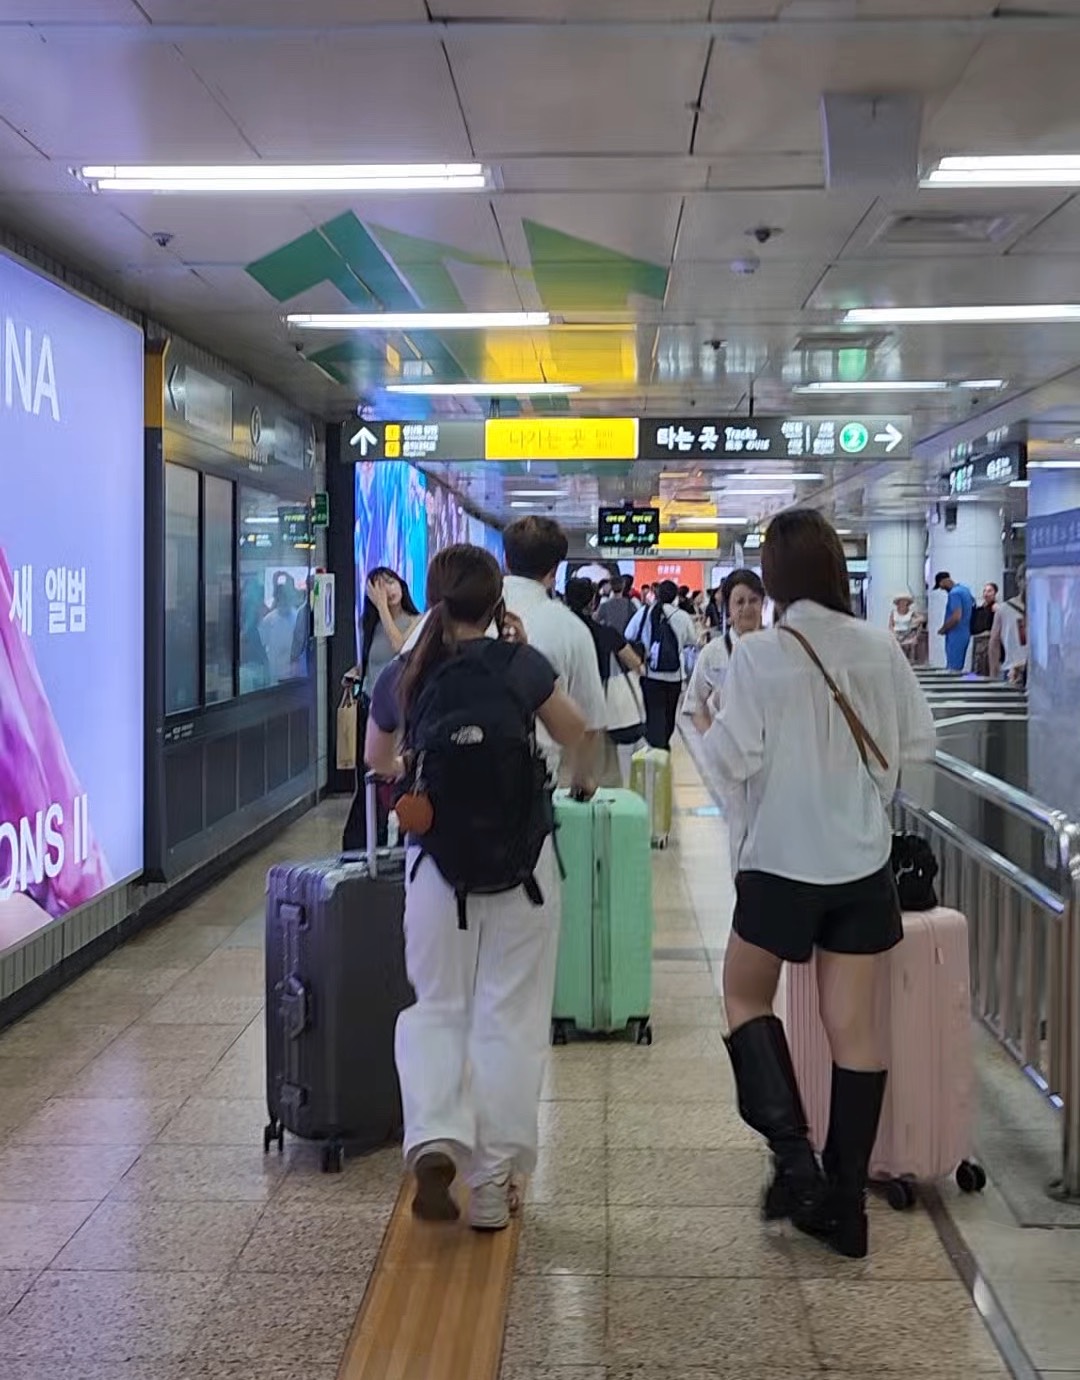
    Three travellers pulling wheeled suitcases along a corridor inside Hongik Univ. Station, seen from behind.
    This is what the four options are for. Which one you want comes down to whether your case fits a locker — and the overhead signs here are the same ones that will point you to storage.

    1. Why there is a queue

    The staffed desk is one counter serving everyone, and it is the option that handles oversized suitcases — the ones lockers cannot take. So it draws exactly the travellers who have no alternative.
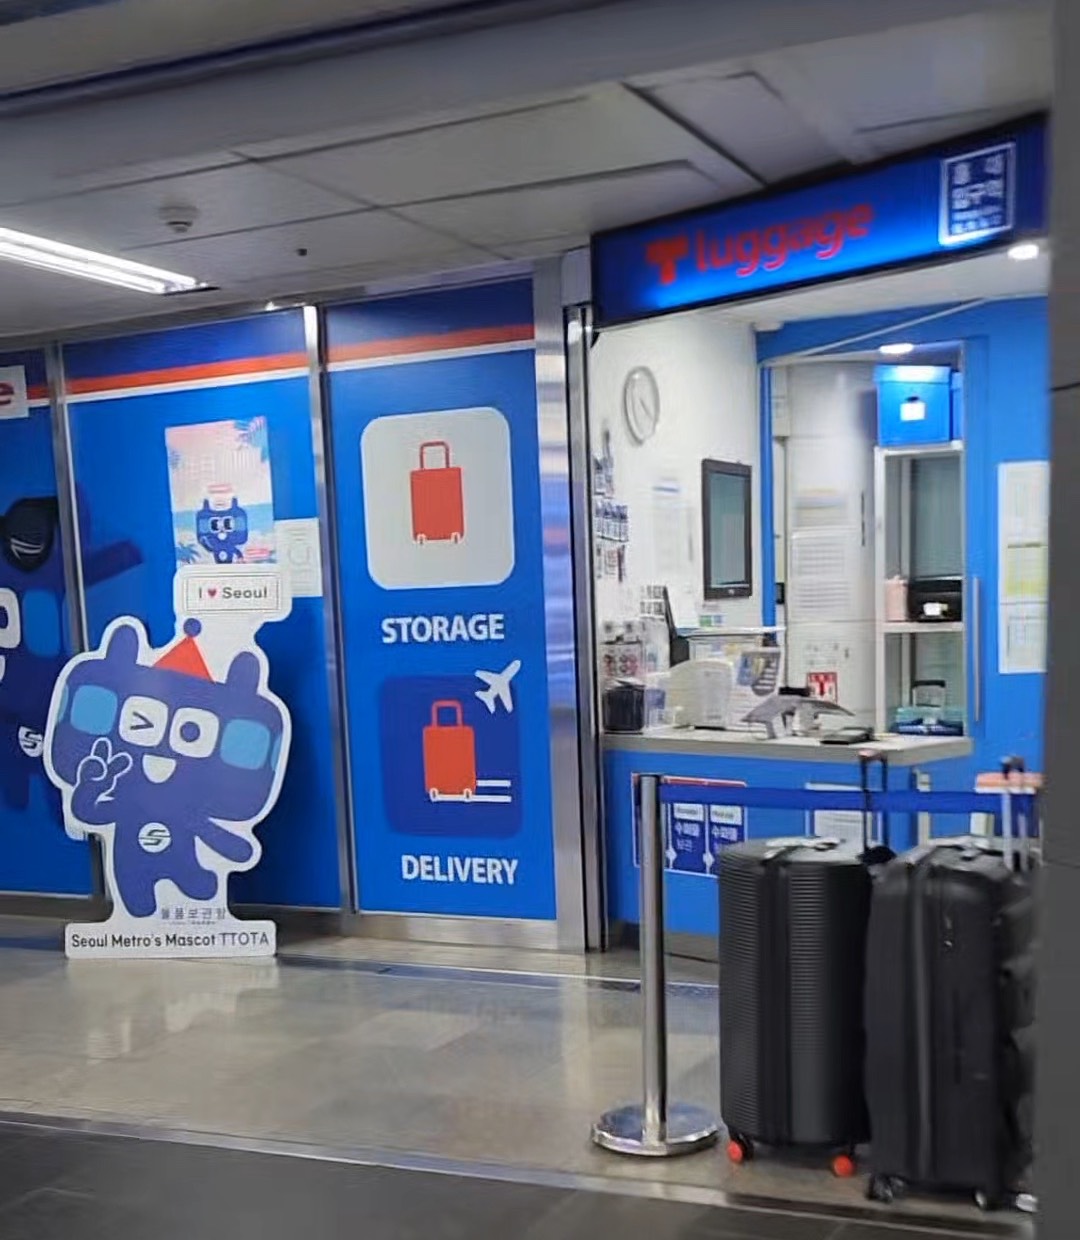
    The T-Luggage staffed storage desk inside Hongik Univ. Station, with STORAGE and DELIVERY signage in English and two large suitcases parked at the counter.
    The staffed desk at Hongik Univ. Station. The cases parked at the counter are exactly the size no coin locker takes — and the queue posts are permanent fixtures. Look for the words STORAGE and DELIVERY; the signage is in English.

    Demand is real and it is uneven. Expect a wait on weekends and at peak hours; the same counter can be quiet on a weekday morning.

    If your bag fits a locker, you can book one in the same station through an app and walk straight to it. If it does not, the desk is where you belong — go early or off-peak.

    2. The four options

    T-Locker (또타라커) — subway lockers, book by app

    Automated lockers across the Seoul subway. Roughly 5,500 lockers at 269 stations, so there are several at a busy station like this one.

    Weekday rate, 4 hours:

    Size Dimensions 4 hours Each extra hour
    Small 50 × 30 × 60 cm ₩2,200 ₩500
    Medium 50 × 45 × 60 cm ₩3,300 ₩800
    Large 50 × 90 × 60 cm ₩4,400 ₩1,000

    This is the cheapest option and it takes reservations. Install the T-Locker app, check availability, book, and go straight to the locker. No queue.

    The catch is size — a large locker fits a big suitcase, but large lockers are the first to fill on a busy day. Book ahead if you can.

    T-Luggage (또타러기지) — the staffed desk

    The counter people queue at. It operates at six stations — Hongik Univ., Seoul Station, Myeongdong, Gimpo Airport, Jongno 3-ga and Jamsil — daily from 09:00 to 22:00 (T-Luggage official). The Hongik Univ. desk sits on B1, on the connecting passage toward the Airport Railroad.

    Weekday rate, 4 hours, priced by suitcase size:

    Size 4 hours Each extra hour
    S (up to 20″) ₩3,000 ₩1,000
    M (20–23″) ₩4,000 ₩1,000
    L (23–27″) ₩6,000 ₩1,000
    XL (27″+) ₩9,000 ₩1,000

    Weekends cost more — noticeably more. The same four hours runs roughly ₩4,000 to ₩13,000 at weekend rates, a 30–50% premium over the weekday figures above. That is the same time you are most likely to meet a queue.

    The desk also runs a delivery service: instead of collecting your bag later, you can have it sent to another subway station or to Incheon Airport. If you are flying out and do not want to come back for it, this is the thing to ask about.

    More expensive than lockers, but with real advantages: no size limit that a locker imposes, staff on hand, and signage in English, Chinese and Japanese (Seoul Metropolitan Government).

    Worth the queue if your suitcase is oversized or you want a person to hand it to. Not worth it for a backpack.

    Private storage counters

    Independent operators sit around the station exits. Luggage Q, for example, is about a minute from Exit 7, open 24 hours, charges around ₩1,000 per hour, takes cards, and requires no reservation.

    The 24-hour part matters. Subway lockers and the staffed desk are bound by station hours; a late flight or a night out is where these earn their keep.

    Shop-based storage (LugStay and similar)

    Instead of a locker, your bag sits behind the counter of a partner café, restaurant or salon. You book through an app and drop it off.

    The advantage is location — you can often find one closer to where you actually are than the station is. The constraint is opening hours: if the shop closes at 8pm, your bag is in there until tomorrow. Check before you book.

    3. Choosing

    Your situation Take
    Backpack or small bag, few hours T-Locker — cheapest, bookable
    Large suitcase, want no fuss T-Luggage desk — go off-peak if you can
    Oversized case a locker will not fit T-Luggage desk
    Picking up late at night Private 24-hour counter
    Staying near Hongdae, not at the station Shop-based app — check closing time
    You hate queues, bag fits a locker Book a T-Locker before you arrive

    4. Before you go

    • If your bag fits a locker, you can skip the queue. Lockers in the same station take app bookings
    • If it does not, the desk is the right choice — just go on a weekday or off-peak
    • T-Locker is cheapest — from ₩2,200 for four hours
    • Large lockers fill first. Book ahead on weekends
    • The staffed desk costs more but has no locker-size limit and multilingual signage
    • Private counters run 24 hours — the only option for late pickups
    • Shop-based storage closes when the shop does. Check the hours before booking
    • Rates above are weekday, 4-hour baselines. Longer stays add hourly
    • Weekend rates run 30–50% higher at the staffed desk — budget for it
    • The desk can deliver your bag to Incheon Airport instead of holding it for pickup
    • Staffed desk hours: 09:00–22:00, six stations citywide

    PART 2 — 한국어

    주말 오후 홍대입구역 유인 보관 데스크 앞을 지나가 보면 줄이 있습니다. 큰 캐리어를 끌고 차례를 기다리는 여행자들입니다.

    그 줄은 잘못된 선택이 아닙니다. 그 캐리어 대부분은 실제로 물품보관함에 들어가지 않고, 그런 짐에는 데스크가 맞는 곳입니다. 다만 여기 선택지가 그것 하나는 아니고, 짐이 작다면 더 빠른 방법이 있습니다.

    이 역 주변에는 성격이 다른 보관 방법이 네 가지 있고 요금도 다릅니다. 선택을 가르는 건 들고 있는 짐의 크기입니다.

    홍대입구역 통로에서 캐리어를 끌고 가는 여행자 세 명의 뒷모습.
    네 가지 선택지가 있는 이유입니다. 어느 쪽을 쓸지는 결국 캐리어가 보관함에 들어가느냐로 갈립니다.

    1. 왜 줄이 생기나

    유인 데스크는 카운터 하나로 모두를 상대하고, 보관함에 안 들어가는 대형 캐리어를 받는 곳입니다. 그래서 다른 대안이 없는 여행자들이 정확히 여기로 모입니다.

    홍대입구역 안의 또타러기지 유인 보관 데스크. STORAGE, DELIVERY 영문 안내와 카운터 앞에 놓인 대형 캐리어 두 개.
    홍대입구역 유인 데스크. 카운터 앞 캐리어들이 물품보관함에 들어가지 않는 크기이고, 줄 폴대는 상시로 세워져 있습니다. 안내가 STORAGE·DELIVERY로 영문 표기되어 있어 찾기 쉽습니다.

    수요는 실제로 많고, 시간대에 따라 편차가 큽니다. 주말과 붐비는 시간대에는 기다림을 예상하세요. 같은 카운터가 평일 오전에는 한산하기도 합니다.

    짐이 보관함에 들어가면 같은 역에서 앱으로 예약하고 곧장 가면 됩니다. 들어가지 않는다면 데스크가 맞는 곳이니, 이른 시간이나 한산한 때를 노리세요.

    2. 네 가지 선택지

    또타라커 — 지하철 무인 보관함, 앱 예약

    서울 지하철 전역의 자동 보관함입니다. 269개 역에 약 5,500칸이라 홍대입구역처럼 붐비는 역에는 여러 개가 있습니다.

    주중 4시간 기준

    크기 규격 4시간 추가 1시간
    50 × 30 × 60 cm 2,200원 500원
    50 × 45 × 60 cm 3,300원 800원
    50 × 90 × 60 cm 4,400원 1,000원

    가장 저렴하고 예약이 됩니다. 또타라커 앱을 설치해 빈 칸을 확인하고 예약한 뒤 곧장 가면 됩니다. 줄이 없습니다.

    단점은 크기입니다. 대형 칸에 큰 캐리어가 들어가지만, 붐비는 날에는 대형부터 찹니다. 가능하면 미리 예약하세요.

    또타러기지 — 유인 보관소

    사람들이 줄 서는 그 카운터입니다. 홍대입구·서울역·명동·김포공항·종로3가·잠실 6개 역에서 운영하며, 매일 09:00~22:00입니다(또타러기지 공식). 홍대입구역 데스크는 지하 1층, 공항철도 연결 통로 쪽에 있습니다.

    주중 4시간 기준, 캐리어 크기로 요금이 갈립니다.

    크기 4시간 추가 1시간
    S (20인치 이하) 3,000원 1,000원
    M (20~23인치) 4,000원 1,000원
    L (23~27인치) 6,000원 1,000원
    XL (27인치 초과) 9,000원 1,000원

    주말은 눈에 띄게 비쌉니다. 같은 4시간이 주말 요금으로는 대략 4,000~13,000원이고, 위 주중 요금보다 30~50% 높습니다. 하필 줄을 만날 가능성이 가장 큰 때가 그때입니다.

    데스크는 배송 서비스도 합니다. 나중에 찾으러 오는 대신 다른 지하철역이나 인천공항으로 보낼 수 있습니다. 출국하는 날 짐을 다시 찾으러 오기 싫다면 이걸 물어보세요.

    보관함보다 비싸지만 실질적인 장점이 있습니다. 보관함 규격에 갇히지 않고, 직원이 있고, 안내문이 영어·중국어·일본어로 제공됩니다(서울특별시).

    캐리어가 크거나 사람에게 맡기고 싶다면 줄 설 값어치가 있습니다. 배낭 하나라면 아닙니다.

    사설 보관소

    역 출구 주변에 개별 업체들이 있습니다. 예를 들어 러기지큐7번 출구에서 도보 1분, 24시간 운영, 시간당 1,000원가량이고 카드 결제가 되며 예약이 필요 없습니다.

    24시간이라는 점이 중요합니다. 지하철 보관함과 유인 데스크는 역 운영시간에 묶여 있습니다. 늦은 비행기나 밤 일정이 있을 때 이쪽이 값을 합니다.

    상점 보관 (럭스테이 등)

    보관함 대신 제휴한 카페·식당·미용실 카운터 뒤에 짐을 둡니다. 앱으로 예약하고 맡기면 됩니다.

    장점은 위치입니다. 역보다 지금 있는 곳에 가까운 데를 찾을 수 있는 경우가 많습니다. 제약은 영업시간입니다. 가게가 저녁 8시에 닫으면 짐도 내일까지 그 안에 있습니다. 예약 전에 확인하세요.

    3. 고르기

    내 상황 선택
    배낭이나 작은 가방, 몇 시간 또타라커 — 가장 싸고 예약 가능
    큰 캐리어, 신경 쓰기 싫음 또타러기지 — 가능하면 한산한 시간대
    보관함에 안 들어가는 대형 또타러기지
    밤늦게 찾아야 함 사설 24시간 보관소
    역이 아니라 홍대 안쪽에 있음 상점 보관 앱 — 마감 시간 확인
    줄 서기 싫고 짐이 보관함에 들어감 도착 전에 또타라커 예약

    4. 가기 전에

    • 짐이 보관함에 들어가면 줄을 피할 수 있습니다. 같은 역의 보관함이 앱 예약을 받습니다
    • 안 들어가면 데스크가 맞습니다 — 대신 평일이나 한산한 시간대를 노리세요
    • 또타라커가 가장 저렴합니다 — 4시간 2,200원부터
    • 대형 칸부터 찹니다. 주말이면 미리 예약하세요
    • 유인 데스크는 비싸지만 보관함 규격 제한이 없고 다국어 안내가 있습니다
    • 사설 보관소는 24시간 — 늦게 찾아야 한다면 사실상 유일한 선택지입니다
    • 상점 보관은 가게가 닫으면 끝입니다. 예약 전 영업시간 확인
    • 위 요금은 주중 4시간 기준입니다. 길어지면 시간당 추가됩니다
    • 유인 데스크는 주말 요금이 30~50% 비쌉니다. 감안하세요
    • 데스크는 짐을 인천공항으로 배송해 줄 수도 있습니다
    • 유인 데스크 운영시간 09:00~22:00, 전국 6개 역

    함께 읽으면 좋은 글

    참고자료 / Sources

  • Eating in Korea with Dietary Restrictions: What “Vegetarian” Usually Isn’t

    This guide is written in two parts. English first, Korean below. 이 글은 두 파트로 되어 있습니다. 영문이 먼저, 한국어가 아래에 있습니다.


    PART 1 — ENGLISH

    You order bibimbap because a bowl of vegetables and rice is obviously vegetarian. The kimchi on top contains fermented shrimp. The soybean stew beside it was built on anchovy stock.

    Nobody misled you. In Korean cooking, seafood is not a topping — it is a flavour base, dissolved into things that look and taste entirely plant-based. That single fact explains most of the trouble visitors have here, and once you understand it the problem becomes manageable.

    This guide covers vegetarian and vegan eating, halal options, and allergies. If getting this wrong has real consequences for you, read the caution at the end.

    1. The thing to understand first

    Three ingredients appear almost invisibly across Korean food:

    • Fish sauce (액젓) and fermented seafood (젓갈)
    • Anchovy stock (멸치육수)
    • Shellfish paste

    They are used the way stock cubes are used elsewhere — as the base layer of savouriness. A dish can contain no visible seafood and still be built on it.

    Dishes that look safe and usually are not:

    Dish Why
    Kimchi Usually contains fermented shrimp or fish sauce. Vegan kimchi exists but is not the default
    Doenjang jjigae (soybean stew) Commonly made with anchovy stock
    Tteokbokki Usually contains fish cakes and anchovy broth
    Banchan (side dishes) Arrive free and unasked. Many contain fish sauce

    Even soy sauce can contain anchovy extract in some brands, which matters if you are strict.

    The banchan point deserves emphasis. They appear without being ordered, which means they arrive without a conversation about ingredients.

    2. Eating vegetarian or vegan

    Say what you cannot eat, not what you are. “저는 채식주의자예요” (I’m a vegetarian) is often heard as “no meat” — fish stock and fish sauce may not register as violations. Naming the ingredients works better:

    고기, 생선, 액젓, 멸치육수 다 빼주세요. No meat, no fish, no fish sauce, no anchovy stock, please.

    Show it on your phone rather than attempting the pronunciation.

    Where it gets easier:

    • Temple food (사찰음식) is the reliable answer. Buddhist temple cuisine excludes meat, fish and fish products by doctrine, not by request. Dedicated restaurants exist in Seoul
    • Buddhist-influenced dishes and dedicated vegan restaurants have grown considerably in Seoul
    • Naver Map searches for 비건 (vegan) or 채식 (vegetarian) will surface local options

    Set expectations: outside dedicated restaurants and temple food, strict vegan eating in Korea takes work. This is a cuisine built on fermented seafood. It is not hostility, it is architecture.

    3. Eating halal

    The situation has improved sharply. Korea Tourism Organization reports Muslim-friendly certified establishments up roughly 150% compared to 2020, driven by more than 1.2 million Muslim visitors a year as of 2026.

    Where to look:

    • Itaewon, around Seoul Central Mosque, is the densest area — KMF-certified Turkish, Pakistani and halal Korean BBQ restaurants sit on the streets around the mosque
    • Dongdaemun has Uzbek and Central Asian halal restaurants serving plov and samsa

    Certification: the Korea Muslim Federation (KMF) certifies halal restaurants and products, and maintains an online directory. Certification levels vary — some places are fully certified, others self-declare as Muslim-friendly or pork-free. Check which one you are looking at rather than assuming.

    Watch for: pork appears widely in Korean cooking, and cooking alcohol (맛술, mirin) is common in marinades and sauces even where no alcohol is served.

    4. Allergies

    This is the section where accuracy matters most, so here is the honest position.

    Korea does have an allergen labelling law. It requires declaration of a defined list including eggs, milk, buckwheat, peanut, soybean, wheat, mackerel, crab, shrimp, pork, peach, tomato, sulfites, walnut, chicken, beef, squid, shellfish and pine nut.

    But note two gaps:

    • The list is not identical to those you may be used to. Almonds and cashews are not on it, though walnuts are
    • The regulation has not been fully implemented for non-prepacked foods — which is most restaurant food. Packaged products are labelled; a bowl of stew is not

    So in practice, restaurant dining depends on communication rather than labels.

    What actually helps:

    • Carry an allergy card written in Korean naming your specific allergens. Show it rather than explaining. This is the single most effective thing you can do
    • Use Papago (Naver’s translator) with camera mode to read packaged labels
    • Ask specifically about sauces and broths — that is where hidden ingredients live, and where staff are least likely to think to mention them
    • Sesame deserves particular attention: sesame oil and seeds are used constantly in Korean cooking, often as a finishing touch that may not be thought of as an ingredient

    If your allergy is severe: treat verbal assurances with caution across any language barrier. Prepacked food with a printed label is more reliable than a restaurant conversation. Know where the nearest hospital is, and carry your medication.

    5. Practical summary

    • Korean food uses seafood as a flavour base, not just a topping — this is the root of most problems
    • Name the ingredients you avoid, do not name your diet
    • Kimchi, doenjang jjigae, tteokbokki and free banchan are the usual traps
    • Temple food (사찰음식) is the most reliable vegetarian option
    • Halal: Itaewon mosque area and Dongdaemun; check KMF certification level
    • Watch for cooking alcohol in marinades even at pork-free places
    • Allergies: carry a Korean-language allergy card; restaurant food is largely unlabelled
    • Almonds and cashews are not on Korea’s mandatory allergen list
    • Sesame is everywhere and often unremarked

    A note on this article. Ingredients vary by restaurant, and recipes change. Nothing here replaces asking at the specific place you are eating. If your restriction is medical rather than dietary, treat this as orientation, not assurance.


    PART 2 — 한국어

    비빔밥을 시킵니다. 채소와 밥이니 당연히 채식이라고 생각하면서요. 위에 얹힌 김치에는 젓갈이 들어 있습니다. 옆에 나온 된장찌개는 멸치육수로 끓였습니다.

    누가 속인 게 아닙니다. 한국 음식에서 해산물은 고명이 아니라 맛의 기반입니다. 완전히 식물성으로 보이고 그런 맛이 나는 음식에 녹아 있습니다. 이 사실 하나가 외국인이 겪는 어려움의 대부분을 설명하고, 이걸 이해하면 문제가 다룰 만해집니다.

    채식, 할랄, 알레르기를 차례로 다룹니다. 이게 틀렸을 때 실제로 위험한 상황이라면 마지막의 주의사항을 꼭 읽어주세요.

    1. 먼저 이해할 것

    세 가지 재료가 한국 음식 전반에 거의 보이지 않게 들어갑니다.

    • 액젓젓갈
    • 멸치육수
    • 새우젓 등 조개류 페이스트

    다른 나라에서 육수 큐브를 쓰듯 감칠맛의 바탕으로 씁니다. 눈에 보이는 해산물이 하나도 없어도 그 위에 지어진 음식일 수 있습니다.

    안전해 보이지만 대개 아닌 음식

    음식 이유
    김치 대개 젓갈이나 액젓이 들어갑니다. 비건 김치가 있지만 기본값은 아닙니다
    된장찌개 멸치육수로 끓이는 경우가 흔합니다
    떡볶이 대개 어묵과 멸치육수가 들어갑니다
    반찬 주문하지 않아도 나옵니다. 액젓이 들어간 것이 많습니다

    간장조차 일부 제품에는 멸치 추출물이 들어갑니다. 엄격하게 지킨다면 중요한 지점입니다.

    반찬은 특히 강조할 만합니다. 주문하지 않았는데 나온다는 건, 재료에 대한 대화 없이 도착한다는 뜻이니까요.

    2. 채식·비건으로 먹기

    자신이 무엇인지 말고, 못 먹는 것을 말하세요. “저는 채식주의자예요”는 흔히 “고기를 안 먹는다”로 들립니다. 생선 육수나 액젓은 위반으로 인식되지 않을 수 있습니다. 재료를 직접 말하는 편이 통합니다.

    고기, 생선, 액젓, 멸치육수 다 빼주세요.

    발음을 시도하기보다 휴대폰 화면으로 보여주세요.

    수월해지는 곳

    • 사찰음식이 가장 확실한 답입니다. 요청이 아니라 원칙으로 고기·생선·어패류를 배제합니다. 서울에 전문점이 있습니다
    • 비건 전문 식당이 서울에 상당히 늘었습니다
    • 네이버지도에서 비건 또는 채식으로 검색하면 주변 선택지가 나옵니다

    기대치를 맞춰두면: 전문점과 사찰음식을 벗어나면 엄격한 비건 식사는 품이 듭니다. 발효 해산물 위에 지어진 요리 체계라서 그렇습니다. 배타적이어서가 아니라 구조가 그렇습니다.

    3. 할랄로 먹기

    상황이 빠르게 나아졌습니다. 한국관광공사에 따르면 무슬림 친화 인증 업소가 2020년 대비 약 150% 증가했습니다. 2026년 기준 연간 120만 명이 넘는 무슬림 방문객이 배경입니다.

    찾을 곳

    • 이태원 서울중앙성원 주변이 가장 밀집돼 있습니다. KMF 인증 터키·파키스탄 식당과 할랄 한식 바비큐가 모스크 주변 거리에 있습니다
    • 동대문에는 우즈베크·중앙아시아 할랄 식당이 있어 플롭과 삼사를 냅니다

    인증에 대해: 한국이슬람교중앙회(KMF)가 할랄 식당과 제품을 인증하고 온라인 목록을 운영합니다. 인증 수준이 갈립니다 — 완전 인증인 곳이 있고, 무슬림 친화 또는 돼지고기 미사용을 자체 표방하는 곳이 있습니다. 어느 쪽인지 확인하고 가세요.

    주의할 것: 돼지고기가 한국 요리 전반에 쓰이고, 맛술(미림) 같은 조리용 알코올이 양념과 소스에 흔합니다. 술을 팔지 않는 곳에서도 그렇습니다.

    4. 알레르기

    정확도가 가장 중요한 대목이라 있는 그대로 씁니다.

    한국에도 알레르기 유발물질 표시 제도가 있습니다. 알류, 우유, 메밀, 땅콩, 대두, 밀, 고등어, 게, 새우, 돼지고기, 복숭아, 토마토, 아황산류, 호두, 닭고기, 쇠고기, 오징어, 조개류, 잣이 포함된 목록을 표시하도록 규정합니다.

    다만 두 가지 빈틈이 있습니다.

    • 목록이 당신에게 익숙한 것과 다릅니다. 아몬드와 캐슈넛은 포함돼 있지 않습니다. 호두는 포함됩니다
    • 비포장 식품에는 규정이 완전히 적용되지 않았습니다. 식당 음식 대부분이 여기 해당합니다. 포장 제품에는 표시가 있지만 끓여 나온 찌개에는 없습니다

    그래서 실제로 식당에서는 표시가 아니라 대화에 의존해야 합니다.

    실제로 도움이 되는 것

    • 한국어로 쓴 알레르기 카드를 지참하세요. 설명하지 말고 보여주세요. 할 수 있는 것 중 가장 효과적입니다
    • 파파고 카메라 번역으로 포장 표시를 읽으세요
    • 소스와 육수를 특정해서 물어보세요. 숨은 재료가 사는 곳이고, 직원이 먼저 언급할 생각을 가장 안 하는 부분입니다
    • 참깨는 따로 주의할 만합니다. 참기름과 깨는 한국 요리에 끊임없이 쓰이고, 마무리로 뿌리는 것이라 ‘재료’로 인식되지 않는 경우가 많습니다

    중증 알레르기라면: 언어가 다른 상황에서 구두 확인은 조심스럽게 받아들이세요. 표시가 인쇄된 포장 식품이 식당 대화보다 신뢰할 만합니다. 가까운 병원 위치를 알아두고 약을 지참하세요.

    5. 정리

    • 한국 음식은 해산물을 맛의 기반으로 씁니다. 고명이 아닙니다 — 문제의 뿌리가 여기입니다
    • 피하는 재료를 말하세요. 식습관의 이름을 말하지 말고
    • 김치·된장찌개·떡볶이·기본 반찬이 흔한 함정입니다
    • 사찰음식이 가장 확실한 채식 선택지입니다
    • 할랄: 이태원 모스크 주변동대문. KMF 인증 수준을 확인하세요
    • 돼지고기를 안 쓰는 곳에서도 조리용 알코올이 들어갈 수 있습니다
    • 알레르기: 한국어 알레르기 카드를 지참하세요. 식당 음식은 대체로 표시가 없습니다
    • 아몬드와 캐슈넛은 한국의 의무 표시 대상이 아닙니다
    • 참깨는 어디에나 있고 언급되지 않는 경우가 많습니다

    이 글에 대해. 재료는 식당마다 다르고 조리법도 바뀝니다. 여기 쓴 내용이 실제로 먹는 그 가게에 물어보는 것을 대신하지 못합니다. 식습관이 아니라 의학적 제약이라면, 이 글을 확답이 아니라 방향 안내로 받아들여 주세요.


    함께 읽으면 좋은 글

    참고자료 / Sources

  • Seoul Transit Cards: T-money, Climate Card, WOWPASS, NAMANE — Which One

    This guide is written in two parts. English first, Korean below. 이 글은 두 파트로 되어 있습니다. 영문이 먼저, 한국어가 아래에 있습니다.


    PART 1 — ENGLISH

    Most guides tell you to buy a T-money card and stop there. That was good advice five years ago. Now there are four realistic options, they do different things, and picking the wrong one costs you money or leaves you stranded at a gate.

    Here is what each actually is, and how to choose in about a minute.

    1. The four, in one table

    What it is Best for
    T-money Pay-as-you-go transit card Almost everyone. The safe default
    Climate Card (기후동행카드) Unlimited-ride pass, Seoul only Heavy riders staying inside Seoul
    WOWPASS Prepaid card + currency exchange, for foreigners Arriving with foreign cash
    NAMANE Prepaid card, app top-up, for foreigners Topping up from your phone

    WOWPASS and NAMANE also work as transit cards, so they are not either/or with T-money — they replace it.

    2. T-money — the default, and usually right

    Buy it at any convenience store, load cash, tap on and off. It works on subway, bus, and taxis across the country, and as a payment card in convenience stores.

    Choose it if you are staying under a week, moving at a normal pace, or travelling beyond Seoul. It is boring and it always works.

    The only real downside is that you pay per ride.

    3. Climate Card — powerful, but read the boundaries

    Seoul’s unlimited-ride pass. Thirty days costs ₩62,000, or ₩55,000 for ages 13–39. There are also short-term passes of 1–7 days for ₩5,000–20,000, which is the version that actually fits a trip (Seoul Metropolitan Government).

    What it covers: Seoul subway plus some Gyeonggi sections, Seoul-licensed city and village buses, Ttareungi public bikes, and the Hangang bus.

    What it does not cover: Shinbundang Line, GTX, subway outside Seoul, express and airport buses, and buses licensed to other regions.

    Two boundary rules matter more than the price:

    • Board inside the zone, alight outside it, and the card does not apply — you are charged separately at the gate. This catches people going to Suwon, Incheon or anywhere past the boundary.
    • Exception: alighting at Incheon Airport Terminal 1 or 2 on the airport railroad is allowed, as is the Line 7 Seokman–Kkachiul section.

    That exception is genuinely useful — it means you can ride out to the airport on the pass — but do not generalise it. Everything else outside Seoul is chargeable.

    And crossing the boundary costs more than money. When you alight outside the zone, the tap-out does not register. You settle the fare with a station attendant — but the system records a missed tap-out. Accumulate two missed tap-outs and the card is suspended for 24 hours (Seoul Metropolitan Government).

    So two trips past the boundary can freeze your pass for a day, even though you paid the difference both times.

    Know where your line stops. The boundary is not the Seoul city limit — it varies by line. On the Gyeongui-Jungang Line, for example, coverage runs from Korea Aerospace University to Tanhyeon (ten stations: Korea Aerospace University, Gangmae, Haengsin, Neunggok, Daegok, Goksan, Baengma, Pungsan, Ilsan, Tanhyeon). Continue toward Geumchon or Munsan and you are outside it.

    Seoul runs a coverage lookup — check your line before you rely on the pass.

    One restriction specific to visitors: foreigners can use the physical card only. The mobile version is not available to you.

    Choose it if you are staying in Seoul, riding a lot, and your trip length matches a short-term pass. Otherwise T-money is cheaper.

    And if you buy one, read our tap-out guide first. Missing the tap-out twice suspends the card for 24 hours — a penalty that does not exist on a normal card.

    4. WOWPASS — for arriving with cash

    A prepaid card aimed at foreign visitors, with one distinctive feature: you feed foreign banknotes into a machine and it converts and loads them in won, with no separate exchange fee. Kiosks sit in airports and major stations.

    It doubles as a transit card and a payment card.

    Choose it if you are bringing cash and would otherwise queue at an exchange counter. The convenience is real.

    Be aware the kiosks are concentrated in central locations. If you run low somewhere without one, you need to get to one.

    5. NAMANE — for topping up from your phone

    Also a prepaid card for foreigners, but it takes a different approach to loading. You cannot insert foreign banknotes. You top up with Korean cash at CU convenience stores or station machines, or by credit card through the app.

    Choose it if you would rather top up from your phone wherever you are than find a specific kiosk.

    The trade-off is the mirror image of WOWPASS: more flexible topping up, no built-in currency exchange.

    6. Choosing in one minute

    Your trip Take
    Under a week, normal pace T-money
    Staying in Seoul, riding constantly, 1–7 days Climate Card short-term pass
    Travelling outside Seoul at all T-money — the Climate Card stops at the boundary
    Arriving with foreign cash to change WOWPASS
    Want to top up from your phone anywhere NAMANE
    Not sure T-money. It is never the wrong answer, only sometimes not the cheapest

    7. Before you buy

    • T-money is the safe default. The others are optimisations, not upgrades
    • Climate Card has 1–7 day passes — do not assume it is only the ₩62,000 monthly
    • Climate Card stops at the Seoul boundary. Going to Suwon or Incheon? You pay separately
    • Exception: riding to Incheon Airport Terminal 1 or 2 is covered
    • Crossing the boundary registers a missed tap-out — two of those suspend the card for 24 hours
    • Check your line’s boundary. Gyeongui-Jungang, for instance, covers only as far as Tanhyeon
    • Foreigners can use the Climate Card as a physical card only
    • Climate Card penalises missed tap-outs with a 24-hour suspension — see the tap-out guide
    • WOWPASS converts foreign cash at a kiosk; NAMANE tops up via app. Pick by how you will add money

    PART 2 — 한국어

    대부분의 가이드는 “T-money를 사세요”라고 하고 끝냅니다. 5년 전이면 맞는 조언이었습니다. 지금은 현실적인 선택지가 넷이고, 하는 일이 서로 다르며, 잘못 고르면 돈을 더 쓰거나 개찰구 앞에서 막힙니다.

    각각이 실제로 무엇인지, 그리고 1분 안에 고르는 법을 정리했습니다.

    1. 네 가지를 한 표로

    무엇인가 이런 사람에게
    T-money 충전식 교통카드 거의 모든 사람. 무난한 기본값
    기후동행카드 무제한 정기권, 서울 한정 서울 안에서 많이 타는 사람
    WOWPASS 외국인용 선불카드 + 환전 외화 현금을 들고 온 사람
    NAMANE 외국인용 선불카드, 앱 충전 폰으로 충전하고 싶은 사람

    WOWPASS와 NAMANE도 교통카드 기능이 있어서, T-money와 둘 다 살 필요는 없습니다. 대체하는 관계입니다.

    2. T-money — 기본값이고, 대개 정답입니다

    편의점 어디서나 사고, 현금을 충전하고, 타고 내릴 때 대면 됩니다. 전국의 지하철·버스·택시에서 쓰이고 편의점 결제도 됩니다.

    이런 경우 선택하세요: 일주일 미만 체류, 평범한 이동량, 또는 서울 밖으로 나가는 일정. 지루하지만 언제나 작동합니다.

    유일한 단점은 탈 때마다 요금을 낸다는 것입니다.

    3. 기후동행카드 — 강력하지만 경계선을 읽어야 합니다

    서울의 무제한 정기권입니다. 30일권이 62,000원, 만 13~39세는 55,000원입니다. 그리고 1~7일 단기권이 5,000~20,000원으로 따로 있는데, 여행에 실제로 맞는 건 이쪽입니다(서울특별시).

    포함되는 것: 서울지역 지하철과 일부 경기도 구간, 서울시 면허 시내·마을버스, 따릉이, 한강버스.

    제외되는 것: 신분당선, GTX, 서울지역 외 지하철, 광역·공항버스, 타 지역 면허버스.

    가격보다 중요한 경계 규칙이 둘 있습니다.

    • 범위 안에서 타고 범위 밖에서 내리면 적용되지 않습니다. 개찰구에서 별도 요금이 부과됩니다. 수원이나 인천처럼 경계를 넘는 경우가 여기 걸립니다.
    • 예외: 공항철도 인천공항 1·2터미널 하차는 가능합니다. 7호선 석남~까치울 구간도 마찬가지입니다.

    이 예외는 실제로 유용합니다 — 정기권으로 공항까지 갈 수 있다는 뜻이니까요. 다만 일반화하지 마세요. 그 외 서울 밖은 모두 별도 요금입니다.

    그리고 경계를 넘으면 돈보다 큰 대가가 있습니다. 범위 밖에서 내리면 하차 태그가 되지 않습니다. 역무원을 통해 차액을 정산하게 되는데, 시스템에는 하차 미태그로 기록됩니다. 미태그가 2회 누적되면 카드가 24시간 정지됩니다(서울특별시).

    즉 경계를 넘는 이동을 두 번 하면, 두 번 다 차액을 냈는데도 카드가 하루 멈출 수 있습니다.

    자기 노선의 경계를 알아두세요. 경계는 서울시 행정구역과 다르고 노선마다 다릅니다. 예를 들어 경의중앙선한국항공대역부터 탄현역까지 열 개 역이 범위입니다(한국항공대·강매·행신·능곡·대곡·곡산·백마·풍산·일산·탄현). 금촌이나 문산 방향으로 더 가면 범위 밖입니다.

    서울시가 사용범위 조회를 운영하니, 정기권에 의존하기 전에 자기 노선을 확인하세요.

    방문자에게만 해당하는 제한이 하나 있습니다. 외국인은 실물카드만 사용할 수 있습니다. 모바일 버전은 이용할 수 없습니다.

    이런 경우 선택하세요: 서울 안에 머물고, 많이 타고, 여행 기간이 단기권과 맞을 때. 그 외에는 T-money가 저렴합니다.

    그리고 산다면 하차 태그 안내를 먼저 읽으세요. 하차 태그를 두 번 놓치면 카드가 24시간 정지됩니다. 일반 카드에는 없는 제재입니다.

    4. WOWPASS — 현금을 들고 왔다면

    외국인 방문자를 겨냥한 선불카드이고, 특징이 하나 뚜렷합니다. 외화 지폐를 기계에 넣으면 원화로 환전되어 충전됩니다. 별도 환전 수수료가 없습니다. 키오스크는 공항과 주요 역에 있습니다.

    교통카드와 결제카드 역할을 겸합니다.

    이런 경우 선택하세요: 현금을 들고 왔고, 아니었으면 환전소에 줄을 섰을 상황. 편의가 실질적입니다.

    알아둘 점: 키오스크가 중심지에 몰려 있습니다. 없는 지역에서 잔액이 떨어지면 있는 곳까지 가야 합니다.

    5. NAMANE — 폰으로 충전하고 싶다면

    역시 외국인용 선불카드인데 충전 방식이 다릅니다. 외화 지폐는 넣을 수 없습니다. CU 편의점이나 역 충전기에서 원화 현금을 넣거나, 앱에서 신용카드로 충전합니다.

    이런 경우 선택하세요: 특정 키오스크를 찾아다니기보다 어디서든 폰으로 충전하고 싶을 때.

    WOWPASS와 정확히 반대의 교환 관계입니다. 충전은 자유롭고, 환전 기능은 없습니다.

    6. 1분 만에 고르기

    여행 형태 선택
    일주일 미만, 평범한 이동량 T-money
    서울 안에서 계속 타고, 1~7일 기후동행카드 단기권
    서울 밖으로 나가는 일정이 있음 T-money — 기후동행카드는 경계에서 멈춥니다
    환전할 외화 현금이 있음 WOWPASS
    어디서든 폰으로 충전하고 싶음 NAMANE
    모르겠음 T-money. 틀린 답이 되는 일은 없고, 가끔 가장 싸지 않을 뿐입니다

    7. 사기 전에

    • T-money가 안전한 기본값입니다. 나머지는 업그레이드가 아니라 최적화입니다
    • 기후동행카드에는 1~7일 단기권이 있습니다. 62,000원 월권만 있는 게 아닙니다
    • 기후동행카드는 서울 경계에서 멈춥니다. 수원이나 인천에 간다면 별도 요금입니다
    • 예외: 인천공항 1·2터미널 하차는 포함됩니다
    • 경계를 넘으면 하차 미태그로 기록됩니다. 2회 누적 시 24시간 정지
    • 자기 노선의 경계를 확인하세요. 경의중앙선은 탄현역까지입니다
    • 외국인은 기후동행카드를 실물카드로만 쓸 수 있습니다
    • 기후동행카드는 하차 미태그 시 24시간 정지 제재가 있습니다 — 하차 태그 안내 참고
    • WOWPASS는 키오스크에서 외화 환전, NAMANE은 앱 충전. 돈을 어떻게 넣을지로 고르세요

    함께 읽으면 좋은 글

    참고자료 / Sources

  • Why Korean Apps Reject You: The Identity Verification Wall, Explained

    This guide is written in two parts. English first, Korean below. 이 글은 두 파트로 되어 있습니다. 영문이 먼저, 한국어가 아래에 있습니다.


    PART 1 — ENGLISH

    You downloaded a Korean delivery app. You entered your phone number. It asked for a six-digit code, you got it, you typed it in — and it still refused you.

    Nothing you did was wrong. The system was never going to let you through, and it is worth understanding why, because that tells you which apps are worth trying and which are a waste of your evening.

    A note on sources: unlike tax rules, this area has almost no official English documentation. What follows separates [confirmed] — stated in official service documentation — from [reported] — consistent across user accounts but not officially confirmed. Things also change here faster than elsewhere.

    1. What the system is actually checking

    Korean identity verification does not simply check that you own a phone. It checks three things at once [reported]:

    1. Is this number registered to a real-name subscriber account?
    2. Does the name on that account match the ID document given to the carrier?
    3. Does the subscriber record contain a Korean resident registration number or an Alien Registration Number?

    The third check is where foreigners stop.

    Korean nationals have their registration number linked automatically through national ID systems. There is nothing to set up. For a foreigner, that link has to exist in the carrier’s database — and it usually does not.

    2. Why buying a SIM does not fix it

    This is the part that surprises people who did everything properly.

    When you buy a SIM with a passport, carriers record you as a passport-registered subscriber. That is enough to make calls and use data. It is not enough for identity verification, because the system wants a finalised identity record tied to a registration number, and a passport alone does not provide one [reported].

    Tourist SIMs are worse. Many are registered under the retailer’s own account rather than yours, or are issued without linking any individual’s ID to the subscriber record at all. If your SIM is one of these, there is no path to verification — not a difficult path, none.

    And if you have an ARC, it still may not work. Receiving your Alien Registration Card does not update your carrier’s database. Their system keeps showing the provisional passport registration until you physically visit a carrier store and have the record updated [reported]. Long-term residents often hit a wall of failures across banking, messaging and government services without realising this one visit is the fix.

    3. So what actually works

    Short answer: skip the apps built on that assumption, and use the ones that were built without it.

    Shuttle is made for foreigners and requires no Korean identity verification. English interface, English support [confirmed]. If you want food delivered and do not want a fight, start here.

    Baemin (배달의민족) has opened up considerably. It accepts overseas-issued cards (Visa, Mastercard and others) and global payment methods including WeChat Pay and Alipay+. Apple Pay with overseas cards was added in June 2026 [confirmed]. Guest ordering and overseas-number SMS verification are also reported to work in some cases [reported].

    Coupang Eats accepts overseas cards and has an in-app language switch to English [confirmed]. Verification requirements vary, so treat it as worth trying rather than guaranteed.

    A useful pattern: delivery and retail apps are generally more flexible than banking apps and government portals [reported]. The stricter the service, the harder the wall. Do not judge all Korean apps by your experience with a bank app.

    4. What to expect by situation

    You are Realistic outcome
    Tourist with a tourist SIM Identity verification will not work. Use Shuttle, or apps accepting overseas cards
    Tourist with an eSIM or roaming Same. The number is not tied to a Korean identity record
    Resident with an ARC, no carrier visit Verification keeps failing. Visit your carrier store and have them update the record
    Resident with ARC, record updated Most services should work normally

    If you are staying long term, that carrier visit is worth doing early. It unblocks banking, KakaoTalk verification, and government services in one step.

    5. Before you waste an evening

    • The wall is not language — it is a missing link between your phone number and a Korean identity record
    • A tourist SIM has no path to verification. This is not something you can work around from inside the app
    • Try Shuttle first if you want delivery without the fight
    • Baemin and Coupang Eats accept overseas cards — payment is often the easier route than verification
    • Payment success varies by app, timing and card issuer. If one card is declined, try another before giving up
    • Have an ARC and still failing? Visit the carrier store in person. The card alone does not update their database
    • Do not judge every Korean app by a banking app — delivery and retail are far more open

    PART 2 — 한국어

    한국 배달앱을 받았습니다. 전화번호를 넣었습니다. 여섯 자리 인증번호를 요구하길래 받아서 입력했는데도 거부당했습니다.

    잘못한 게 없습니다. 애초에 통과할 수 없는 구조였습니다. 그 이유를 알아두면 어떤 앱은 시도할 값어치가 있고 어떤 앱은 저녁 시간만 버리는지 판단할 수 있습니다.

    출처에 대해: 세금 규정과 달리 이 영역은 공식 영문 문서가 거의 없습니다. 아래에서는 [확인] — 공식 서비스 안내에 명시된 것 — 과 [보고됨] — 이용자 후기에서 일관되게 나타나지만 공식 확인이 안 된 것 — 을 구분했습니다. 이 영역은 다른 주제보다 변화도 빠릅니다.

    1. 시스템이 실제로 확인하는 것

    한국의 본인인증은 단순히 “이 번호가 당신 것인가”를 묻지 않습니다. 세 가지를 동시에 봅니다 [보고됨].

    1. 이 번호가 실명 가입자 계정에 등록돼 있는가
    2. 그 계정의 이름이 통신사에 제출한 신분증과 일치하는가
    3. 가입자 기록에 주민등록번호 또는 외국인등록번호가 들어 있는가

    외국인이 막히는 지점은 세 번째입니다.

    한국인은 주민등록번호가 국가 신원 체계를 통해 자동으로 연결됩니다. 따로 할 일이 없습니다. 외국인은 그 연결이 통신사 데이터베이스 안에 존재해야 하는데, 대개 존재하지 않습니다.

    2. 유심을 사도 해결되지 않는 이유

    제대로 절차를 밟은 사람들이 여기서 당황합니다.

    여권으로 유심을 사면 통신사는 여권 등록 가입자로 기록합니다. 통화와 데이터를 쓰기에는 충분합니다. 하지만 본인인증에는 부족합니다. 시스템은 등록번호에 묶인 확정된 신원 기록을 요구하는데, 여권만으로는 그게 만들어지지 않기 때문입니다 [보고됨].

    관광객용 유심은 더 심합니다. 상당수가 판매점 자체 계정으로 등록돼 있거나, 개인의 신분증을 가입자 기록에 아예 연결하지 않고 발급됩니다. 이런 유심이라면 인증 경로가 어렵다는 게 아니라 아예 없습니다.

    외국인등록증이 있어도 안 될 수 있습니다. 등록증을 받았다고 통신사 데이터베이스가 자동으로 갱신되지 않습니다. 직접 통신사 매장에 방문해 기록을 갱신하기 전까지는 여전히 임시 여권 등록 상태로 남아 있습니다 [보고됨]. 장기 체류자가 은행·메신저·정부 서비스에서 줄줄이 막히면서도 매장 방문 한 번이 해법인 줄 모르는 경우가 많습니다.

    3. 그래서 뭐가 되나

    짧게 답하면 그 전제 위에 만들어진 앱은 건너뛰고, 그 전제 없이 만들어진 앱을 쓰세요.

    Shuttle은 외국인을 위해 만들어진 서비스라 한국 본인인증이 필요 없습니다. 영어 인터페이스와 영어 고객지원을 제공합니다 [확인]. 배달을 시키고 싶고 씨름하기 싫다면 여기서 시작하세요.

    배달의민족은 상당히 열렸습니다. 해외 발급 카드(비자·마스터카드 등)와 위챗페이·알리페이+ 같은 글로벌 결제를 지원하고, 2026년 6월부터 해외 카드 애플페이도 추가됐습니다 [확인]. 게스트 주문이나 해외 번호 SMS 인증이 되는 경우도 보고됩니다 [보고됨].

    쿠팡이츠도 해외 카드를 받고 앱 안에서 영어로 전환할 수 있습니다 [확인]. 인증 요구사항은 경우에 따라 달라서, 보장된 방법이라기보다 시도해볼 값어치가 있는 쪽으로 보세요.

    알아두면 유용한 패턴이 하나 있습니다. 배달·유통 앱은 은행 앱이나 정부 포털보다 훨씬 유연합니다 [보고됨]. 엄격한 서비스일수록 벽이 높습니다. 은행 앱에서 겪은 일로 한국 앱 전체를 판단하지 마세요.

    4. 상황별로 예상되는 결과

    당신의 상황 현실적인 결과
    관광객 + 관광용 유심 본인인증이 되지 않습니다. Shuttle이나 해외 카드를 받는 앱을 쓰세요
    관광객 + eSIM·로밍 마찬가지입니다. 번호가 한국 신원 기록에 묶여 있지 않습니다
    외국인등록증 보유, 통신사 미방문 계속 실패합니다. 통신사 매장을 방문해 기록을 갱신하세요
    외국인등록증 보유, 기록 갱신 완료 대부분의 서비스가 정상 작동합니다

    장기 체류라면 그 매장 방문을 일찍 해두는 게 좋습니다. 은행, 카카오톡 인증, 정부 서비스가 한 번에 풀립니다.

    5. 저녁 시간을 버리기 전에

    • 이 벽은 언어 문제가 아닙니다. 전화번호와 한국 신원 기록 사이의 연결이 없는 것입니다
    • 관광용 유심에는 인증 경로가 없습니다. 앱 안에서 우회할 수 있는 종류의 문제가 아닙니다
    • 씨름 없이 배달을 원하면 Shuttle부터 써보세요
    • 배달의민족과 쿠팡이츠는 해외 카드를 받습니다. 인증보다 결제 쪽이 뚫기 쉬운 경우가 많습니다
    • 결제 성공 여부는 앱·시점·카드사에 따라 다릅니다. 한 카드가 거절되면 포기 전에 다른 카드를 시도해 보세요
    • 외국인등록증이 있는데도 안 된다면 통신사 매장에 직접 방문하세요. 카드만으로는 데이터베이스가 갱신되지 않습니다
    • 은행 앱 하나로 한국 앱 전체를 판단하지 마세요. 배달·유통은 훨씬 개방적입니다

    함께 읽으면 좋은 글

    참고자료 / Sources

    이 주제는 공식 영문 문서가 거의 없어, 위 두 곳을 포함한 여러 이용자 안내를 교차 확인해 정리했습니다. 공식 확인이 된 항목과 그렇지 않은 항목을 본문에 표시했습니다.

  • Incheon and Gimpo to Central Seoul: Which Option, and What If You Land at 1am

    This guide is written in two parts. English first, Korean below. 이 글은 두 파트로 되어 있습니다. 영문이 먼저, 한국어가 아래에 있습니다.


    PART 1 — ENGLISH

    Most guides tell you the airport train takes 40 minutes and costs ₩9,500, then stop.

    That is fine if you land at 2pm with a carry-on. It is useless if you land at 1am, or with two large suitcases, or heading somewhere the train does not go.

    Here is the decision as it actually presents itself, including the gap between the last train and the first one — the part nobody covers.

    1. From Incheon: the three options

    Time Fare Arrives at
    AREX Express ~40 min ₩9,500 Seoul Station only, non-stop
    AREX All-stop ~60 min ₩4,150–4,750 Seoul Station, stopping en route
    Airport bus 60–80 min ₩5,000–15,000 Neighbourhoods across Seoul
    Taxi 60–100 min ₩47,000–55,000 + toll Door to door

    Figures from Seoul’s official tourism site.

    The train ends at Seoul Station. If your hotel is near there or on subway lines 1 or 4, this is the obvious choice. The express is non-stop; the all-stop version is half the price and twenty minutes slower.

    The bus goes where the train does not — Gangnam, Jamsil, Myeongdong, Sinchon and many other districts, dropping you closer to your hotel. Slower and traffic-dependent, but often no subway transfer at the other end. Pay by cash, T-money card, or credit card.

    Taxis run ₩47,000–55,000 to central areas, plus a ₩7,900 expressway toll that catches people out. Four types serve the airport: standard, International (20% premium, English-speaking driver), Deluxe (40–50% more), and Jumbo vans for up to 8 people.

    2. Which one, honestly

    • Hotel near Seoul Station, light luggage → AREX express
    • Watching the budget, not in a hurry → AREX all-stop, half the price
    • Hotel in Gangnam, Jamsil, Myeongdong, Sinchon → airport bus, likely no transfer
    • Two or more large suitcases → airport bus or taxi. Dragging cases through Seoul Station transfers is worse than it sounds
    • Three or more people → taxi becomes competitive. Split four ways, ₩50,000 is close to four bus fares
    • Arriving between midnight and 4am → see below
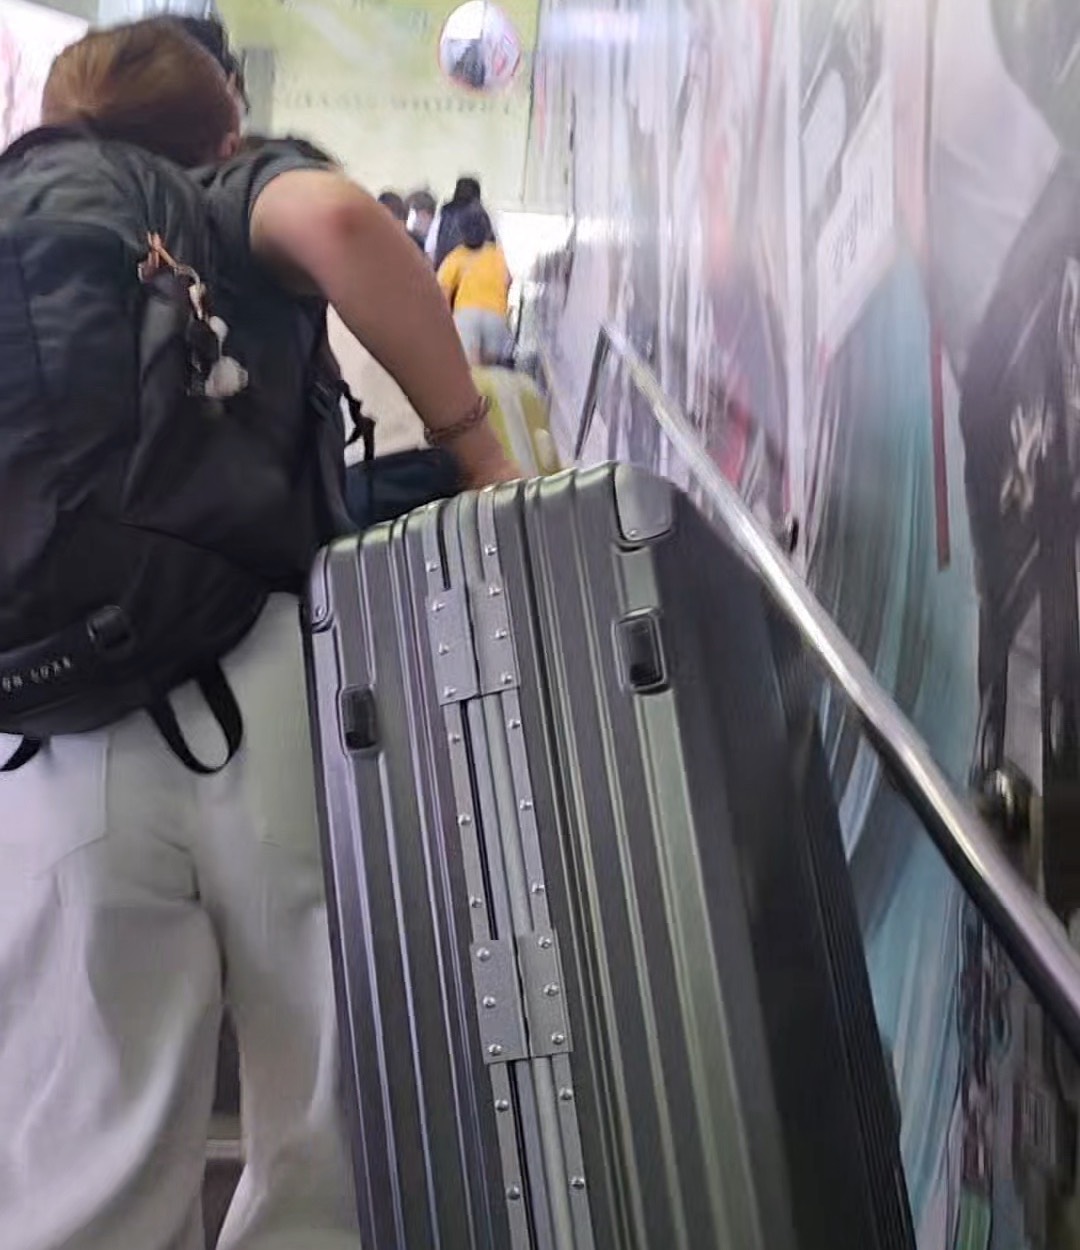
    A traveller with a backpack hauling a large hard-shell suitcase up a flight of stairs in a Seoul subway station, seen from behind.
    This is what “worse than it sounds” looks like. Transfers involve stairs, and stairs with two large cases is the part that turns a cheap route into a bad hour.

    One thing to keep straight: an airport bus is not a city bus. Airport buses have under-floor luggage holds and are built for exactly this. Ordinary Seoul city buses cap carry-on at 50 × 40 × 20 cm, which a checked-size suitcase exceeds — a driver may refuse to let you board. Once you are in the city, move a large case by subway or taxi, not by local bus. More on that in taking luggage on Seoul transport.

    3. Landing late: the gap nobody mentions

    Regular airport buses run roughly 04:00–06:00 first departure to 22:00–23:00 last. The train stops too. So if you land at 1am, the standard advice does not apply.

    Incheon runs night buses for exactly this window (Incheon International Airport):

    Route To From airport Fare (adult)
    N6000 Gangnam Express Bus Terminal 00:10–04:20 ₩17,000
    N6002 Cheongnyangni 00:00–04:40 ₩18,000
    N6701 Dongdaemun Design Plaza 23:50–04:40 ₩18,000
    N6703 Gwangnaru Station 23:40–04:50 varies by stop

    Boarding points at Terminal 1: stop 6A for N6000 and N6002, stop 3B for N6701 and N6703.

    Two things worth knowing. Night fares are roughly double the daytime bus — ₩17,000–18,000 against ₩5,000–15,000. And they drop you at a transport hub, not your door; at 3am the subway is closed, so budget for a short taxi at the other end.

    If your arrival falls in the narrow window when even night buses have stopped, a taxi is the only option, and the meter runs higher at night.

    4. From Gimpo: easier, and often overlooked

    Gimpo is much closer to the city, and its station is a hub on five lines: Subway 5, Subway 9, AREX, Gimpo Gold Line, and the Seohae Line.

    That means you can usually reach your destination with one transfer or none, and the fare is ordinary subway pricing rather than an airport premium. Seoul Station is about 22 minutes away by rail.

    If you have a choice of airports when booking, Gimpo saves both time and money on the transfer into the city.

    One caution: moving between Gimpo’s domestic and international terminals takes about 20 minutes. Factor that in if you are connecting.

    5. Before you land

    • Check where your hotel actually is — near Seoul Station favours the train, elsewhere often favours the bus
    • AREX all-stop is half the price of the express for twenty extra minutes
    • Taxi fares exclude the ₩7,900 expressway toll
    • Landing after midnight? Night buses N6000/N6002/N6701/N6703 run until roughly 04:40, at about double the daytime fare
    • Night bus stops at Terminal 1: 6A and 3B
    • Heavy luggage or three-plus people shifts the maths toward bus or taxi
    • Flying into Gimpo instead? Five subway lines, roughly 22 minutes to Seoul Station

    PART 2 — 한국어

    대부분의 가이드는 공항철도가 40분에 9,500원이라고 알려주고 끝납니다.

    오후 2시에 기내용 가방 하나로 도착한다면 그걸로 충분합니다. 하지만 새벽 1시에 내렸거나, 대형 캐리어가 두 개거나, 열차가 가지 않는 동네로 간다면 아무 도움이 안 됩니다.

    실제로 부딪히는 선택지를 정리했습니다. 막차와 첫차 사이의 공백 — 아무도 다루지 않는 그 구간까지요.

    1. 인천공항에서 — 세 가지 선택지

    소요시간 요금 도착지
    공항철도 직통 약 40분 9,500원 서울역 무정차
    공항철도 일반 약 60분 4,150~4,750원 서울역, 중간 정차
    공항버스 60~80분 5,000~15,000원 서울 각 지역
    택시 60~100분 47,000~55,000원 + 통행료 목적지 앞까지

    수치는 서울 공식 관광정보 기준입니다.

    공항철도는 서울역에서 끝납니다. 숙소가 서울역 근처거나 1·4호선 라인이면 이게 답입니다. 직통은 무정차, 일반열차는 절반 가격에 20분 더 걸립니다.

    공항버스는 열차가 가지 않는 곳으로 갑니다. 강남·잠실·명동·신촌을 비롯한 여러 지역에 서고, 숙소에 더 가까이 내려줍니다. 느리고 교통 상황을 타지만 도착해서 지하철을 갈아탈 일이 없는 경우가 많습니다. 현금·교통카드·신용카드로 결제합니다.

    택시는 도심까지 47,000~55,000원이고, 여기에 고속도로 통행료 7,900원이 별도로 붙습니다. 이걸 모르고 있다가 놀라는 경우가 많습니다. 공항에는 네 종류가 있습니다 — 일반, 인터내셔널(20% 할증, 영어 가능 기사), 모범(40~50% 비쌈), 그리고 최대 8인승 점보밴입니다.

    2. 그래서 뭘 타야 하나

    • 숙소가 서울역 근처, 짐이 가벼움 → 공항철도 직통
    • 비용을 아끼고 급하지 않음 → 공항철도 일반, 절반 가격
    • 숙소가 강남·잠실·명동·신촌 → 공항버스, 환승 없이 갈 가능성이 큼
    • 대형 캐리어 두 개 이상 → 공항버스나 택시. 서울역에서 캐리어 끌고 환승하는 건 생각보다 훨씬 고됩니다
    • 세 명 이상 → 택시가 경쟁력이 생깁니다. 넷이 나누면 5만원은 버스 네 명분과 비슷합니다
    • 자정~새벽 4시 도착 → 아래를 보세요
    큰 하드케이스 캐리어를 들고 지하철역 계단을 오르는 여행자의 뒷모습. 배낭을 메고 있다.
    “생각보다 훨씬 고되다”가 이런 모습입니다. 환승에는 계단이 따라오고, 대형 캐리어 두 개로 계단을 오르는 구간이 싼 경로를 힘든 한 시간으로 바꿔놓습니다.

    한 가지 구분할 것. 공항버스와 시내버스는 다릅니다. 공항버스는 하부 짐칸이 있고 애초에 이 용도로 만들어졌습니다. 일반 서울 시내버스는 휴대품이 50 × 40 × 20cm 이내로, 위탁수하물 크기 캐리어는 초과이고 기사가 승차를 거부할 수 있습니다. 시내에 들어온 뒤 큰 캐리어를 옮길 때는 지하철이나 택시를 쓰세요. 자세한 내용은 캐리어 들고 대중교통 타기에 있습니다.

    3. 늦게 도착했을 때 — 아무도 말해주지 않는 공백

    일반 공항버스는 대체로 첫차 04~06시, 막차 22~23시입니다. 공항철도도 끊깁니다. 그래서 새벽 1시에 내리면 일반적인 안내가 전부 무용지물입니다.

    인천공항은 정확히 이 시간대를 위해 심야버스를 운행합니다(인천국제공항).

    노선 행선지 공항 출발 요금(성인)
    N6000 강남고속버스터미널 00:10~04:20 17,000원
    N6002 청량리 00:00~04:40 18,000원
    N6701 동대문디자인플라자 23:50~04:40 18,000원
    N6703 광나루역 23:40~04:50 정류장별 상이

    제1여객터미널 승차장: N6000·N6002는 6A, N6701·N6703은 3B입니다.

    두 가지를 알아두세요. 심야 요금은 주간 버스의 약 두 배입니다(17,000~18,000원 대 5,000~15,000원). 그리고 목적지 앞이 아니라 교통 거점에 내려줍니다. 새벽 3시에는 지하철이 끊겨 있으니 거기서 택시비를 한 번 더 예상해 두세요.

    심야버스마저 끊긴 좁은 시간대에 도착했다면 택시밖에 없고, 심야에는 미터기가 더 빨리 올라갑니다.

    4. 김포공항에서 — 더 쉽고, 자주 간과됩니다

    김포는 도심에서 훨씬 가깝고, 김포공항역이 다섯 개 노선이 만나는 환승역입니다. 5호선, 9호선, 공항철도, 김포골드라인, 서해선입니다.

    그래서 대개 환승 없이 또는 한 번만에 목적지에 닿고, 요금도 공항 할증 없이 일반 지하철 수준입니다. 서울역까지 철도로 약 22분입니다.

    항공권을 고를 때 공항을 선택할 수 있다면, 김포는 시내 진입에서 시간과 돈을 모두 아껴줍니다.

    주의 하나: 김포공항 국내선과 국제선 청사 사이 이동에 약 20분이 걸립니다. 환승이 있다면 계산에 넣으세요.

    5. 도착 전에

    • 숙소 위치부터 확인 — 서울역 근처면 열차, 그 외 지역이면 버스가 유리한 경우가 많습니다
    • 공항철도 일반열차는 직통의 절반 가격입니다. 20분만 더 쓰면 됩니다
    • 택시 요금에 고속도로 통행료 7,900원은 포함돼 있지 않습니다
    • 자정 이후 도착이라면? 심야버스 N6000·N6002·N6701·N6703이 새벽 4시 40분경까지, 주간의 약 두 배 요금으로 운행합니다
    • 제1터미널 심야버스 승차장은 6A3B
    • 짐이 많거나 세 명 이상이면 버스나 택시 쪽으로 계산이 기웁니다
    • 김포로 들어온다면? 지하철 다섯 개 노선, 서울역까지 약 22분

    함께 읽으면 좋은 글

    참고자료 / Sources

  • Paying by Card in Korea: The Question at Checkout That Costs You 3–7%

    This guide is written in two parts. English first, Korean below. 이 글은 두 파트로 되어 있습니다. 영문이 먼저, 한국어가 아래에 있습니다.


    PART 1 — ENGLISH

    The terminal asks whether you want to pay in Korean won or in your own currency. Your currency looks helpful — you can see exactly what it costs without doing math.

    Choose it and you just paid a markup of 3–7%, sometimes more. Every time.

    This is called dynamic currency conversion, and it is the single most expensive habit a visitor can pick up in Korea. It is also the easiest to fix: always choose won.

    1. The rule: always pay in Korean won

    When a card terminal or an ATM offers you a choice of currency, pick KRW. Not dollars, not euros, not yen — won.

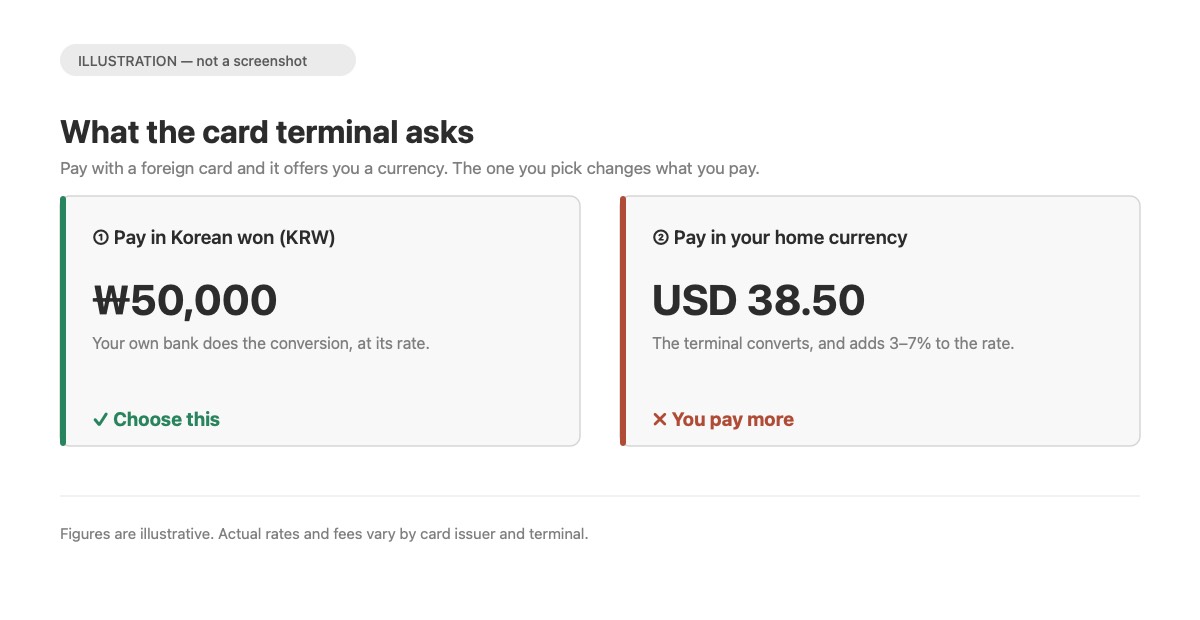
    Diagram of the currency choice at a card terminal: paying 50,000 won in Korean won versus 38.50 US dollars in your home currency, with 3-7% added by the terminal.
    This is an illustration, not a screenshot of a real terminal — the prompt only appears on foreign-issued cards, so it cannot be photographed here. The shape of the choice is what matters: same purchase, two currencies, one of them with a markup already inside it.

    Choosing your home currency hands the exchange rate to the merchant’s payment processor instead of your card network. Studies of dynamic currency conversion find markups of 3–7% above the interbank rate, sometimes 12% or more (Beancount). Investigations have found that in every case examined, the customer paid more — between 2.6% and 12% more.

    Your own bank will charge a foreign transaction fee either way, typically 1–3%. That fee is unavoidable. The DCC markup stacks on top of it and is entirely avoidable.

    On a ₩300,000 shopping day, choosing wrong costs roughly ₩9,000–21,000. On a two-week trip it adds up to a nice dinner you did not get to eat.

    2. Why the offer looks so appealing

    The screen shows your home currency, which feels like a courtesy. Sometimes staff will helpfully press the button for you, assuming you would prefer to see familiar numbers.

    They are not trying to cheat you. The commission goes to the payment processor, and merchants and ATM operators receive a cut. It is a business model built on the fact that “pay in your own currency” sounds like a service rather than a fee.

    If you are ever unsure, say “Korean won, please.” Staff hear it constantly and will not find it strange.

    3. Watch for it in three places

    • Card terminals in shops — the most common. The prompt appears before you approve
    • ATMs — the same choice appears when withdrawing cash, and the markup is identical
    • Online checkouts — Korean sites sometimes default to your currency based on your card

    If the receipt shows a total in your home currency, DCC was applied. Some banks let you dispute it; more practically, watch for it next time.

    4. Where your card will not work at all

    Avoiding DCC assumes your card works. In Korea, sometimes it will not.

    Usually fine Department stores, hotels, chain restaurants and cafes, convenience stores (GS25, CU, 7-Eleven), major tourist attractions.

    Often a problem Small local shops, traditional markets, street food, unmanned kiosks, and — this catches people out — most Korean delivery apps, which generally require a Korean card or bank account.

    Transit is its own case. Foreign cards are not generally usable to tap directly on subway gates; you need a transit card such as T-money. Seoul has been rolling out kiosks that accept foreign cards for topping up, and broader card compatibility is planned, but do not arrive assuming your Visa will open the gate.

    5. The local workaround you cannot use

    Here is why the cash advice below is firmer than it looks.

    When a Korean customer meets a shop that does not take cards, they rarely reach for cash. They send a bank transfer — account number, phone, done in seconds. It is so routine that many Koreans carry no cash at all, and small merchants are comfortable being paid this way.

    That exit is closed to you. A bank transfer needs a Korean bank account, and a Korean bank account needs an Alien Registration Card — issued to people staying 91 days or more, and taking two to four weeks to arrive after you apply. A tourist stamp does not qualify.

    There are edges to this. A few banks, Hana and Shinhan among them, will sometimes open a basic account on a passport and valid visa. But branches refuse it routinely, internet banking and check cards are often withheld, and none of it is something to plan a trip around.

    So the chain that saves a local — card declined, transfer instead — has no second link for you. What is left is cash.

    The partial bridge is a prepaid card aimed at foreign visitors, such as WOWPASS, which you load with cash and spend like a card. It does not open a bank account, but it covers some of the gap. See transit and prepaid cards.

    6. So carry some cash

    Not much, but some. Common guidance is ₩50,000–100,000 for general sightseeing, and ₩150,000–200,000 if you plan to spend time in traditional markets or eating street food.

    When withdrawing at an ATM, the same rule applies: choose won, not your home currency.

    7. Quick checklist

    • At every terminal: choose KRW, never your home currency
    • Same at ATMs — the markup is the same
    • If staff offer to “help” by selecting your currency, say “won, please”
    • Check receipts — a total in your home currency means DCC was applied
    • Carry ₩50,000–100,000 cash; more for markets and street food
    • Bank transfer is what locals use instead of cash — and you cannot. An account needs an Alien Registration Card, so cash is your only fallback
    • Do not count on a foreign card for delivery apps or subway gates
    • Your bank’s foreign transaction fee (1–3%) is separate and unavoidable — DCC is the part you control

    PART 2 — 한국어

    단말기가 원화로 결제할지, 당신의 통화로 결제할지 묻습니다. 자국 통화 쪽이 친절해 보입니다. 계산하지 않아도 얼마인지 바로 보이니까요.

    그걸 고르면 3~7%, 때로는 그 이상을 더 낸 것입니다. 매번요.

    이것을 자국통화 결제(DCC)라고 합니다. 한국을 찾는 여행자가 들이기 쉬운 가장 비싼 습관이자, 고치기는 가장 쉬운 습관입니다. 항상 원화를 고르세요.

    1. 규칙: 무조건 원화로

    카드 단말기나 ATM이 통화를 고르라고 하면 KRW(원화) 를 선택하세요. 달러도, 유로도, 엔도 아닙니다.

    카드 단말기의 통화 선택을 설명한 그림. 원화 50,000원으로 결제하는 쪽과 자국 통화 38.50달러로 결제하는 쪽을 비교하고, 후자에 3~7%가 얹힌다고 표시돼 있다.
    실제 단말기 화면 캡처가 아니라 설명 그림입니다. 이 선택 화면은 해외에서 발급한 카드로 결제할 때만 뜨기 때문에 국내에서는 촬영할 수 없습니다. 중요한 건 선택의 구조입니다. 같은 물건, 두 가지 통화, 그중 하나에는 이미 수수료가 들어 있습니다.

    자국 통화를 고르면 환율 결정권이 카드 네트워크가 아니라 가맹점 결제사로 넘어갑니다. DCC를 분석한 자료들은 은행 간 환율 대비 3~7%, 때로는 12% 이상의 마크업을 보고합니다(Beancount). 조사된 모든 사례에서 소비자가 더 냈고, 그 폭은 2.6%에서 12% 사이였습니다.

    카드사의 해외 이용 수수료(보통 1~3%)는 어느 쪽을 고르든 붙습니다. 그건 피할 수 없습니다. DCC 마크업은 그 위에 얹히고, 이건 전적으로 피할 수 있습니다.

    30만원어치 쇼핑한 날이라면 잘못 고른 대가가 대략 9,000~21,000원입니다. 2주 여행이면 못 먹은 저녁 한 끼 값이 됩니다.

    2. 왜 그렇게 친절해 보이는가

    화면에 익숙한 통화가 뜨니 배려처럼 느껴집니다. 직원이 친절하게 대신 눌러주기도 합니다. 낯선 숫자보다 익숙한 숫자를 보고 싶어 할 거라고 생각해서요.

    속이려는 것이 아닙니다. 수수료는 결제사로 가고 가맹점과 ATM 운영사가 일부를 나눠 갖습니다. “자국 통화로 결제하세요”가 수수료가 아니라 서비스처럼 들린다는 점에 기대는 사업 모델입니다.

    헷갈리면 “원화로 해주세요”라고 말하세요. 직원들이 늘 듣는 말이라 이상하게 여기지 않습니다.

    3. 세 곳에서 나옵니다

    • 매장 카드 단말기 — 가장 흔합니다. 승인 전에 선택 화면이 뜹니다
    • ATM — 현금 인출할 때도 같은 선택이 나오고 마크업도 같습니다
    • 온라인 결제 — 카드 정보를 보고 자국 통화를 기본값으로 잡는 경우가 있습니다

    영수증 총액이 자국 통화로 찍혀 있으면 DCC가 적용된 것입니다. 카드사에 이의를 제기할 수 있는 경우도 있지만, 현실적으로는 다음번에 주의하는 편이 빠릅니다.

    4. 카드가 아예 안 되는 곳

    DCC를 피하는 것은 카드가 된다는 전제가 있어야 합니다. 한국에서는 안 될 때가 있습니다.

    대체로 되는 곳 백화점, 호텔, 체인 음식점과 카페, 편의점(GS25·CU·세븐일레븐), 주요 관광지.

    자주 막히는 곳 소규모 상점, 전통시장, 길거리 음식, 무인 키오스크. 그리고 의외로 걸리는 것이 한국 배달앱입니다. 대체로 한국 카드나 계좌가 필요합니다.

    대중교통은 별개입니다. 해외 카드로 지하철 개찰구를 직접 통과하기는 일반적으로 어렵고, T-money 같은 교통카드가 필요합니다. 서울이 해외 카드로 충전할 수 있는 키오스크를 확대하고 있고 호환 범위도 넓혀갈 계획이지만, 비자카드로 개찰구가 열릴 거라 기대하고 오지는 마세요.

    5. 한국 사람들이 쓰는 우회로, 당신은 못 씁니다

    아래 현금 조언이 생각보다 단호한 이유가 있습니다.

    한국 손님은 카드가 안 되는 가게를 만나도 현금을 꺼내지 않습니다. 계좌이체를 합니다. 계좌번호나 전화번호만 있으면 몇 초면 끝납니다. 워낙 일상이라 현금을 아예 안 들고 다니는 사람이 많고, 소규모 상인들도 이 방식에 익숙합니다.

    그 출구가 당신에게는 닫혀 있습니다. 계좌이체를 하려면 한국 은행 계좌가 있어야 하고, 계좌를 열려면 외국인등록증이 필요합니다. 91일 이상 체류자에게 발급되며 신청 후 2~4주가 걸립니다. 관광 입국으로는 해당되지 않습니다.

    예외의 여지는 있습니다. 하나·신한 등 일부 은행이 여권과 유효한 비자만으로 기본 계좌를 열어주기도 합니다. 다만 지점에서 거절되는 경우가 흔하고 인터넷뱅킹과 체크카드가 제한되기도 해서, 여행 계획의 전제로 삼을 만한 것은 아닙니다.

    그러니 현지인을 구해주는 흐름 — 카드 안 됨, 그럼 이체 — 에는 당신 몫의 두 번째 고리가 없습니다. 남는 건 현금입니다.

    부분적인 다리는 외국인용 선불카드입니다. 와우패스처럼 현금을 충전해 카드처럼 쓰는 방식이고, 계좌를 열어주지는 않지만 빈틈의 일부를 메웁니다. 교통카드 4종 비교를 참고하세요.

    6. 그래서 현금을 조금은 챙기세요

    많이는 아니고 조금요. 일반 관광이라면 5만~10만원, 전통시장이나 길거리 음식에 시간을 쓸 계획이라면 15만~20만원이 흔히 권장됩니다.

    ATM에서 인출할 때도 같은 규칙입니다. 원화를 고르세요.

    7. 체크리스트

    • 모든 단말기에서 KRW(원화) 선택. 자국 통화 금지
    • ATM도 동일 — 마크업이 같습니다
    • 직원이 자국 통화를 눌러주려 하면 “원화로 해주세요”
    • 영수증 확인 — 총액이 자국 통화면 DCC가 붙은 것
    • 현금 5만~10만원, 시장·길거리 음식 계획이 있으면 더
    • 현지인은 현금 대신 계좌이체를 씁니다. 당신은 못 씁니다. 계좌 개설에 외국인등록증이 필요하므로 남는 퇴로는 현금뿐입니다
    • 배달앱과 지하철 개찰구는 해외 카드를 믿지 마세요
    • 카드사 해외 수수료(1~3%)는 별개이고 피할 수 없습니다. DCC가 당신이 통제할 수 있는 부분입니다

    함께 읽으면 좋은 글

    참고자료 / Sources

  • Tapping Out on Korean Buses: Skip It and You Pay Twice (or Lose Your Card for 24 Hours)

    This guide is written in two parts. English first, Korean below. 이 글은 두 파트로 되어 있습니다. 영문이 먼저, 한국어가 아래에 있습니다.


    PART 1 — ENGLISH

    You tapped your card getting on the bus. You get off through the back door and walk away.

    In most cities that is the whole transaction. In Seoul it costs you money — and if you bought a Climate Card, it can lock you out of the transit system for a full day.

    This one takes ten seconds to get right and almost nobody tells visitors about it.

    1. The rule

    Tap your card again when you get off the bus. There is a reader by the rear door. Hold your card to it as you step down.

    That is it. That is the whole rule. But the consequences of forgetting differ depending on which card you are holding, and one of them is much worse than the other.

    2. With a normal transit card

    If you do not tap out, the system has no record that you left the bus. As far as it knows, you are still on board.

    So when you board your next bus or enter the subway, that is not treated as a transfer. It is a fresh journey at full fare — you lose the transfer discount and pay a new base fare.

    Seoul’s official guidance is direct about it: skipping the tap-out breaks the transfer chain, and the uncharged amount is collected on your next boarding (Seoul Metropolitan Government).

    There is a second cost on longer routes. Buses that run beyond the city charge by distance — the base fare covers the first 10 km, then roughly ₩100 per additional 5 km. Without a tap-out the system cannot calculate your distance, so it cannot bill you correctly, and the correction lands on your next trip.

    3. With a Climate Card — this is the one that hurts

    The Climate Card (기후동행카드) is Seoul’s unlimited-ride pass. Because it is unlimited, the system cannot punish a missed tap-out by charging you more. There is nothing to charge.

    So it does something else instead.

    Miss the tap-out twice during your pass period and the card is suspended for 24 hours, counted from the moment you boarded on the second missed tap. — Seoul Metropolitan Government

    Read that again if you bought one. Two careless exits and your unlimited pass stops working for a full day — probably a day you had plans for.

    It is not two in a row. It is two cumulative, across the whole validity period of the card.

    There is a second way to trigger it that has nothing to do with forgetting. The Climate Card only works inside a defined zone, and the boundary is not the Seoul city limit — it varies by line. Ride past it and the tap-out will not register even if you present your card. You settle the difference with a station attendant, but the system logs a missed tap-out anyway. Two such trips and the card is suspended.

    On the Gyeongui-Jungang Line, for instance, coverage ends at Tanhyeon. Continue toward Geumchon or Munsan and you are outside the zone. Check your line in our transit card comparison before relying on the pass.

    4. What about the subway?

    On the subway you tap through a gate to get out, so there is nothing to forget. The gate will not open otherwise.

    The problem is buses specifically, because you can physically walk off without tapping. The transfer discount runs both ways — subway to bus and bus to subway — so a missed bus tap-out also breaks a transfer into the subway.

    5. How to not get caught

    • Tap out every single time you leave a bus. Not just when transferring — every time. The system cannot read your intentions
    • The reader is by the rear door. Tap as you step down
    • Listen for the beep. A successful tap makes a sound. No beep means it did not register — try again before the doors close
    • If you are getting off at a crowded stop, have your card out before you reach the door rather than digging for it in the doorway
    • If you are on a Climate Card, treat this as non-negotiable. The penalty is a lost day, not a lost ₩1,500

    6. Quick reference

    Normal transit card Climate Card
    Miss one tap-out Lose transfer discount, pay new base fare Warning territory — one more and you are out
    Miss two Same, each time Card suspended 24 hours
    Long-distance routes Distance fare corrected on next trip
    Where to tap Rear door reader Rear door reader

    PART 2 — 한국어

    버스를 탈 때 카드를 찍었습니다. 뒷문으로 내려서 그냥 걸어갑니다.

    대부분의 도시에서는 그걸로 끝입니다. 서울에서는 돈이 나갑니다. 그리고 기후동행카드를 샀다면 하루 종일 대중교통을 못 쓰게 될 수도 있습니다.

    10초면 되는 일인데, 외국인 안내에는 거의 나오지 않습니다.

    1. 규칙

    버스에서 내릴 때 카드를 한 번 더 대세요. 뒷문 옆에 단말기가 있습니다. 내리면서 카드를 갖다 대면 됩니다.

    그게 전부입니다. 다만 잊었을 때의 결과가 카드 종류에 따라 다르고, 한쪽은 훨씬 심각합니다.

    2. 일반 교통카드인 경우

    하차 태그를 안 하면 시스템은 당신이 버스에서 내렸다는 기록을 갖지 못합니다. 시스템이 보기엔 아직 타고 있는 상태입니다.

    그래서 다음 버스를 타거나 지하철에 들어갈 때 그것은 환승으로 처리되지 않습니다. 새로운 이용으로 계산되고, 환승 할인을 잃고 기본요금이 다시 부과됩니다.

    서울시 안내도 이 점을 분명히 밝히고 있습니다. 하차 미태그 시 환승이 단절되며, 미징수 금액은 다음 수단 승차 시 징수됩니다(서울특별시).

    장거리 노선에는 비용이 하나 더 붙습니다. 시외를 함께 운행하는 버스는 거리로 요금을 매기는데, 기본요금이 10km까지이고 이후 5km마다 100원가량이 추가됩니다. 하차 태그가 없으면 거리를 계산할 수 없어 정산이 다음 이용으로 넘어갑니다.

    3. 기후동행카드 — 이쪽이 진짜 문제입니다

    기후동행카드는 무제한 정기권입니다. 무제한이기 때문에 하차 태그를 놓쳐도 요금을 더 물릴 수가 없습니다. 물릴 요금이 없으니까요.

    그래서 다른 방식으로 제재합니다.

    사용기간 중 하차태그를 2회 이상 미실시하면, 두 번째 미태그 승차 시간을 기준으로 24시간 동안 사용이 중지됩니다. — 서울특별시

    기후동행카드를 샀다면 다시 읽어보세요. 두 번 무심코 내리면 무제한 카드가 하루 종일 멈춥니다. 하필 일정이 있는 날일 가능성이 높고요.

    연속 2회가 아니라 카드 사용기간 전체에서 누적 2회입니다.

    깜빡하는 것과 무관하게 걸리는 경로가 하나 더 있습니다. 기후동행카드는 정해진 범위 안에서만 작동하고, 그 경계는 서울시 행정구역과 다르며 노선마다 다릅니다. 범위를 넘어가면 카드를 대도 하차 태그가 되지 않습니다. 역무원에게 차액을 정산하지만 시스템에는 미태그로 기록됩니다. 그런 이동을 두 번 하면 카드가 정지됩니다.

    예를 들어 경의중앙선은 탄현역까지가 범위입니다. 금촌이나 문산 방향으로 더 가면 범위 밖입니다. 정기권에 의존하기 전에 교통카드 비교 글에서 자기 노선을 확인하세요.

    4. 지하철은요?

    지하철은 나갈 때 개찰구에 태그해야 문이 열리므로 잊을 수가 없습니다.

    문제는 버스입니다. 태그하지 않고도 그냥 내릴 수 있으니까요. 그리고 환승 할인은 양방향으로 적용되므로 — 지하철에서 버스로, 버스에서 지하철로 — 버스 하차 태그를 놓치면 지하철로 이어지는 환승도 끊깁니다.

    5. 놓치지 않는 법

    • 버스에서 내릴 때는 매번 태그하세요. 환승할 때만이 아니라 항상입니다. 시스템은 의도를 읽지 못합니다
    • 단말기는 뒷문 옆에 있습니다. 내리면서 대세요
    • 소리를 확인하세요. 정상 처리되면 소리가 납니다. 소리가 안 나면 인식되지 않은 것이니 문이 닫히기 전에 다시 대세요
    • 사람이 많은 정류장에서 내린다면 문 앞에서 카드를 찾지 말고 미리 손에 들고 계세요
    • 기후동행카드 사용자라면 선택의 문제가 아닙니다. 잃는 것이 1,500원이 아니라 하루입니다

    6. 한눈에 보기

    일반 교통카드 기후동행카드
    1회 미태그 환승 할인 상실, 기본요금 재부과 경고 구간 — 한 번 더면 정지
    2회 미태그 매번 같은 불이익 24시간 사용 정지
    장거리 노선 거리 요금이 다음 이용에 정산
    태그 위치 뒷문 단말기 뒷문 단말기

    함께 읽으면 좋은 글

    참고자료 / Sources

  • K-ETA in 2026: 22 Countries Are Exempt — But You Might Still Want to Apply

    This guide is written in two parts. English first, Korean below. 이 글은 두 파트로 되어 있습니다. 영문이 먼저, 한국어가 아래에 있습니다.


    PART 1 — ENGLISH

    If you are flying to Korea from the US, the UK, Japan, Australia or 18 other places, you do not need a K-ETA in 2026.

    Most guides stop there. That is where they get it wrong — because applying anyway gets you two things the exemption does not, and because the exemption has an expiry date that is closer than it looks.

    1. Are you exempt?

    Korea’s Ministry of Justice extended the temporary K-ETA waiver through December 31, 2026. Twenty-two countries and territories are covered:

    Region Covered
    Americas United States (including Guam), Canada
    Europe Austria, Belgium, Denmark, Finland, France, Germany, Italy, Netherlands, Norway, Poland, Spain, Sweden, United Kingdom
    Asia-Pacific Australia, Hong Kong, Japan, Macao, New Zealand, Singapore, Taiwan

    If your passport is from one of these, you can board without a K-ETA.

    If it is not on this list, you still need a K-ETA before you fly — assuming you are otherwise eligible for visa-free entry. Apply early: approval usually comes within 72 hours, but “usually” is doing work in that sentence, and airlines will not board you without it.

    2. The exemption ends sooner than you think

    This waiver has been extended one year at a time. The current extension runs to December 31, 2026, and the requirement is scheduled to return on January 1, 2027 unless it is extended again.

    Nobody has announced what happens after that.

    This matters if you are booking ahead. A trip in November 2026 is covered. A trip in February 2027 currently is not — and you will not know for sure until the government decides, possibly late in the year. If your travel crosses into 2027, check again before you fly.

    3. Why apply even when you are exempt

    Here is what most guides miss. Being exempt means you may skip the K-ETA. It does not mean applying is pointless.

    A K-ETA approval gives you two things the exemption does not:

    • You skip the arrival card. Without a K-ETA, you fill out a paper arrival card on the plane or at the airport — every single trip. With one, you do not.
    • You can use the dedicated K-ETA lane at Incheon. A separate queue at immigration.

    And the approval lasts three years (or until your passport expires), covering every trip in that window. Fill it in once, skip the paperwork for three years.

    4. What it costs and how long it takes

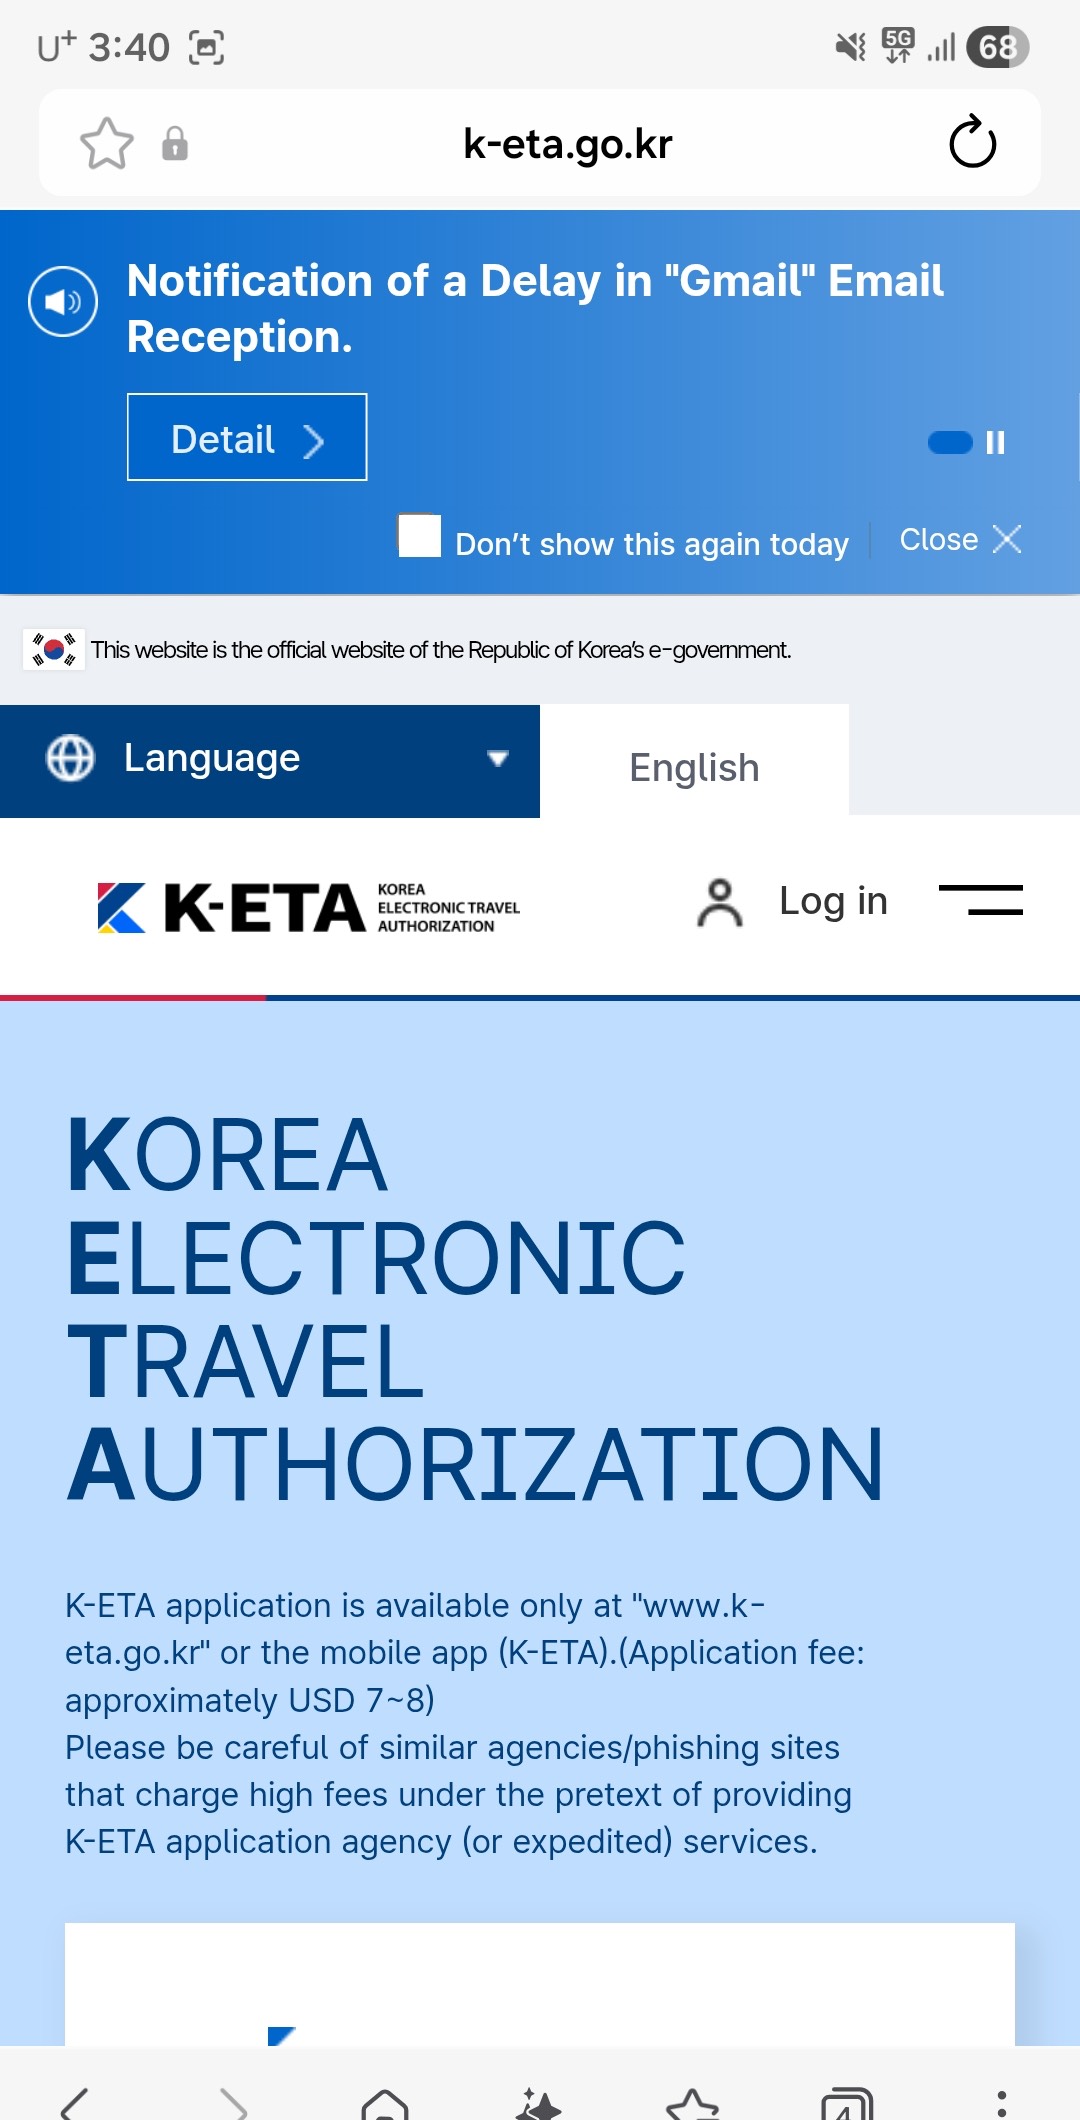
    The official K-ETA website in English, carrying a warning about similar agencies and phishing sites that charge high fees.
    k-eta.go.kr, the official site. The warning it carries on the front page is the point: agencies and phishing sites charge high fees for a government form that costs around USD 7–8.
    Fee ₩10,000 (roughly USD 7–8)
    Processing Generally within 72 hours
    Validity 3 years, or until your passport expires

    Apply at the official site: k-eta.go.kr

    Two cautions worth more than the fee:

    • Apply from the official site only. Search results are full of third-party services that charge several times the real price for filling in the same form.
    • Do not leave it to the airport. Processing is generally within 72 hours, not guaranteed. Apply at least a few days out.

    5. So should you apply?

    Your situation Recommendation
    Not on the exempt list Required. Apply at least 72 hours before departure
    Exempt, one short trip, minimal paperwork Skip it. The arrival card takes two minutes
    Exempt, but visiting more than once in 3 years Apply. ₩10,000 once covers three years of skipped arrival cards
    Exempt, but travelling in 2027 or later Check the current rule before booking — the waiver may have ended
    Exempt, and you hate queues Apply, for the dedicated immigration lane

    6. Before you book

    • Check whether your passport is on the 22-country list above
    • If not: apply for K-ETA at k-eta.go.kr, at least 72 hours before departure
    • If yes: applying anyway costs ₩10,000 and buys 3 years of no arrival cards
    • Travelling in 2027? The waiver is scheduled to end December 31, 2026 — verify before booking
    • Use the official site. Third-party “K-ETA services” charge extra for nothing

    PART 2 — 한국어

    미국, 영국, 일본, 호주를 비롯한 22개국에서 한국으로 오는 여행자는 2026년에 K-ETA가 필요 없습니다.

    대부분의 가이드는 여기서 끝납니다. 그런데 그게 틀린 지점입니다. 면제 대상이어도 신청하면 얻는 것이 두 가지 있고, 면제에는 생각보다 가까운 만료일이 있기 때문입니다.

    1. 나는 면제 대상인가

    법무부가 K-ETA 한시 면제를 2026년 12월 31일까지 연장했습니다. 대상은 22개 국가·지역입니다.

    지역 대상
    미주 미국(괌 포함), 캐나다
    유럽 오스트리아, 벨기에, 덴마크, 핀란드, 프랑스, 독일, 이탈리아, 네덜란드, 노르웨이, 폴란드, 스페인, 스웨덴, 영국
    아시아·태평양 호주, 홍콩, 일본, 마카오, 뉴질랜드, 싱가포르, 대만

    이 중 하나의 여권을 갖고 있다면 K-ETA 없이 탑승할 수 있습니다.

    명단에 없다면 출발 전에 K-ETA를 받아야 합니다(무비자 입국 대상인 경우). 미리 신청하세요. 승인은 보통 72시간 안에 나지만 ‘보통’이라는 말이 걸리고, 항공사는 K-ETA 없이 탑승시키지 않습니다.

    2. 면제는 생각보다 빨리 끝납니다

    이 조치는 1년 단위로 연장돼 왔습니다. 이번 연장은 2026년 12월 31일까지이고, 다시 연장되지 않으면 2027년 1월 1일부터 의무가 부활합니다.

    그 이후가 어떻게 될지는 아직 발표되지 않았습니다.

    미리 예약한다면 중요한 문제입니다. 2026년 11월 여행은 면제 대상이지만, 2027년 2월 여행은 현재 기준으로 아닙니다. 그리고 정부 결정이 연말에나 나올 수 있어서 그때까지는 확실히 알 수 없습니다. 여행이 2027년으로 넘어간다면 출발 전에 다시 확인하세요.

    3. 면제인데도 신청하는 이유

    여기가 대부분의 가이드가 놓치는 부분입니다. 면제란 K-ETA를 생략해도 된다는 뜻이지, 신청할 이유가 없다는 뜻이 아닙니다.

    승인받으면 면제만으로는 얻지 못하는 두 가지가 생깁니다.

    • 입국신고서를 쓰지 않아도 됩니다. K-ETA가 없으면 기내나 공항에서 종이 입국신고서를 매번 작성해야 합니다.
    • 인천공항 K-ETA 전용 심사대를 쓸 수 있습니다.

    그리고 승인은 3년간(여권 만료일 이내) 유효합니다. 그 기간의 모든 방문에 적용되니, 한 번 작성하고 3년간 서류를 건너뛰는 셈입니다.

    4. 비용과 소요 시간

    영문으로 표시된 K-ETA 공식 사이트. 높은 수수료를 받는 유사 대행 사이트와 피싱 사이트에 대한 주의 문구가 보인다.
    공식 사이트 k-eta.go.kr. 첫 화면에 붙어 있는 경고가 핵심입니다. 정부 수수료가 7~8달러인 서식을 두고 대행·피싱 사이트가 높은 수수료를 받습니다.
    수수료 1만원 (약 7~8달러)
    심사 보통 72시간 이내
    유효기간 3년 또는 여권 만료일까지

    신청은 공식 사이트 k-eta.go.kr 에서 합니다.

    수수료보다 중요한 주의사항이 둘 있습니다.

    • 반드시 공식 사이트에서 신청하세요. 검색 결과에는 같은 양식을 대신 채워주고 몇 배를 받는 대행 업체가 많습니다.
    • 공항에서 하려 하지 마세요. 72시간은 ‘보통’이지 보장이 아닙니다. 최소 며칠 전에 신청하세요.

    5. 그래서 신청해야 하나

    내 상황 권장
    면제 명단에 없음 필수. 출발 72시간 전까지 신청
    면제 대상 · 짧은 단발 여행 생략해도 무방. 입국신고서는 2분이면 씁니다
    면제 대상 · 3년 안에 두 번 이상 방문 신청 권장. 1만원으로 3년간 입국신고서 면제
    면제 대상 · 2027년 이후 여행 예약 전 현재 규정 확인 — 면제가 끝났을 수 있습니다
    면제 대상 · 줄 서기가 싫다 신청. 전용 심사대를 쓸 수 있습니다

    6. 예약 전 확인할 것

    • 내 여권이 위 22개국 명단에 있는지 확인
    • 없다면 k-eta.go.kr 에서 출발 72시간 전까지 신청
    • 있다면 — 그래도 신청하면 1만원으로 3년간 입국신고서가 면제됩니다
    • 2027년 여행이라면? 면제는 2026년 12월 31일 종료 예정 — 예약 전 확인
    • 공식 사이트를 쓰세요. 대행 업체는 같은 일에 더 받습니다

    함께 읽으면 좋은 글

    참고자료 / Sources

  • Google Maps in Korea: What Still Works, What Doesn’t, and What to Use (August 2026)

    This guide is written in two parts. English first, Korean below. 이 글은 두 파트로 되어 있습니다. 영문이 먼저, 한국어가 아래에 있습니다.


    PART 1 — ENGLISH

    Two things you have probably heard about Google Maps in Korea, and both are misleading.

    The first: “Google Maps doesn’t work in Korea.” It does — just not for the thing you need most.

    The second: “They fixed it in February 2026.” The government did grant permission. The feature still is not live.

    Here is the accurate picture as of August 2026, and what to actually put on your phone before you land.

    1. What works and what doesn’t

    Google Maps is not blank in Korea. Most of it behaves normally:

    Works Doesn’t work
    Viewing the map Walking directions (turn-by-turn)
    Searching for places Driving navigation
    Reviews, photos, opening hours Cycling directions
    Subway and bus routes Step-by-step guidance inside transit walking segments

    The surprise for most visitors is that public transit directions do work. Seoul Metro publishes open transit data, so Google’s subway routing is reasonably accurate. If you want to know which line to take from Hongdae to Gangnam, Google Maps will tell you.

    What it will not do is walk you there — and the way it fails is worth seeing, because it is not subtle.

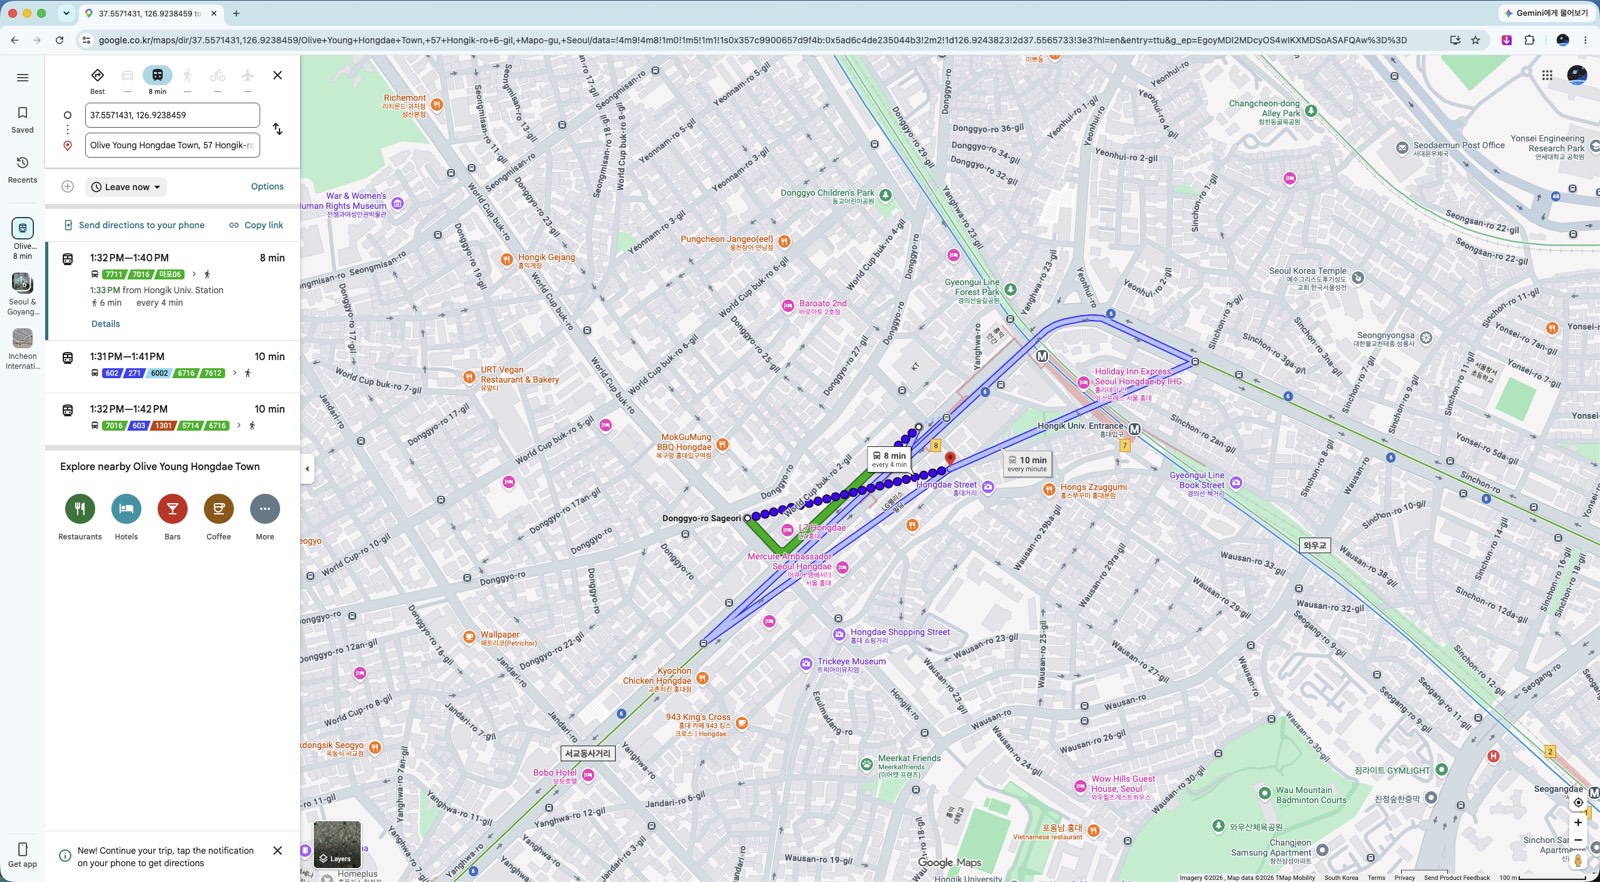
    Ask for directions between two points in Seoul and look at the row of travel modes across the top. Transit shows a time. Driving, walking and cycling show a dash. Those three are simply not calculated. You do not get a bad route; you get no route.

    Close-up of the Google Maps travel mode row in Seoul: transit shows 8 min while driving, walking and cycling each show a dash.
    The mode row, close up. Transit returns 8 minutes; driving, walking and cycling each return a dash — those three are simply never calculated here.

    The give-away is what Google offers instead. Put in a destination a few hundred metres away and every suggestion that comes back is a bus — and most of the quoted journey time is spent walking to the stop and away from it again, for a distance you could have covered on foot without stopping. Not one of the alternatives says “walk.” Google is not being obtuse. Transit is the only mode it is allowed to compute, so transit is the only answer it has.

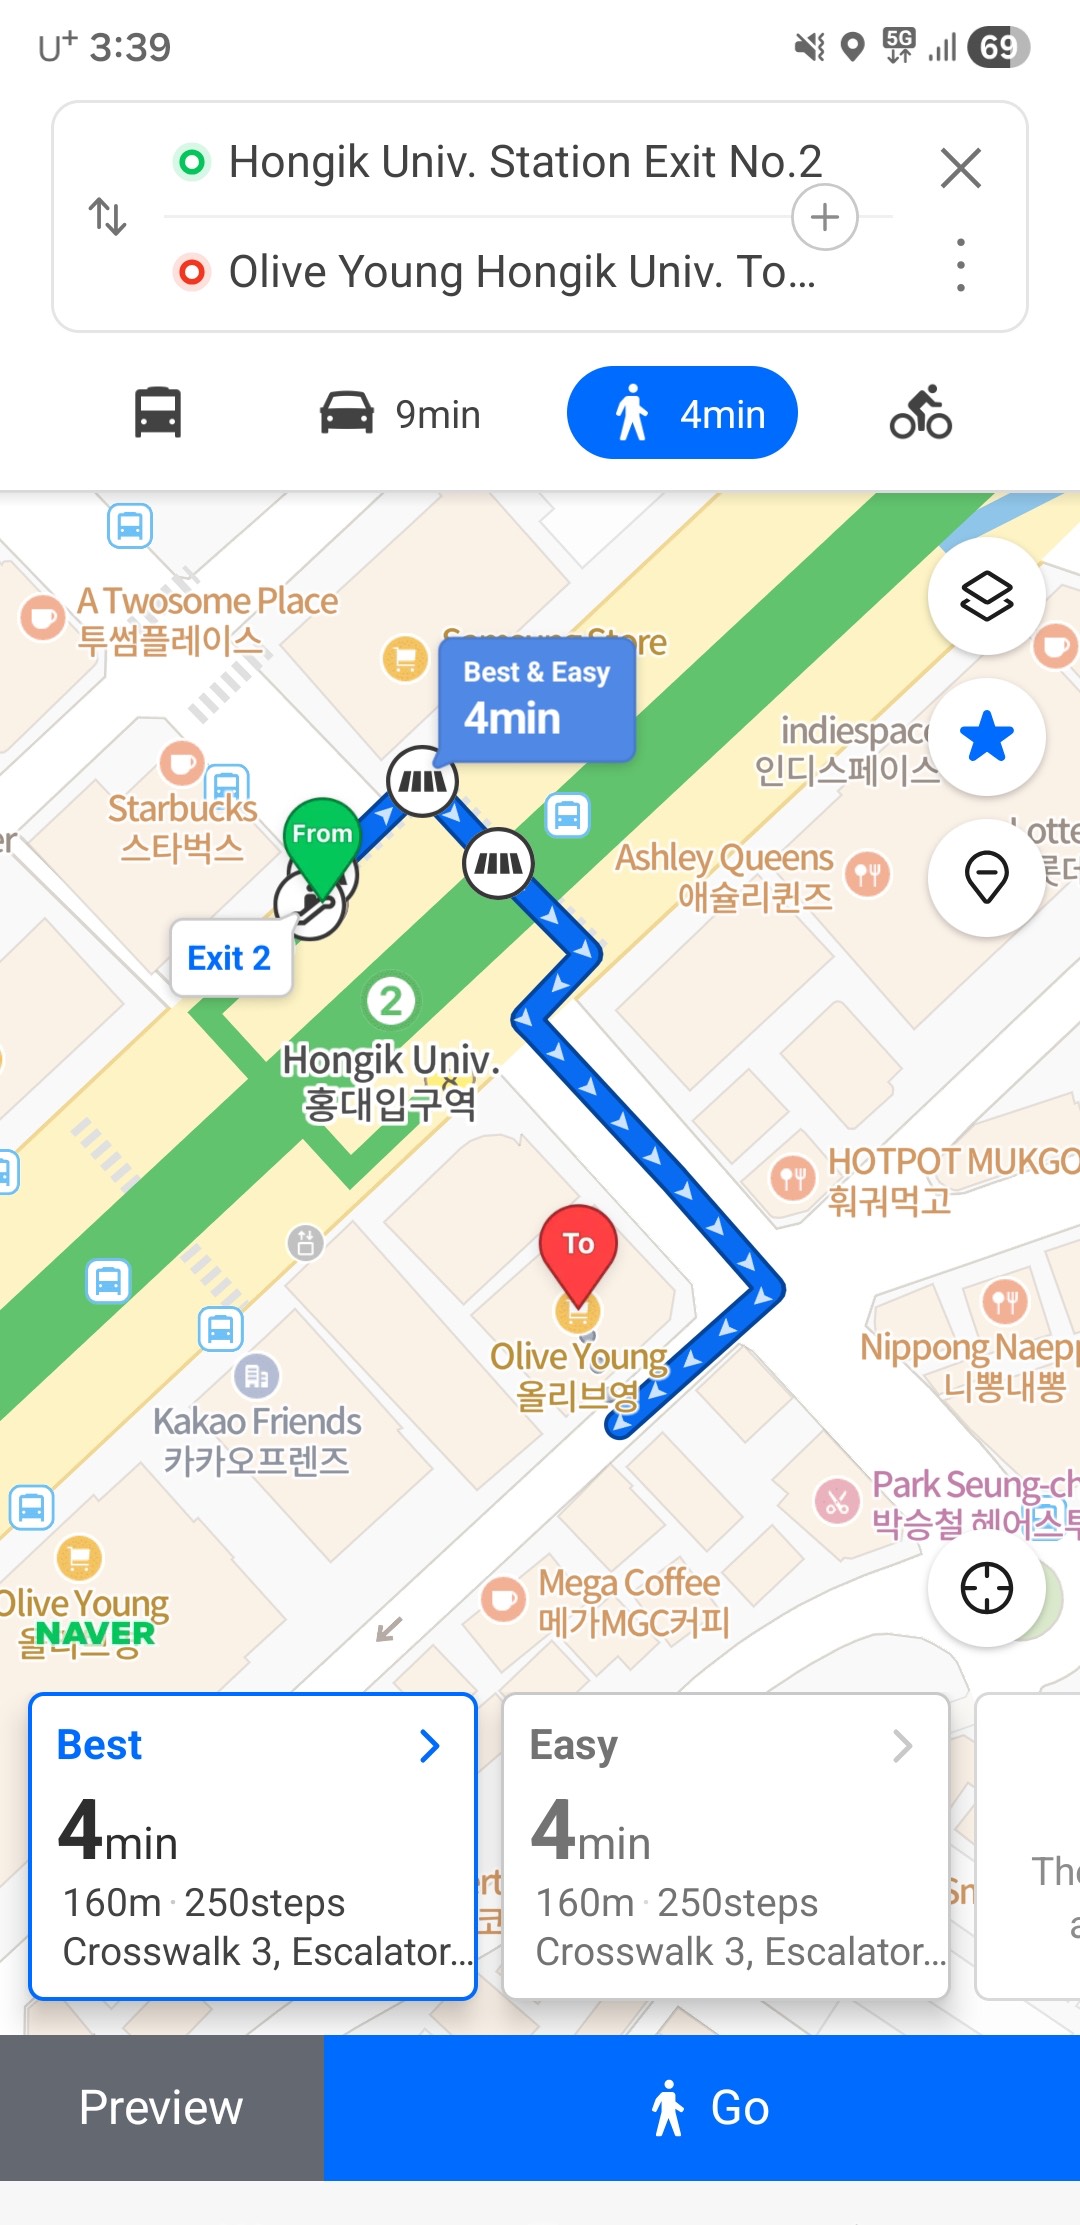
    Naver Map showing a walking route in English from Hongik Univ. Station Exit 2 to a nearby shop: 4 minutes, 160 metres, 250 steps, with a turn-by-turn line drawn on the map.
    The same kind of trip in Naver Map, in English: 4 minutes, 160 metres, 250 steps, turn by turn. This is the feature Google cannot offer here — not a worse version of it, the whole thing.
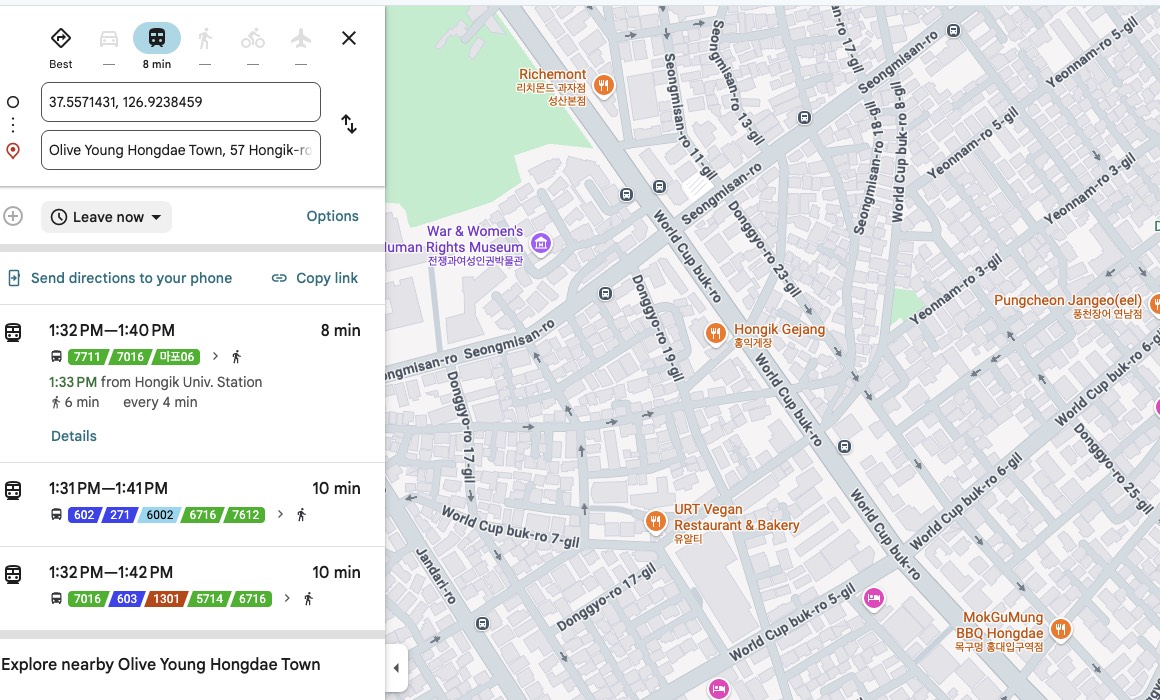
    Google Maps in Seoul returning three bus options for a walkable distance, with driving, walking and cycling unavailable.
    The same search in full. Hongik Univ. Station to Olive Young Hongdae Town — every option Google returns is a bus, and six of the eight minutes are spent walking anyway.

    Inside a transit route the same gap appears. The walking legs — station exit to your destination — come with no step-by-step guidance.

    That last part matters more than it sounds. Korean subway stations often have a dozen or more exits spread across several blocks. Coming out of the wrong one can mean a fifteen-minute correction.

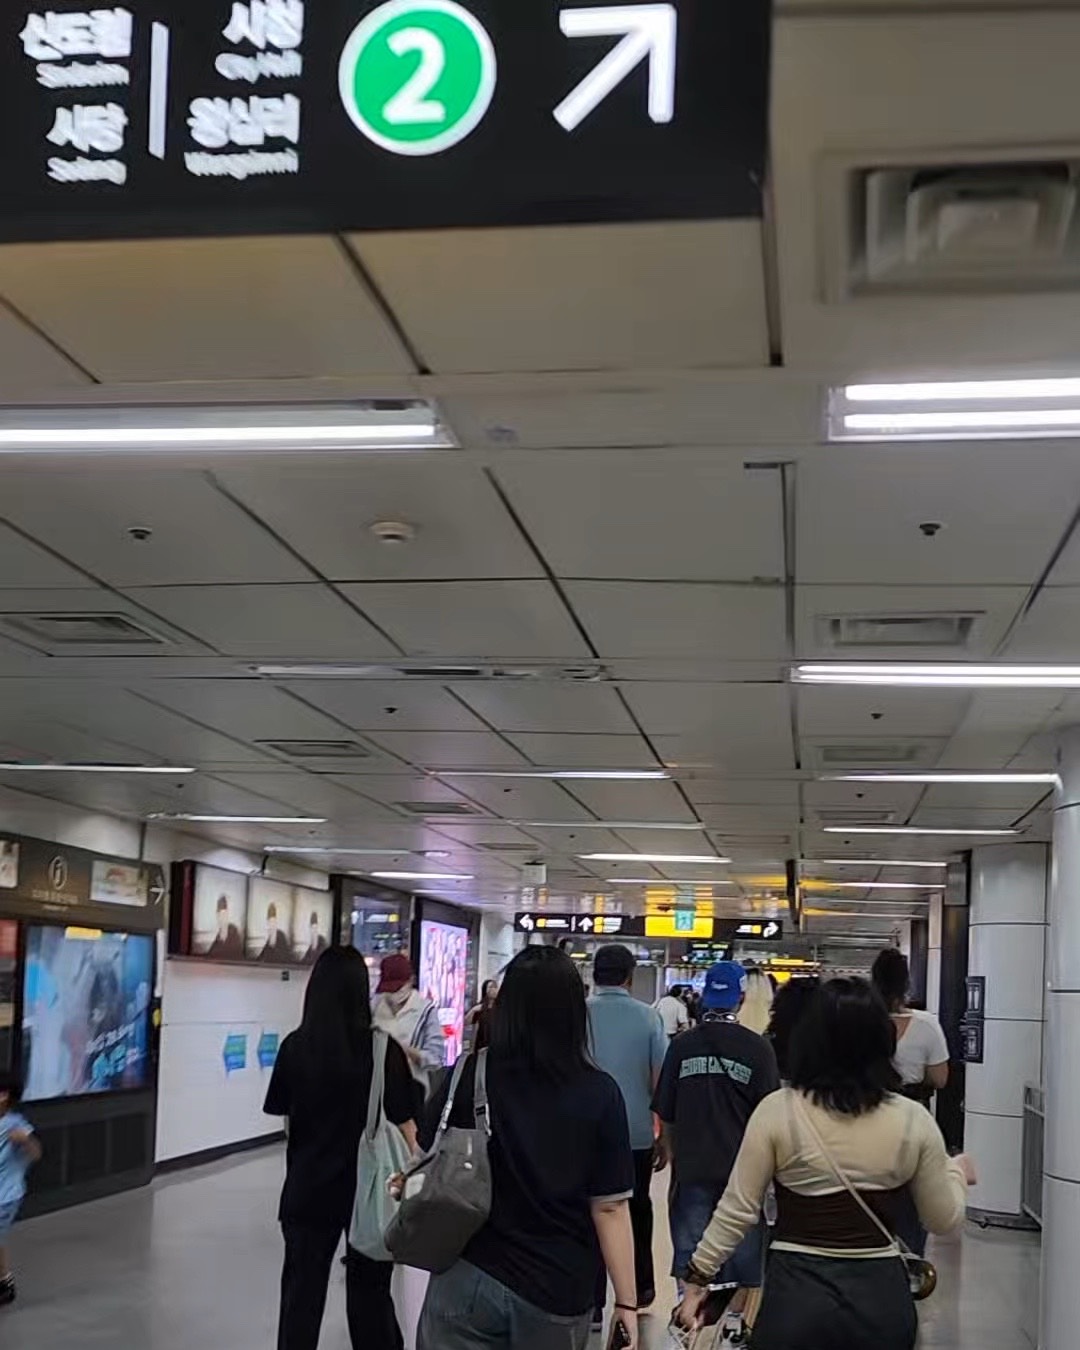
    An overhead sign inside a Seoul subway station showing exit number 2 with a directional arrow.
    Exit numbers are signposted clearly — but only once you are already inside the station. What Google Maps will not tell you is which number to aim for, and that is exactly where the missing walking directions cost you.

    One more thing the apps will not warn you about: on buses you have to tap your card again when getting off. Skip it and you lose the transfer discount — see the tap-out rule.

    2. Why it doesn’t work

    Korean law restricts exporting high-precision map data to servers outside the country. Google has served Korean maps from domestic servers since 2008, but the features that need Google’s own processing — walking directions, turn-by-turn navigation — were never possible under that arrangement.

    Google’s position is that routing requires “the enormous computing power of data centers distributed around the world,” which is why exporting the data is necessary rather than optional (Google Korea Q&A, August 2025).

    Worth noting: the data Google asked for is the 1:5000 national base map — already cleared through security review and already used by Naver and Kakao. The dispute was never about whether the data is secret.

    3. What changed in February 2026 — and what didn’t

    On February 27, 2026, an inter-agency committee under the National Geographic Information Institute approved conditional export of the 1:5000 high-precision map, closing an argument that had run for 18 years (ZDNet Korea).

    The committee included the Ministry of Land, the Ministry of National Defense, the National Intelligence Service, the Ministry of Foreign Affairs, and several others. Approval came with security conditions: imagery processing, restrictions on coordinate display, and continued use of domestic servers. The permission is limited to navigation and routing (Byline Network).

    Headlines at the time read like the problem was solved. It is not, yet.

    As of August 2026 — roughly six months after approval — walking and driving navigation still are not available in Google Maps in Korea, and no launch date has been announced.

    So if you read in February that Google Maps now works in Korea, that was permission being granted, not a feature shipping. Plan your trip on the assumption that it still does not work. If it launches while you are here, that is a bonus.

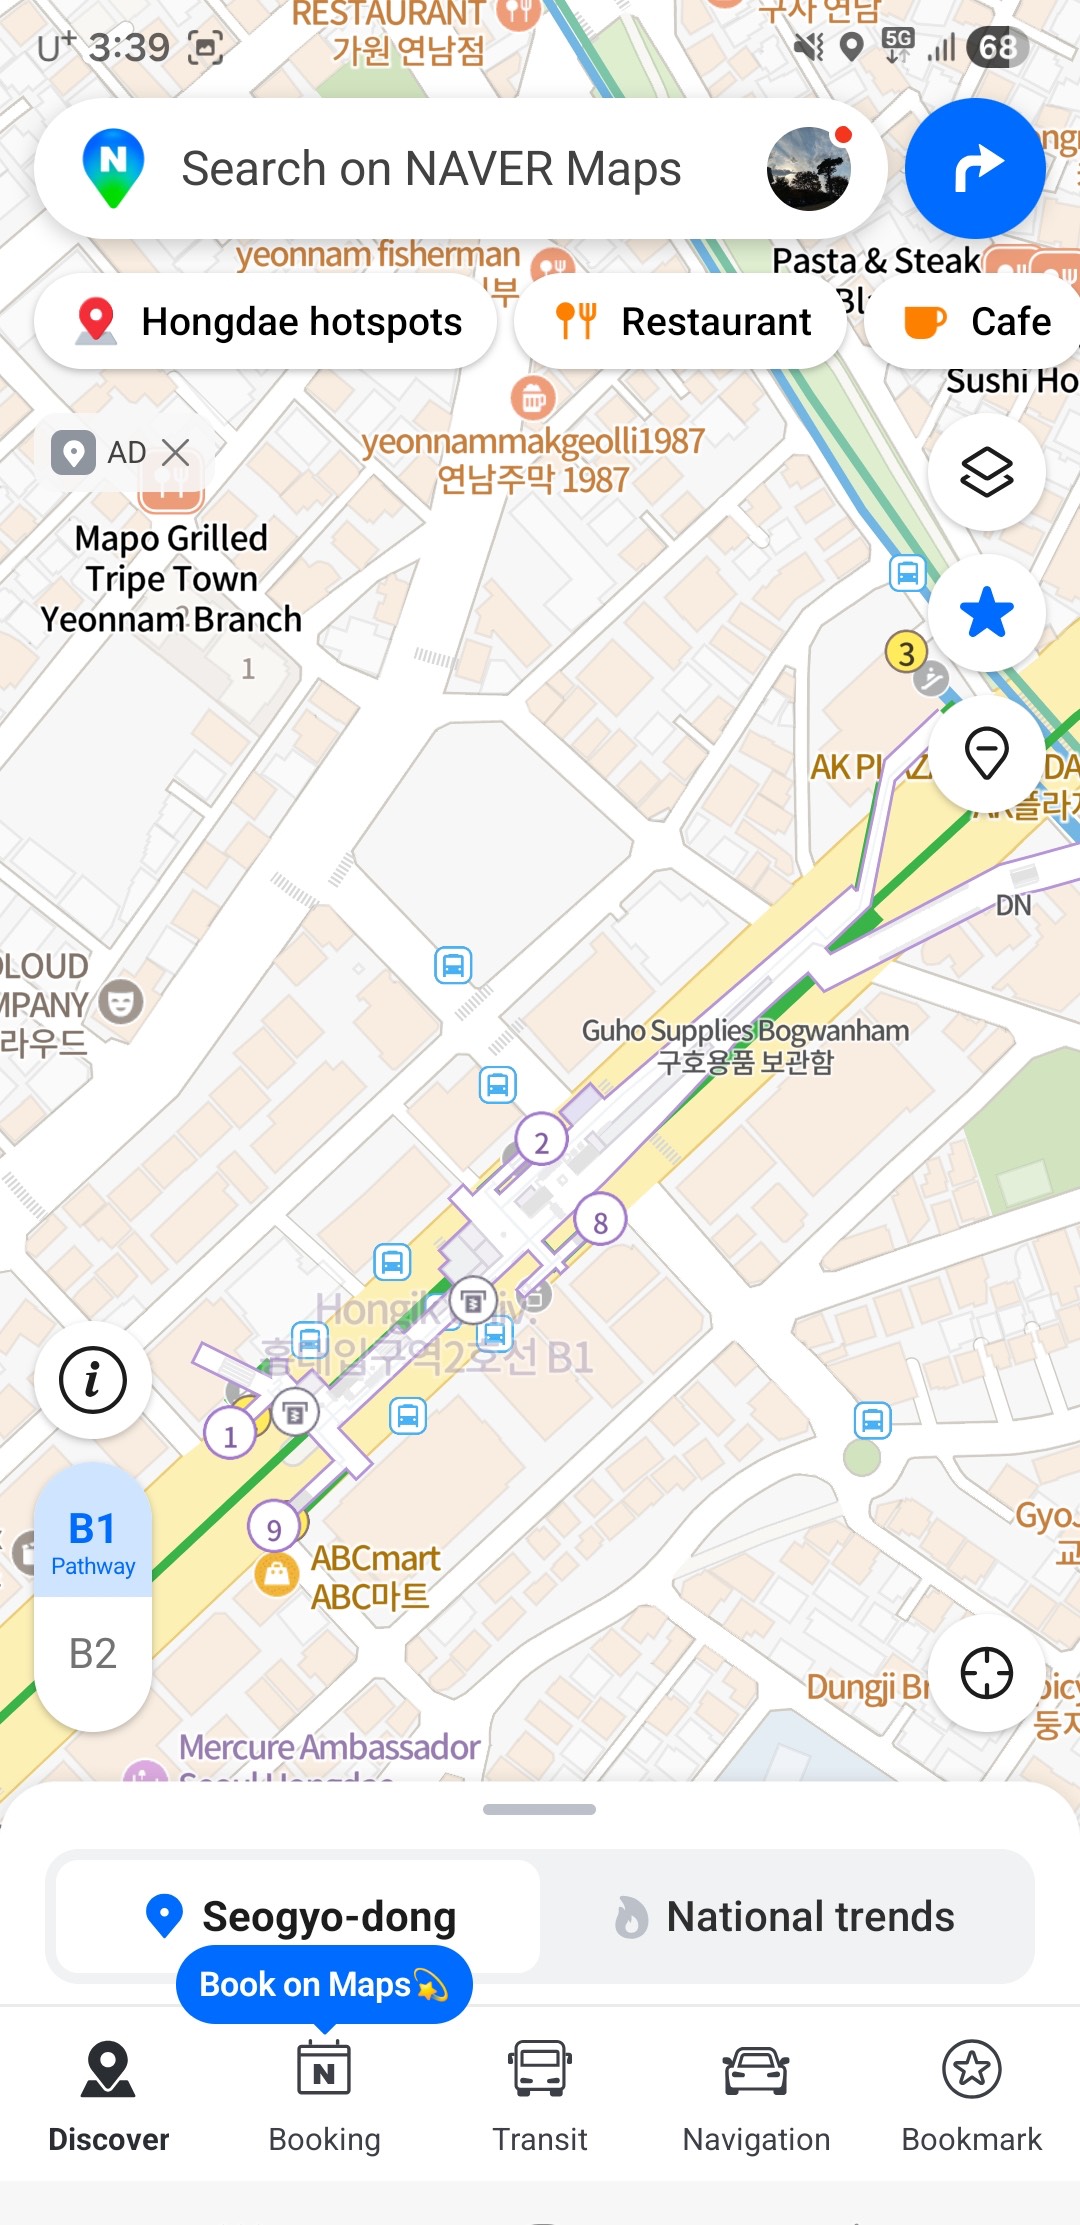
    4. Naver Map — install this one

    If you install one app, make it Naver Map. It has the strongest English support of the Korean options, accurate walking directions, and the most complete business listings — hours, photos, reviews, and which exit to use.

    The Naver Map home screen in English, with an English search bar and English category buttons along the bottom.
    What the app looks like once it is in English. If you have been putting this off because you expected a wall of Korean, this is the actual screen.

    It is probably already in English. Naver Map follows your phone’s language setting, so if your device is in English the app opens that way — no setup needed. Open it and check before hunting through menus.

    If it opened in Korean, switch it:

    1. Tap the menu icon (☰) in the top-left
    2. Tap the gear icon (⚙️) to open settings
    3. Find 언어 (Language) and choose English
    4. The app restarts in English — buttons, directions, and station names

    On desktop, go to map.naver.com, click the profile icon, and choose English in settings.

    (App layouts change with updates. If the icons have moved, look for the gear first, then the language entry.)

    Two things worth knowing:

    • You do not need an account. When a login screen appears, tap Skip or use Guest Mode. All core navigation works without a Korean phone number.
    • Place names often show in both Korean and English. This is deliberate and useful — you can show the Korean name to a taxi driver or shop staff.

    The limits: some reviews and smaller place names stay in Korean, and offline use is limited. Real-time navigation and transit need a connection.

    5. Kakao Map — the backup

    KakaoMap covers driving, walking, cycling, and public transit, and locals use it heavily. Its transit routing is as good as Naver’s.

    Its English support is weaker than Naver’s, so as a visitor it is harder to lean on as your only app.

    Where it earns its place on your phone: as a second opinion. Map apps disagree — about which exit is closest, whether a small shop is still open, how a complicated transfer actually works. When Naver gives you something that looks wrong, checking Kakao takes ten seconds.

    If you are only installing one app, install Naver. If you have room for two, this is the second.

    6. Before you arrive

    • Install Naver Map before you fly — download over your home wifi, not airport data
    • Switch it to English: ☰ → ⚙️ → 설정 → 언어 → English
    • Skip the login. No Korean phone number needed
    • Consider KakaoMap as a backup for cross-checking
    • Google Maps is still fine for subway routes — keep it, just do not rely on it to walk you anywhere
    • Do not assume the February 2026 approval means navigation works. Check on arrival; as of August 2026 it does not

    PART 2 — 한국어

    한국의 구글 지도에 대해 흔히 듣는 말이 두 가지 있고, 둘 다 정확하지 않습니다.

    첫째, “한국에서는 구글 지도가 안 된다.” 됩니다. 다만 가장 필요한 기능이 안 될 뿐입니다.

    둘째, “2026년 2월에 해결됐다.” 정부가 허가한 것은 맞습니다. 서비스는 아직 시작되지 않았습니다.

    2026년 8월 기준으로 정확한 상황과, 입국 전에 무엇을 준비해야 하는지 정리합니다.

    1. 되는 것과 안 되는 것

    한국에서 구글 지도가 백지로 나오지는 않습니다. 대부분은 정상적으로 작동합니다.

    안 됨
    지도 보기 도보 길찾기 (단계별 안내)
    장소 검색 자동차 내비게이션
    리뷰·사진·영업시간 자전거 길찾기
    지하철·버스 경로 대중교통 경로 안의 도보 구간 안내

    대부분의 방문자가 의외로 여기는 지점은 대중교통 길찾기가 된다는 것입니다. 서울교통공사가 공개 교통 데이터를 제공하기 때문에 지하철 경로는 상당히 정확합니다. 홍대에서 강남까지 어느 노선을 타야 하는지는 구글 지도가 알려줍니다.

    하지만 걸어서 데려다주지는 않습니다. 그리고 실패하는 방식이 꽤 노골적입니다.

    서울 안에서 두 지점을 놓고 길찾기를 하면 화면 위쪽 이동수단 줄을 보세요. 대중교통에만 시간이 나오고 자동차·도보·자전거는 대시(—)입니다. 계산 자체를 하지 않습니다. 부정확한 경로가 나오는 게 아니라 아예 경로가 없습니다.

    구글 지도 이동수단 줄 확대. 대중교통은 8분, 자동차·도보·자전거는 각각 대시로 표시된다.
    이동수단 줄 확대. 대중교통만 8분이 나오고 자동차·도보·자전거는 모두 대시입니다. 이 셋은 한국에서 아예 계산되지 않습니다.

    결정적인 건 대신 내놓는 답입니다. 몇백 미터 거리를 넣으면 돌아오는 안내가 전부 버스이고, 그 소요시간의 상당 부분이 정류장까지 걸어가고 내려서 다시 걸어가는 시간입니다. 그냥 쉬지 않고 걸으면 되는 거리인데도요. 대안 중 어느 것도 “걸으세요”라고 하지 않습니다. 구글이 어리석은 게 아니라, 계산할 수 있는 유일한 수단이 대중교통이라 그 답밖에 못 내놓는 것입니다.

    네이버지도의 영문 도보 길찾기. 홍대입구역 2번 출구에서 근처 매장까지 4분, 160m, 250걸음과 턴바이턴 경로가 표시돼 있다.
    같은 성격의 이동을 네이버지도에서 본 화면입니다. 영문으로 4분, 160m, 250걸음, 단계별 안내까지 나옵니다. 구글이 한국에서 제공하지 못하는 기능이 바로 이것입니다.
    걸어갈 거리인데 구글 지도가 버스 경로 세 개만 제시하는 화면.
    같은 검색의 전체 화면. 홍대입구역에서 올리브영 홍대 타운까지 — 돌아온 안내가 전부 버스이고, 8분 중 6분이 어차피 걷는 시간입니다.

    대중교통 경로 안에서도 같은 구멍이 생깁니다. 지하철 출구에서 목적지까지의 도보 구간에는 단계별 안내가 없습니다.

    이 마지막 부분이 생각보다 중요합니다. 한국 지하철역은 출구가 열 개를 넘고 여러 블록에 흩어져 있는 경우가 많습니다. 잘못된 출구로 나오면 15분을 되돌아가야 할 수도 있습니다.

    서울 지하철역 안의 2번 출구 안내 표지판과 방향 화살표.
    출구 번호는 역 안에서는 잘 표시돼 있습니다. 문제는 구글 지도가 몇 번 출구로 나가야 하는지를 알려주지 않는다는 점이고, 도보 안내의 부재가 실제로 손해를 끼치는 지점이 바로 여기입니다.

    지도 앱이 알려주지 않는 것이 하나 더 있습니다. 버스는 내릴 때도 카드를 대야 합니다. 놓치면 환승 할인을 잃습니다 — 하차 태그 규칙에 정리했습니다.

    2. 왜 안 되나

    한국 법은 정밀 지도 데이터를 국외 서버로 반출하는 것을 제한합니다. 구글은 2008년부터 국내 서버를 통해 한국 지도를 서비스해 왔지만, 구글 자체 연산이 필요한 기능 — 도보 길찾기, 턴바이턴 내비게이션 — 은 그 구조에서 제공할 수 없었습니다.

    구글의 설명은 길찾기가 “전 세계에 분산된 데이터센터의 막대한 컴퓨팅 파워”를 필요로 하기 때문에 반출이 선택이 아니라 필수라는 것입니다(구글코리아 Q&A, 2025년 8월).

    짚어둘 점은, 구글이 요청한 데이터가 1:5000 국가기본도라는 사실입니다. 이미 보안심사를 통과한 공개 데이터이고 네이버와 카카오도 쓰고 있습니다. 이 논쟁은 데이터가 비밀이냐 아니냐의 문제가 아니었습니다.

    3. 2026년 2월에 바뀐 것, 그리고 아직 안 바뀐 것

    2026년 2월 27일, 국토지리정보원 산하 협의체가 1:5000 고정밀 지도의 조건부 국외반출을 허가하면서 18년간 이어진 논쟁이 마무리됐습니다(ZDNet Korea).

    협의체에는 국토교통부, 국방부, 국가정보원, 외교부 등 관계 부처가 참여했습니다. 허가에는 영상 보안처리, 좌표 표시 제한, 국내 서버 활용이라는 조건이 붙었고, 범위는 내비게이션·길찾기로 한정됐습니다(바이라인네트워크).

    당시 기사 제목만 보면 문제가 해결된 것처럼 읽힙니다. 아직 아닙니다.

    2026년 8월 현재, 허가로부터 약 6개월이 지났지만 구글 지도의 도보·자동차 길찾기는 여전히 제공되지 않으며 서비스 개시 일정도 발표되지 않았습니다.

    2월에 “이제 한국에서 구글 지도가 된다”는 기사를 봤다면, 그건 허가가 났다는 뜻이지 기능이 나왔다는 뜻이 아닙니다. 아직 안 된다는 전제로 여행을 계획하세요. 머무는 동안 시작되면 그건 덤입니다.

    4. 네이버지도 — 이건 꼭 까세요

    하나만 설치한다면 네이버지도입니다. 한국 앱 중 영어 지원이 가장 낫고, 도보 안내가 정확하며, 업체 정보(영업시간·사진·리뷰·출입구)가 가장 충실합니다.

    영문으로 표시된 네이버지도 첫 화면. 검색창과 하단 메뉴가 모두 영어다.
    영어로 전환한 뒤의 화면입니다. 한글투성이일까 봐 미뤄뒀다면, 실제로 보게 될 화면은 이것입니다.

    대개는 이미 영어로 열립니다. 네이버지도는 휴대폰의 언어 설정을 따라가므로, 기기가 영어로 되어 있다면 앱도 영어로 실행됩니다. 메뉴를 뒤지기 전에 먼저 열어 확인해 보세요.

    한국어로 열렸다면 이렇게 바꿉니다.

    1. 왼쪽 위 메뉴 아이콘(☰) 을 누릅니다
    2. 톱니바퀴 아이콘(⚙️) 을 눌러 설정으로 들어갑니다
    3. 언어 항목에서 English 를 선택합니다
    4. 앱이 다시 시작되면서 버튼·길안내·역 이름이 영어로 바뀝니다

    PC에서는 map.naver.com에 접속해 프로필 아이콘을 누르고 설정에서 English를 고르면 됩니다.

    (앱 화면은 업데이트로 바뀝니다. 아이콘 위치가 다르면 톱니바퀴를 먼저 찾고 그 안에서 언어 항목을 찾으세요.)

    알아두면 좋은 두 가지

    • 계정이 필요 없습니다. 로그인 화면이 나오면 건너뛰기나 게스트 모드를 누르세요. 한국 전화번호 없이도 길찾기 기능은 모두 쓸 수 있습니다.
    • 장소 이름이 한국어와 영어로 함께 표시됩니다. 의도된 설계이고 유용합니다. 택시 기사나 가게 직원에게 한국어 이름을 그대로 보여줄 수 있습니다.

    한계도 있습니다. 일부 리뷰와 작은 장소 이름은 한국어로 남고, 오프라인 사용은 제한적입니다. 실시간 길안내와 대중교통 정보는 인터넷 연결이 필요합니다.

    5. 카카오맵 — 보조용

    카카오맵은 자동차·도보·자전거·대중교통을 모두 지원하고 현지인이 많이 씁니다. 대중교통 경로는 네이버지도만큼 좋습니다.

    다만 영어 지원이 네이버지도보다 약합니다. 외국인이 이것만 붙들고 다니기에는 어렵습니다.

    그럼에도 깔아둘 값어치는 두 번째 의견에 있습니다. 지도 앱은 서로 다른 답을 줄 때가 있습니다. 어느 출구가 가까운지, 작은 가게가 아직 영업 중인지, 복잡한 환승이 실제로 어떻게 되는지에서요. 네이버지도가 이상한 답을 줄 때 카카오맵으로 확인하는 데 10초면 됩니다.

    하나만 깐다면 네이버지도, 두 개를 깔 여유가 있다면 그다음이 이것입니다.

    6. 도착 전 체크리스트

    • 네이버지도를 출국 전에 설치하세요 — 공항 데이터 말고 집 와이파이에서
    • 영어로 전환: ☰ → ⚙️ → 설정 → 언어 → English
    • 로그인은 건너뛰세요. 한국 전화번호가 필요 없습니다
    • 카카오맵은 교차 확인용 보조로 고려
    • 구글 지도는 지하철 경로용으로는 계속 쓸 만합니다 — 다만 걸어서 안내받을 생각은 마세요
    • 2026년 2월 허가가 곧 서비스 개시는 아닙니다. 도착해서 확인해 보되, 2026년 8월 기준으로는 아직 안 됩니다

    함께 읽으면 좋은 글

    참고자료 / Sources

  • Olive Young’s AI Kiosk: Only 3 Stores Have It (2026)

    This guide is written in two parts. English first, Korean below. 이 글은 두 파트로 되어 있습니다. 영문이 먼저, 한국어가 아래에 있습니다.


    PART 1 — ENGLISH

    In July 2026, Olive Young put an AI avatar inside a kiosk and let it do what a staff member normally would: explain products, check stock, point you to the right shelf, and recommend something for your skin — in eight languages, without anyone having to speak Korean or English to each other.

    The coverage that followed described it as arriving at “large multi-floor stores with high foreign traffic.” That phrasing sent a lot of people to Myeongdong and Hongdae expecting to find one.

    It is in three stores. None of them is Myeongdong or Hongdae.

    Here is what the kiosk actually does, where it actually is, and what to do at the many stores that do not have one.

    1. What it is

    The kiosk runs a conversational AI avatar you talk to in real time. It launched on July 8, 2026, built on ESTsoft’s Perso Interactive avatar platform with a recommendation engine called AURA trained across tens of thousands of Olive Young product listings (Aju Press).

    The point is self-service. You are not queuing for a staff member and you are not miming at a shelf — you describe what you want in your own language and the screen answers.

    It handles 8 languages, including English, Chinese and Japanese. Olive Young has not published the full list of eight.

    A densely packed Olive Young display shelf, every product label and promotional sign written in Korean.
    This is the shelf you would otherwise be miming at. Product names, claims and promotional wording are all in Korean, and the price stickers alone will not tell you what something does.

    2. Where it actually is — three stores

    The initial rollout covers three Seoul branches (Aju Press):

    Store Area Why it was chosen
    Dongdaemun History & Culture Park Station Dongdaemun Shopping district, heavy tourist traffic
    Apgujeong Jungang Gangnam Affluent shopping area
    Ewha Jungang Sinchon / Ewha University area, young international visitors

    Not included: Myeongdong, Hongdae, Seongsu, or anywhere outside Seoul — despite these being the areas most tourist guides send you to.

    Olive Young says it plans to expand the service nationwide, but ESTsoft declined to give a timeline, citing confidentiality. So there is no published schedule to plan around. If you specifically want to try the kiosk, go to one of the three above.

    3. What it can do

    Four things, from one screen:

    • Explain products — what something is and how to use it
    • Check stock — whether the store has it before you hunt for it
    • Locate items in the store — which floor, which section
    • Recommend by skin type — you describe your skin concern, it suggests products

    It also answers the routine questions that eat the most staff time: payment methods and VAT refund procedures. If you were going to ask a cashier how tax refund works, the kiosk can tell you instead — and it will not be in a rush.

    (For the actual refund rules, including the ₩15,000 minimum that most guides get wrong, see our tax refund guide.)

    4. When you still need a person

    The kiosk does not replace staff for everything. For that, Olive Young runs a separate AI interpretation service covering 38 languages — far more than the kiosk’s eight.

    You use it one of two ways: scan a QR code the staff member gives you and chat in real time, or speak into a tablet microphone in the store. It is trained on K-beauty vocabulary, so ingredient names and product terminology come through correctly rather than mangled by a general translator.

    This service appears to be more widely deployed than the kiosks, but Olive Young has not confirmed which stores have it. If you are at a store with no kiosk, still ask — a staff member may be able to pull up interpretation.

    5. Why this exists

    Not a marketing gimmick, as it turns out. An internal Olive Young survey found that roughly 69% of staff reported language barriers with customers (Aju Press). Two out of three employees were regularly unable to help someone properly.

    The kiosk is aimed at foreign shoppers in their 20s and 30s — the group most likely to walk in with a specific product in mind from social media and least likely to want a conversation about it.

    Reading it that way tells you what the kiosk is good at. It is built for “I know roughly what I want, just point me at it” rather than open-ended advice. If you want a genuine consultation, the interpretation service plus a human is still the better route.

    6. Before you go

    • The kiosk exists at three Seoul stores only: Dongdaemun History & Culture Park Station, Apgujeong Jungang, Ewha Jungang
    • Myeongdong and Hongdae do not have it regardless of what general guides imply
    • Kiosk covers 8 languages; staff interpretation covers 38
    • No kiosk at your store? Ask staff about interpretation anyway
    • Use it for product info, stock, location, skin recommendations, and tax refund questions
    • Nationwide expansion is planned but no date has been published — check before making a trip for it

    PART 2 — 한국어

    2026년 7월, 올리브영이 키오스크 안에 AI 아바타를 넣고 직원이 하던 일을 맡겼습니다. 상품 설명, 재고 확인, 매장 내 위치 안내, 피부에 맞는 제품 추천까지 — 8개 국어로, 서로 한국어나 영어를 하지 않아도 되는 방식으로요.

    이후 기사들은 “외국인 비중이 높은 복층 대형 매장”에 도입된다고 전했습니다. 그 표현 때문에 많은 사람이 명동과 홍대에서 키오스크를 찾았습니다.

    실제로는 세 곳뿐이고, 그중에 명동도 홍대도 없습니다.

    키오스크가 실제로 무엇을 하는지, 어디에 있는지, 없는 매장에서는 어떻게 해야 하는지 정리했습니다.

    1. 무엇이 생겼나

    실시간으로 대화하는 AI 아바타가 들어간 키오스크입니다. 2026년 7월 8일 도입됐고, 이스트소프트의 대화형 AI 아바타 플랫폼 Perso Interactive에 수만 건의 올리브영 상품 정보를 학습한 추천 엔진 AURA를 결합했습니다(아주프레스).

    핵심은 셀프 쇼핑입니다. 직원을 기다리거나 진열대 앞에서 손짓할 필요 없이, 원하는 것을 자기 언어로 말하면 화면이 답합니다.

    8개 국어를 지원하며 영어·중국어·일본어가 포함됩니다. 여덟 개 전체 목록은 공개되지 않았습니다.

    빽빽하게 진열된 올리브영 매대. 제품 라벨과 판촉 문구가 모두 한글이다.
    키오스크가 없다면 손짓으로 물어봐야 할 매대입니다. 제품명도 설명도 판촉 문구도 한글이고, 가격표만 봐서는 그게 뭘 하는 물건인지 알 수 없습니다.

    2. 어디에 있나 — 세 곳뿐

    초기 도입 매장은 서울 세 곳입니다(아주프레스).

    매장 지역 선정 배경
    동대문역사문화공원역점 동대문 쇼핑 상권, 관광객 밀집
    압구정중앙점 강남 고소득 쇼핑 상권
    이화중앙점 신촌·이대 대학가, 젊은 외국인 방문객

    포함되지 않은 곳: 명동, 홍대, 성수, 그리고 서울 외 전 지역. 여행 가이드가 가장 많이 보내는 곳들이 빠져 있습니다.

    올리브영은 전국 확대 계획을 밝혔지만, 이스트소프트는 기밀을 이유로 일정 공개를 거절했습니다. 공개된 일정이 없으니 계획을 세울 근거도 없습니다. 키오스크를 꼭 써 보고 싶다면 위 세 곳으로 가야 합니다.

    3. 무엇을 할 수 있나

    화면 하나에서 네 가지가 됩니다.

    • 상품 설명 — 이게 무엇이고 어떻게 쓰는지
    • 재고 조회 — 찾아 헤매기 전에 있는지 확인
    • 매장 내 위치 — 몇 층, 어느 구역인지
    • 피부 맞춤 추천 — 피부 고민을 말하면 제품을 제안

    직원 시간을 가장 많이 쓰던 반복 문의도 처리합니다. 결제 방법과 부가세 환급 절차입니다. 계산대에서 택스리펀드를 물어보려 했다면 키오스크에 물어도 되고, 이쪽은 재촉하지 않습니다.

    (환급 규칙 자체는 영문 가이드 대부분이 틀리는 1만 5천원 기준을 포함해 택스리펀드 안내에 정리했습니다.)

    4. 사람이 필요할 때

    키오스크가 모든 것을 대신하지는 않습니다. 그래서 별도로 38개 언어를 지원하는 AI 통역 서비스를 운영합니다. 키오스크의 8개보다 훨씬 많습니다.

    이용 방법은 두 가지입니다. 직원이 주는 QR을 스캔해 실시간 채팅을 하거나, 매장의 태블릿에 대고 말하면 됩니다. K뷰티 어휘를 학습해서 성분명이나 제품 용어가 일반 번역기처럼 뭉개지지 않고 정확히 전달됩니다.

    이 서비스는 키오스크보다 넓게 배포된 것으로 보이지만, 어느 매장에 있는지는 공개되지 않았습니다. 키오스크가 없는 매장이라도 일단 물어보세요. 직원이 통역을 꺼내 줄 수 있습니다.

    5. 왜 만들었나

    홍보용 장치만은 아니었습니다. 올리브영 내부 조사에서 직원 약 69%가 고객과의 언어 장벽을 겪는다고 답했습니다(아주프레스). 세 명 중 두 명이 손님을 제대로 돕지 못하는 상황을 겪고 있었다는 뜻입니다.

    대상은 20~30대 외국인 고객입니다. SNS에서 특정 제품을 정해 오고, 그것에 대해 대화하고 싶어 하지는 않는 층이죠.

    이렇게 읽으면 키오스크가 무엇에 강한지도 보입니다. “뭘 원하는지는 대충 아니까 어디 있는지만 알려달라”에 맞춰져 있습니다. 제대로 된 상담을 원한다면 통역 서비스와 사람 쪽이 여전히 낫습니다.

    6. 가기 전에

    • 키오스크가 있는 곳은 서울 세 곳뿐 — 동대문역사문화공원역점, 압구정중앙점, 이화중앙점
    • 일반 가이드가 무엇을 암시하든 명동과 홍대에는 없습니다
    • 키오스크 8개 국어, 직원 통역 38개 언어
    • 키오스크가 없는 매장이라도 직원에게 통역을 물어보세요
    • 상품 정보·재고·위치·피부 추천·택스리펀드 문의에 쓸 수 있습니다
    • 전국 확대는 예정돼 있지만 일정이 공개되지 않았습니다 — 이것 때문에 방문한다면 미리 확인하세요

    함께 읽으면 좋은 글

    참고자료 / Sources